

All employees must be assigned to a login authenticator to log in to NiCE CXone.
Complete each of these tasks in the given order.
Before You Begin
-
If you want to use custom roles instead of the default roles that come with NiCE CXone, you need to create the roles first.
-
If you want to use a login authenticator besides the system default, you need to create the login authenticator first.
-
If you want to assign employees to custom teams and not the default one, you need to create the teams first.
-
If you want to assign employees to custom scheduling units and not the default one, you need to create the scheduling units first.
-
If you want to assign employees to locations, which you can currently only use for IP address verification on login, you need to create the locations first.
-
If you want to assign employees to custom groups, you need to create the groups first.
-
If you want to apply views
 A way to control the information users can see in NiCE CXone. to employees to limit the data they're allowed to see, you need to create the views first.
 -
If you want to assign employees to WEM skills, you need to create the WEM skills first.
Create Employee Template
Required Permissions: Employee Templates > Create/Edit
If you want to create several employees with similar assignments, you can save time by creating an employee template. This lets you assign a team, primary role, time zone, attributes, login authenticator, secondary roles, views, and WEM skills automatically to a new or existing employee profile when you load the template. Once the template is applied to the employee profile, you can make adjustments to those settings as needed.
- Click the app selector
 and select Admin.
 - Go to Employee Templates.
- If you want to create a new template from a blank form, click Create Template. If you want to duplicate an existing template and make adjustments to it, locate the template you want to copy, click the Actions
 icon on the right side of the template's row, and select Duplicate.
 -
Give the template a unique Template Name. Assign a Team and specify the Primary Role. Make any other assignments as needed. If you plan to apply the employee template to existing employee profiles and there are fields in those profiles you do not want to overwrite, select the Ignore checkbox for those fields. Select the Attributes for the features you want to enable for this employee template.
Learn more about fields in this step
Field Details Template Name A unique, descriptive name for the employee template that you choose. Team
The team the user is assigned to.
The Ignore checkbox prevents the employee profile setting from being overwritten or cleared when you load the template into an existing employee profile.
Primary Role The role assigned to the user.
The Ignore checkbox prevents the employee profile setting from being overwritten or cleared when you load the template into an existing employee profile.
Time Zone The time zone allowed for dialing. By default, an employee's time zone is the same as the applicable tenant
High-level organizational grouping used to manage technical support, billing, and global settings for your NiCE CXone system. time zone and is automatically populated. You can edit the time zone if needed. The time zone must be in Internet Assigned Numbers Authority (IANA) format. For example, America/New York. If you don't select one, the user is assigned to time zone configured for your system.
The Ignore checkbox prevents the employee profile setting from being overwritten or cleared when you load the template into an existing employee profile.
Attributes Enable features or functionalities for the user. Each attribute impacts billing; if an employee profile is marked with an attribute, your organization is charged for that user's use of that feature or functionality.
-
Can be Evaluated/Coached: Only available if your system includes NiCE CXone QM. It enables the user to be evaluated.
This is selected by default for new users. If you add QM to a system with existing users, you must manually enable this setting for those users.
-
Can be Scheduled: Only available if your system includes WFM. It enables the user for scheduling.
The default value is selected for new users. If you add WFM to a system that has existing users, you must manually enable this setting for those users. Users who don't have this attribute selected won't appear in employee lists when creating weekly rules or shift templates. Removing this attribute from a user deletes that user from any weekly rules or shift templates the user is assigned to.
-
Can Be Recorded (Screen): Only available if your system includes Recording Management (CXone) Advanced. It enables the user's screen to be recorded.
This is selected by default for new users. If you add Recording Management (CXone) Advanced to a system with existing users, you must manually enable this setting for those users.
This attribute is required to enable screen recording, screen monitoring, or both.
-
Can be Recorded (Voice): Only available if your system includes Recording Management (CXone)/Recording Management (CXone) Advanced. It enables the user's voice to be recorded.
This is selected by default for a new users. If you add Recording Management (CXone)/Recording Management (CXone) Advanced to a system with existing users, you must manually enable this setting for those users.
-
Can be Analyzed: Only available if your system includes Interaction Analytics (CXone). It enables the user's recorded interactions
The full conversation with an agent through a channel. For example, an interaction can be a voice call, email, chat, or social media conversation. to be analyzed by Interaction Analytics (CXone). This is cleared by default for new users.
-
Digital Engagement: Only available if your system includes Digital Experience (DX). It enables the user's record to be synced to Digital Experience (DX) and allows them to handle digital
Any channel, contact, or skill associated with Digital Experience (DX). contacts The person interacting with an agent, IVR, or bot in your contact center.. This is cleared by default for new users.
-
Customer Card: Enables users who don't handle digital contacts to access available customer cards for omnichannel-routed voice, chat, email, and SMS Messaging contacts.
This is cleared by default for new users.
-
Can View BI Reports: Enables users to see any BI reports. Reports are in the Reporting application. The users must also have the correct permissions enabled in their role for viewing BI reports. BI reports have no usage fee for up to 10% of either your concurrent or configured users, depending on your pricing model. Once the 10% threshold is passed, you will be billed for each additional employee with this checkbox selected.
This is cleared by default.
-
Can Edit BI Reports: Enables users to edit any of the BI reports in the Reporting application. The users must also have the correct permissions enabled in their role for editing BI reports.
The default value is cleared for all users, both existing and new.
-
Agent Integrations: Enables users to see CRM records in the customer card in NiCE CXone Agent Workspace (Agent) applications. This is cleared by default for new users. You are billed for CRM integration based on the number of employees with this attribute enabled.
This attribute also enables agents to access NiCE CXone Agent Workspace for Salesforce.
-
Virtual agent enabled: Only available if your system includes Digital Experience (DX). It marks the user's profile as a non-human profile. This attribute does not enable a virtual agent in Virtual Agent Hub. When the Virtual agent enabled checkbox is enabled, Contact Handling settings are NOT enforced for that employee, because the user is considered to be a bot, who can handle multiple concurrent interactions, and not a human who can only handle a specific number of concurrent interactions.
-
Outbound Engagement (SmartReach): Only available if your system includes Outbound Engagement (SmartReach). It enables users to handle outbound Outbound Engagement (SmartReach) interactions for omnichannel campaigns.
The Ignore checkbox prevents the employee profile setting from being overwritten or cleared when you load the template into an existing employee profile.
Login Authenticator The login authenticator assigned to the user.
Important: Users can only log in to NiCE CXone if they are assigned to a login authenticator.
The Ignore checkbox prevents the employee profile setting from being overwritten or cleared when you load the template into an existing employee profile.
Secondary Roles The secondary roles assigned to the user. The highest allowed permission between the primary and secondary roles is the one that is granted to the user. Only assign the roles and permissions that the user needs to perform their job.
The Ignore checkbox prevents the employee profile setting from being overwritten or cleared when you load the template into an existing employee profile.
Views The role-based access control (RBAC) views assigned to the user.
The Ignore checkbox prevents the employee profile setting from being overwritten or cleared when you load the template into an existing employee profile.
Division If your system is configured for divisions, the division
Separate data securely between lines of business. Data can only be accessed from within the division it's part of. the employee is assigned to. Employee profiles inherit the division of the team they're assigned to.The Ignore checkbox prevents the employee profile setting from being overwritten or cleared when you load the template into an existing employee profile.
WEM Skills The WEM skills assigned to the user.
The Ignore checkbox prevents the employee profile setting from being overwritten or cleared when you load the template into an existing employee profile.
Omnichannel Skills Settings The ACD skills assigned to the user. You can only select active skills in the Omnichannel Skills drop-down. In the Omnichannel Skill Proficiency drop-down, apply a proficiency for the selected skill. You can select a number from 1-20, with 1 being the highest proficiency.
The Ignore checkbox prevents the employee profile setting from being overwritten or cleared when you load the template into an existing employee profile.
-
- When you're satisfied with your template settings, click Activate.
Create Employee Accounts
Required permissions: Employees Create, Can Manage Passwords, Role Management User Assignment, Employee Templates Apply (if applying an employee template)
You can create individual employee accounts in the Admin application. If you want to create employees in bulk, you can use the bulk upload template for employees.
The steps in this section describe creating a basic employee account with the required fields. NiCE CXonemany options and settings to customize employees. This task covers the essential options required for all employee accounts. There are additional settings to configure on the General, Security, WEM Skills, Preferences, and External Identifiers (Recording Accounts) tabs.
Read through this entire task. Make sure you know the settings you need to configure before you begin.
The instructions here are for creating a single employee account in the application.
If your company uses NiCE CXone ACD, you'll also need to configure ACD user settings for this employee.

View a short video demonstration about creating an employee account.
-
Click the app selector
and select Admin. -
Click Employees > Create Employee.
-
If you're applying an employee template, click Populate Template in the top right corner of the page. In the pop-up window, select the Employee Template you want to use and click Populate.
-
Enter the employee's First Name and Last Name. First Name and Last Name are required, but Middle Name is optional. Special characters are not accepted in these fields, including, but not limited to: ! / < > ? % ".
-
Enter a valid Email Address associated with the employee. NiCE CXone sends emails, like activation invitations and password resets, here. You can use the same email address for multiple employee profiles. If you have a list of allowed email domains, then the employee's email must have an allowed domain for the employee to be created. When you edit an existing employee's email address, a verification email is sent to the new email address.
-
Enter the Username you want to assign to the employee. The username must be in the form of an email address, but it doesn't have to be a real email address. It can be different from the Email Address field. The field is auto filled from the Email Address field. You can edit it if you want to.
-
Assign a Primary Role to the employee. This determines what the employee can do in NiCE CXone based on the role's assigned permissions.
-
Select the Security tab.
-
Select the login authenticator you want to assign to the employee. Employees can only be assigned one login authenticator.
Employees can only log in to NiCE CXone if they are assigned to a login authenticator.
- Configure additional options on the other tabs in the employee profile:
- General tab
- Security tab
- WEM Skills tab
- Preferences tab
- External Identifiers (Recording Accounts) tab
- External Identifiers tab
-
Click Create to create the employee profile and continue setting it up. Click Create & Invite if you're ready for the user to activate their account and set up their password.
Configure the General Tab
-
Go to Admin > Employees.
-
Select an existing employee's account or select Create Employee.
-
Complete the fields on the General tab.
Learn more about fields in this step
Field Details Display Name This field auto-populates from the First Name, Middle Name, and Last Name fields, but you can edit the display name as needed. Users from other teams can view the display name. They cannot view other information about the user unless they have the View Employee permission.
Type Use Type to organize employees outside of their assigned Role or Team. Type allows you to organize employees for reporting purposes. This field makes reporting easier because types are not tied to permissions or unavailability codes.
You can select previously created types from the drop-down. You can also create new types by entering text in the search bar, and clicking Create.
Hire Date The date you hired an employee. This field is for your records only. NiCE CXone doesn't use this information.
Time Zone The time zone allowed for dialing. By default, an employee's time zone is the same as the applicable tenant High-level organizational grouping used to manage technical support, billing, and global settings for your NiCE CXone system. time zone and is automatically populated. You can edit the time zone if needed. The time zone must be in Internet Assigned Numbers Authority (IANA) format. For example, America/New York. If you don't select one, the user is assigned to time zone configured for your system. OS Login OS Login represents the user's login details to their desktop operating system in the format Domain\UserName, for example, NICE\MyUser. The Recording Management (CXone) application requires OS Login information for screen recording to work on advanced configurations, such as, Engagement Hub (Multi-ACD/Open), multi-session environments, and more.
The OS Login value for each employee profile must be unique. The OS Login value cannot be used for multiple employee profiles, even if some of the duplicate employee profiles are inactive. If multiple employee profiles have the same OS Login value, ScreenAgent will not run for any agent using that OS Login value.
Rank
This field shows only if your system includes WFM. It determines the priority when creating a schedule.
Assigned to Team Select a team from the drop-down menu to assign the employee to it. If you haven't created teams yet, or if the employee will belong to a new team, you can just accept the Default Team setting and then change it later.
Assigned To Groups Select one or more groups to assign the employee to. Groups allow you to organize employees in custom ways for your organization's needs. NiCE CXone does not use this information. Assigned To Scheduling Unit Defines the scheduling unit for the employee. This field is visible only if your system includes WFM.
Mobile Number The employee's mobile or cell phone number. This field is for your records only. NiCE CXone doesn't use this information.
ACD Login Id Enter the employee's ACD login ID here. This is a unique ID that lets an employee connect to a contact center.
Important If your tenant is configured with a third-party ACD, ensure that the ACD Login ID is assigned here. This is necessary to map the agent state, monitor real-time adherence, and generate reports.
Attributes Under this drop-down select attributes for the employee. Attributes are like permissions, but are assigned to individual employees instead of roles. The following attributes may be available, based on the applications enabled in your system:
-
Can be Evaluated/Coached: Allows the employee to be evaluated. You will be billed for QM for this employee. This attribute appears only if your system includes NiCE CXone Quality Management (CXone). This option is selected by default for new employee accounts. If you add QM to a system that has existing users, you must manually enable this setting for those users.
-
Can be Scheduled: Allows the employee to be scheduled. You will be billed for WFM for this employee. This attribute is visible only if your system includes WFM. This option is selected by default for new employees. If you add WFM to a system that has existing users, you must manually enable this setting for those users. Important Users who don't have this attribute selected won't appear in employee lists when creating weekly rules or shift templates. Removing this attribute from a user deletes that user from any weekly rules or shift templates to which the user is assigned.
-
Can be Recorded (Voice): Allows the employee's voice to be recorded. You will be billed for voice recording for this employee. This attribute is visible only if your system includes Recording Management (CXone) or Recording Management (CXone) Advanced. This option is selected by default for new employees. If you add Recording Management (CXone) or Recording Management (CXone) Advanced to a system that has existing users, you must manually enable this setting for those users.
-
Can Be Recorded (Screen): Allows the employee's screen to be recorded. You will be billed for screen recording for this employee. This attribute appears only if your system includes Recording Management (CXone) Advanced. This option is selected by default for new employees. If you add Recording Management (CXone) Advanced to a system that has existing users, you must manually enable this setting for those users. This attribute is necessary for enabling screen recording, screen monitoring, or both.
-
Digital Engagement: Allows the employee to work on digital contacts. You will be billed for Digital Experience (DX) for this employee. This option is not enabled by default for new employees. This attribute appears only if your system includes Digital Experience (DX).
-
Customer Card: Allows employees to access the customer card in Agent Workspace (Agent). This option is not enabled by default for new employees.
-
Can View BI Reports: Allows employees to open BI reports. Requires that the employee has individual BI Report permissions to access any BI reports. BI reports have no usage fee for up to 10% of either your concurrent or configured users, depending on your pricing model. Once the 10% threshold is passed, you will be billed for each additional employee with this checkbox selected. This attribute is not enabled by default for new or existing employees.
-
Can Edit BI Reports: Allows employees to edit prebuilt BI reports. Requires that the employee has permissions to edit reports in Reporting. This attribute is not enabled by default for new or existing employees.
-
Agent Integrations: Allows employees to see CRM
Third-party systems that manage such things as contacts, sales information, support details, and case histories. records in the customer card in Agent Workspace (Agent) Suite applications. The customer card displays CRM records related to the contact the employee is handling. This option is not enabled by default for new employees. -
Outbound Engagement (SmartReach): Allows the employee to handle outbound Outbound Engagement (SmartReach) interactions for omnichannel campaigns. This attribute appears only if your system includes Outbound Engagement (SmartReach). This option is not enabled by default for new employees.
-
Agent Workspace Premium (Desk): Allows users to use Agent Workspace Premium (Desk) inside a NiCE CXone Agent Workspace (Agent)application. This attribute appears only if your system includes Agent Workspace Premium (Desk). I
-
Agent Workspace Advanced (Enhanced Customer Card): Allows the employee to use Agent Workspace Advanced (Enhanced Customer Card) inside a NiCE CXoneAgent Workspace (Agent) application. This attribute appears only if your system includes Agent Workspace Advanced (Enhanced Customer Card).
-
Can be Analyzed: Allows the employee's recorded interactions to be analyzed by Interaction Analytics (CXone). You will be billed for Interaction Analytics (CXone) for this employee. This attribute appears only if your system includes Interaction Analytics (CXone). This option is not enabled by default for new employees.
-
Virtual agent enabled: When this attribute is selected, the employee profile is marked as a non-human profile. This attribute does not enable a virtual agent in Virtual Agent Hub. It appears only if your system includes Digital Experience (DX). This option is not enabled by default for new employees.
-
Performance Management Insights: Enables basic PM features for the employee. It includes enhanced dashboards, custom integrations, metrics, widgets, and more. This option is enabled by default for new employees. You must manually enable this attribute for employees who need access to these features. Users without this attribute will not have access to advanced performance management tools and analytics. Removing this attribute from a user revokes their access to Performance Management Insights features and associated data. Only enable one of the PM attributes for each employee to avoid double billing (either PM Insights or PM Act). Choose the option based on the purchased SKU.
-
Performance Management Act: Enables advanced PM features, building on the basic tier. It includes out-of-the-box dashboards, gamification elements, and coaching tools. This option is not enabled by default for new employees. You must manually enable this attribute for users who require these advanced features. Users without this attribute selected won't have access to gamification and coaching tools within the performance management system. Removing this attribute from a user revokes their access to Performance Management Act features, including gamification elements and coaching tools. Only enable one of the PM attributes for each employee to avoid double billing (either PM Insights or PM Act). Choose the option based on the purchased SKU.
-
-
Click Save.
Configure the Security Tab
Required permissions: Employees Edit or Create, Security Policy Configure, Login Authenticator User Assignment
- Click the app selector and select Admin.
-
Go to Employees.
-
Select an existing employee's account or select Create Employee.
-
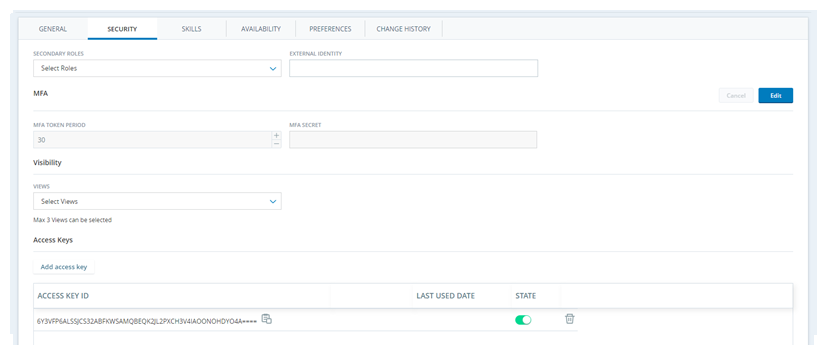
Select the Security tab.
-
Select the secondary role for the employee from the Secondary Roles drop-down. Assigning a secondary role automatically assigns that role's permissions to the employee. Only assign the roles and permissions that the employee needs to perform their job.
-
Select the login authenticator you want to assign to the employee. Employees can only be assigned one login authenticator.
Employees can only log in to NiCE CXone if they are assigned to a login authenticator.
-
Enter the employee's External Identity, if they need one. This is only required if the user is configured to use an external identity provider (IdP). The value you enter here depends on the IdP you use. See the drop-down below for more information.
Learn more about fields in this step
IdP Details SAML 2.0 For SAML 2.0, the value corresponds to the NameID assertion in the response. This can be configured on the identity provider to use a variety of different identifiers. The value in the response and the value of the External Identity field must match exactly, including letter case. OpenID Connect
For OpenID Connect, the value corresponds to the Subject claim in the ID token. The value in the response and the value of the External Identity field must match exactly, including letter case. Some identity providers don't assign a Subject value until the user logs in, making it impossible to know the correct value to configure. In this case, you can have NiCE CXone use the email claim for the first login and then automatically assign the correct Subject value. You can do this by entering information into the External Identity field in this format: claim(email):{email configured by your IdP}. For example, if the user's email in the IdP is nick.carraway@classics.com, you would enter claim(email):nickcarraway@classics.com.
-
If you assigned a primary role with a login authenticator that requires multi-factor authentication (MFA):
-
Enter an MFA Token Period. The value must be between 15 and 300 seconds, and compatible with the virtual or hardware MFA device your employees use. For example, Google Authenticator only allows a value of 30 seconds.
-
Click Edit next to the MFA Secret field.
-
To use a manual key, type an alphanumeric value. Some MFA devices provide a value (often called a "key") for this purpose. If you type your own MFA Secret, the value must be either 16, 26, or 32 characters and encoded in Base32. Base32 allows you to use a 32-character set comprised of the uppercase letters A-Z and the numerals 2-7. The MFA Secret must be RFC 6238-compliant.
-
To automatically generate a value, click Generate
 . Provide this value to the employee, who can use it to set up a virtual MFA device such as Google Authenticator. Scanning a QR code or bar code is not supported. The employee must set up 2-step authentication manually when using a virtual MFA device.
-
-
Select any views from the drop-down that you want to assign to the user.
-
If you want to override the tenant inactivity lock setting for this user, turn Lock User On and adjust the Inactive Days Before a User Can Be Locked setting as needed. If you want to make this user exempt from inactivity locking, turn Lock User Off and select Never Lock User. If Lock User is Off with the Never Lock User checkbox cleared, the tenant setting applies to the user.
When you configure a new Inactive Days Before a User Can Be Locked threshold, the setting applies retroactively. For example, if you set it to 7 days and the employee profile has been inactive for at least seven days, it is immediately locked.
-
Click Save.
Configure Employee Access Keys
Required permissions: Access Key Create
Access keys replace a username and password for user authentication. Access keys can be assigned to human users. But they are most commonly used for applications that function like users, such as bots and intelligent virtual assistants![]() Chatbot or similar application that interacts with a user based on artificial intelligence. (IVAs). Manage your access keys as securely as you do your passwords and advise your employees to do the same.
Chatbot or similar application that interacts with a user based on artificial intelligence. (IVAs). Manage your access keys as securely as you do your passwords and advise your employees to do the same.
Human users can also manage their own access keys from the Access Keys tab of their own employee profile. This requires the My Access Key Create permission
If you're configuring access keys while creating the employee profile, begin with step 3.
- Click the app selector and select Admin.
- Click Employees and then click the employee profile you're editing to open it.
-
Click the Security tab and scroll down to Access Keys.
- Click Add access key.
- Copy the Access Key ID to a secure location.
- Click Show Secret Key and copy the secret key to a secure location.
- Click Save.
Configure WEM Skills
Configure WEM skills if you use Workforce Management (CXone). They're different from ACD skills.
- Click the app selector and select Admin.
- Click Employees and then click the employee profile you're editing to open it.
- Click the WEM Skills tab.
- On the WEM Skills tab, select one or more Skills for this employee.
- For each skill, enter the proficiency or use the up and down arrows to increase or decrease the proficiency level. This option is only available if Proficiency Score is enabled for the WEM Skill. Make sure the direction of the proficiency score is correct when you assign it to an employee. Check the proficiency direction in WEM Skills.
-
Click Save.
Configure Availability
If your organization uses WFM, configure availability for the employees. Otherwise, skip this step.
-
Click the app selector
and select WFM. -
Go to Setup > Agent Configuration.
By default, an employee is set as always available. You can edit the default or existing availability blocks to match an employee's available time frames. Else clear the existing availability blocks and create new ones:
To clear default or existing blocks:
-
To clear all availability blocks, click Clear All.
-
To clear availability blocks for a specific day, click Delete
 on the respective day row.
 -
To clear an individual availability block, click Delete
inside the block.
-
-
Click and drag to add an availability block. An availability block can have a time frame ranging from 15 minutes to 24 hours. To create a new selection, click and drag in the day/time grid. You can create multiple selections for a single day.
An employee can be assigned multiple availability blocks within a single day.
Click All day to mark an employee available for the entire day.
An employee's available time frame is displayed inside the block. If the block is too short to display the available time frame, hover over the block. A popover appears, showing the available time frame and the delete icon.
- Click Save.
Configure Preferences
If your organization uses WFM, configure preferences for the employee schedules.
If you want to define time-off preferences, first assign the employee to a weekly rule. If the weekly rule allows time off, define the time-off preferences.
Sometimes, if multiple agents select the same shift preference, you may not have enough shifts for all agents. In such cases, the Schedule Generator assigns shifts by these rules:
- Agents with a rank take priority over agents without a rank. (The highest rank is 1)
- If none of the agents have a rank or if they all have the same rank, the agent with the earlier hire date has priority.
- If none of the agents have a rank or hire date, then the shifts are assigned randomly among the agents.
In NiCE CXoneWFM, agent shift preferences are configured using a combination of Daily Rules, Weekly Rules, and individual Agent Preferences. These settings help balance agent flexibility with business staffing requirements, ensuring optimal schedule generation aligned with forecasted needs.
-
Daily Rules - It defines flexible Shift Start Times and Start Time Increments. You can also add Slack Time for scheduled activities, allowing them to be placed within a time window on the agent’s schedule. This flexibility improves schedule generation and helps meet staffing requirements.
-
Weekly Rules - It specifies the Day of the Week. Using multiple Weekly Rules increases flexibility in assigning days off, which agents can select as part of their schedule preferences.
For example:
By creating multiple Daily Rules with varying start time windows and increments, agents can choose their preferred shift start times for each day. When Weekly Rules are combined with Daily Rules, agents can prioritize their Time Off Preferences and Possible Days Off.
-
Agent Preferences - The Agent Preferences consist of three components as follows:
-
Agent Rank
-
Located under the Employee menu, Agent Rank determines scheduling priority. A lower rank number indicates a higher priority.
-
If no rank is set, the system uses the Hire Date (longer tenure = higher rank).
-
If neither is provided, rank is not considered in scheduling.
-
-
Shift Preferences by Start Time
-
Agents can select preferred start times for each day of the week.
-
-
Time Off Preferences by Day
-
Agents can prioritize preferred days off, from most to least desired.
-
-
Schedule Generation and Preference Consideration
During schedule generation, agent preferences are considered alongside service level goals and staffing requirements. The system aims to ensure adequate coverage while honoring agent preferences where possible.
-
Agents with the same rank are considered equal in the agent preferences Rank.
-
When multiple WEM skills and Service Level targets are involved, coverage becomes the primary factor in determining how many preferences can be granted.
NiCE CXoneWFM uses proprietary optimization algorithms to evaluate and score potential schedules. These algorithms consider:
-
Start-time preferences
-
Days-off preferences
-
Agent rank or priority
-
Seat limits and staffing coverage (via simulation)
The system balances these factors to generate the most effective schedule while maintaining service level targets.
Setting Shift Preferences
Shift Preferences can be set in two ways:
-
Administrators: Via the Employees > Preferences tab.
-
Agents: Via My Zone > My Schedule, then selecting Shift Preferences from the top-right menu.
When creating new employee profiles, administrators can enter attributes such as Rank and Hire Date. These attributes are used in WFM and across the NiCE CXone Suite.
For more information, visit the NiCE CXoneWFM Help Site – Shift Preferences.
- Click the app selector and select Admin.
- Click Employees and then click the employee profile you're editing to open it.
- Select the Preferences tab.
-
In the Shift Preferences area, from the drop-down list for each day, select the employee's preferred shift.
-
In the Time-Off Preferences area, drag and drop the listed days of the week to the available priority spots.
For example, if the employee's preferred day off is Monday, drag and drop the Mon card to the Priority 1 slot. If the next preference is Wednesday, drag the Wed card to the Priority 2 slot, and so on.
- Click Save.
Configure External Identifiers (Recording Accounts)
This tab is only available with Engagement Hub (Multi-ACD/Open).
An external identifier associates an agent with a telephony system by extension number or agent ID. You can add up to 10 external identifiers to an employee account manually or using bulk upload.
Make sure agents are properly linked to their external identifiers. Otherwise, calls will not be recorded, but the call details will appear in the Search application without an agent name, labeled as Unmapped Agent. You can find these calls by searching for the Unmapped Agent label to quickly identify and resolve any issues with user definitions.
-
Go to Admin > Employees.
-
Select an existing employee's account or select Create Employee.
-
Select the External Identifiers tab.
-
Configure recording accounts:
-
To add a recording account, click New Identifier.
-
Select the System the recording account is assigned to.
-
Select the Identifier Type:
-
For sites using fixed seating, select Extension.
-
For sites using free seating, it is recommended to select Agent ID.
-
(Cisco telephony system only) For sites using a shared line, select UDI (Unique Device Identifier).
-
For Cisco UDI accounts, enter the Device Name if the agent uses Cisco Jabber, or the MAC Address if the agent uses a physical desk phone.
-
-
-
In the Value field, enter a unique value per system for the recording account.
-
Activate an Employee Account
Inviting an employee sends an email to the email address configured for the employee profile. The user must click the link in the email within 48 hours to activate their account and set up a password. If the user doesn't activate their account within 48 hours, you will need to send another invitation. If your company uses single sign-on (SSO), you can skip the following steps and configure employees for immediate activation.
- Click the app selector and select Admin.
- Click Employees.
- In the Employees table, scroll to or search for the employee profile for the user you want to activate.
- Click Invite.
Configure Immediate Activation of Users with SSO
Accounts for employees logging in with single sign-on (SSO) are activated immediately when the employee logs in. Their NiCE CXone account remains active and fully accessible immediately, regardless of whether they have completed email verification.
- Set up a federated identity login authenticator.
- Assign the login authenticator to employee profiles in bulk or individually.
Configure Contact Handling Settings for ACD Routing
If you're using the NiCE CXone ACD and want to modify the employee's contact handling settings for interactions routed through it, finish creating the employee account. Then modify the contact settings in ACD Users. Otherwise, skip this step.
Configure Multi-Region BCP Access
The Multi-Region BCP tab allows you to control the level of access the user has to your Multi-Region Business Continuity Plan (Business Continuity Plan) tenant.
- Click the app selector and select Admin.
Go to Employees.
Select your desired employee profile.
Click the Multi-Region BCP tab.
Select the level of access you want the employee to have for Multi-Region BCP Type:
No Access: The user account does not have access to the Multi-Region BCP tenant. By default, all employees have no access.
Single Access: The user account can only access whichever tenant is active. So, they can only log in to the Multi-Region BCP tenant when you've switched to the Multi-Region BCP tenant and it's active.
Multiple Access: The user account can choose which tenant to log in to. This type of access should be given to administrators, who you want to be able to log in to the Multi-Region BCP tenant at any time. These users will have an updated login page. When logging in, a selector will let them choose between the primary and Multi-Region BCP tenant. This selector will also show which tenant is currently active. This will help them easily know whether the Multi-Region BCP tenant is active or not.
Save your changes.
Supported Time Zones
The following time zones are supported for dialing.
|
Time Zone Name |
IANA Value |
|---|---|
| Midway Island, Samoa | Pacific/Samoa |
| Hawaii | US/Hawaii |
| Alaska | America/Anchorage |
| Pacific Time (US & Canada) | America/Los_Angeles |
| Tijuana, Baja California | America/Tijuana |
| Arizona | US/Arizona |
| Chihuahua, La Paz, Mazatlan | America/Chihuahua |
| Mountain Time (US & Canada) | America/Denver |
| Central Time (US & Canada) | America/Chicago |
| Guadalajara, Mexico City, Monterrey | America/Mexico_City |
| Saskatchewan | Canada/Saskatchewan |
| Bogota, Lima, Quito, Rio Branco | America/Bogota |
| Eastern Time (US & Canada) | America/New_York |
| Indiana (East) | America/Indiana/Indianapolis |
| Atlantic Time (Canada) | America/Moncton |
| Caracas, La Paz | America/Caracas |
| Manaus | America/Manaus |
| Santiago | America/Santiago |
| Newfoundland | America/St_Johns |
| Brasilia | America/Fortaleza |
| Buenos Aires, Georgetown | America/Argentina/Buenos_Aires |
| Montevideo | America/Montevideo |
| Azores | Atlantic/Azores |
| Casablanca, Monrovia, Reykjavik | Africa/Casablanca |
| Greenwich Mean Time | Etc/GMT |
| Greenwich Mean Time: Dublin, Edinburgh, Lisbon, London | Europe/London |
| Amsterdam, Berlin, Bern, Rome, Stockholm, Vienna | Europe/Amsterdam |
| Belgrade, Bratislava, Budapest, Ljubljana, Prague | Europe/Belgrade |
| Brussels, Copenhagen, Madrid, Paris | Europe/Brussels |
| Sarajevo, Skopje, Warsaw, Zagreb | Europe/Sarajevo |
| Amman | Asia/Amman |
| Athens, Bucharest, Istanbul | Europe/Athens |
| Beirut | Asia/Beirut |
| Cairo | Africa/Cairo |
| Harare, Pretoria | Africa/Harare |
| Helsinki, Kyiv, Riga, Sofia, Tallinn, Vilnius | Europe/Helsinki |
| Jerusalem | Asia/Jerusalem |
| Minsk | Europe/Minsk |
| Windhoek | Africa/Windhoek |
| Kuwait, Riyadh, Baghdad | Asia/Kuwait |
| Moscow, St. Petersburg, Volgograd | Europe/Moscow |
| Nairobi | Africa/Nairobi |
| Tbilisi | Asia/Tbilisi |
| Tehran | Asia/Tehran |
| Abu Dhabi, Muscat | Asia/Dubai |
| Baku | Asia/Baku |
| Yerevan | Asia/Yerevan |
| Kabul | Asia/Kabul |
| Yekaterinburg | Asia/Yekaterinburg |
| Islamabad, Karachi, Tashkent | Asia/Karachi |
| Chennai, Kolkata, Mumbai, New Delhi | Asia/Kolkata |
| Kathmandu | Asia/Kathmandu |
| Almaty, Novosibirsk | Asia/Almaty |
| Astana, Dhaka | Asia/Dhaka |
| Yangon (Rangoon) | Asia/Rangoon |
| Bangkok, Hanoi, Jakarta | Asia/Bangkok |
| Krasnoyarsk | Asia/Krasnoyarsk |
| Beijing, Chongqing, Hong Kong, Urumqi | Asia/Hong_Kong |
| Kuala Lumpur, Singapore | Asia/Kuala_Lumpur |
| Irkutsk, Ulaan Bataar | Asia/Irkutsk |
| Perth | Australia/Perth |
| Taipei | Asia/Taipei |
| Osaka, Sapporo, Tokyo | Asia/Tokyo |
| Seoul | Asia/Seoul |
| Yakutsk | Asia/Yakutsk |
| Adelaide | Australia/Adelaide |
| Darwin | Australia/Darwin |
| Brisbane | Australia/Brisbane |
| Canberra, Melbourne, Sydney | Australia/Sydney |
| Hobart | Australia/Hobart |
| Guam, Port Moresby | Pacific/Guam |
| Vladivostok | Asia/Vladivostok |
| Magadan, Solomon Is., New Caledonia | Asia/Magadan |
| Auckland, Wellington | Pacific/Auckland |
| Fiji, Kamchatka, Marshall Is. | Pacific/Fiji |