

Login authenticators control how users log in to NiCE CXone. NiCE CXone supports both internal and external authentication. You can create custom login authenticators according to the needs of your organization and assign them to each employee profile.
For more information about authentication and authorization in NiCE CXone, click here.
Set Up a Location for Location-Based Logins
Required permissions: Location Management Create
If you want to require that users log in from a certain IP address, create a location with the IP addresses, IP address ranges, or IP address subnets you want to allow. When you require a configured location for a user, that user must have both the correct credentials and IP address to log in. Otherwise, their login attempt fails and they receive an error. You can have up to 20 locations at a time and up to 10 rules per location.
- Click the app selector
 and select Admin.
- Go to Locations > Location Definitions.
- Click New Location.
- Give the location a descriptive Name. If you want to add more details about the location, enter a Description.
- You can select the Set as Default Location or Remote Location to indicate the type of location. You can only have one default location. These fields don't currently affect any functionality and selecting them is for your own reference.
-
Add any other information you would like using the remaining fields, including the physical address, country, GPS coordinates, time zone, or assigned groups. These fields don't currently affect anything, and the information entered there would be only for your own reference.
If you add groups to the Assigned Groups field, the users belonging to those groups appear on the Assigned Users tab. However, the location settings won't apply to them. If you assign a location to a login authenticator, the location applies to users who are assigned to that login authenticator and restricts their ability to log in based on their IP address. However, those users will not appear on the Assigned Users tab.
-
Click the Division drop-down menu located beside location name field.
-
On Location Definitions page select the division filter to see only locations assigned to that division. Clear the filter to see all locations again.
You can move a location from the Default Division to a specific division only once. After a location is assigned to a division and saved, it cannot be moved to a different division. If the location has already been moved from the Default Division, this drop-down is disabled and cannot be modified.
-
Click Save.
-
Back on the Location Definitions page, click the location you just created to open it.
-
Click the Auto-Detection Rules tab.
-
Create a new rule. To do so:
-
Click New Rule.
-
Give the rule a descriptive Name.
-
Select the Rule Type from the following:
-
List: A list of specific IP addresses allowed for this location. For example, 100.0.1.100, 100.0.1.101, and 100.0.1.102.
-
Range: An IP address range allowed for this location. For example, 100.0.1.100-100.0.1.125.
-
Subnet: A subnet allowed for this location. For example, 100.0.0.1/32.
-
-
Specify the IP Version as one of the following:
-
IPV4: A 32-bit IP address
-
IPV6: A 128-bit hexadecimal address.
-
-
Enter the actual IP addresses, range, or subnet in the Rule Definition field, following the formats of the examples in the preceding steps. If you selected List, you can enter up to 100 IP addresses. If you selected Range or Subnet, you can only enter one value.
-
Click Confirm.
-
-
Add more rules as needed. You can have up to 10.
-
Click Save.
Create a Custom System Login Authenticator
Required permissions: Can manage passwords, On.
Custom login authenticators allow you to customize authentication requirements for NiCE CXone users. You can create more than one custom login authenticator if you want different sets of requirements for certain users. If you want the same settings to apply to all users, you can use the default system login authenticator instead of creating a custom one.
After you create a login authenticator assign it to employee profiles. From then, the password field displays the configured login authenticator rules when the user tries to set or change their password.
- Click the app selector and select Admin.
- Go to Security Settings > Login Authenticator.
-
Click New Login Authenticator.
-
Enter a unique Name for the login authenticator.
-
Enter an optional Description. Use plain text only. URLs or markup such as HTML will not be saved.
-
Select System as the Authentication Type.
 Learn more about authentication types
Field
Details
System The login authenticator uses the built-in login process of NiCE CXone. It doesn't authenticate using an external single sign-on (SSO) identity provider. SAML SAML 2.0 allows you to set up single sign-on through an external identity provider. NiCE CXone supports multiple instances of SAML 2.0. You can assign different instances to different users. -
If you want to require that users log in from a certain IP address, select the Location you set up in the preceding section.
- Set up your password complexity.
Each user's password is checked against a repository of commonly used passwords. If their password matches one of the commonly used passwords, the system requires them to create a new password. Some of the passwords that are rejected include:
Any password that includes the word "password." For example, Password@1234.
Any password that includes the user's email address, username, first name, last name, or system name.
Passwords are checked against this repository whenever:
A new user is activated.
A user's password expires.
A user resets their password.
Learn more about fields in this stepField Details Require Lower Case (a-z) Requires users to use at least one lower-case letter in their passwords. Require Upper Case (A-Z) Requires users to use at least one upper-case letter in their passwords. Require Numeric (0-9) Requires users to use at least one number in their passwords. Require Non-alphanumeric (!,@,#,etc.) Requires users to use at least one non-alphanumeric character in their passwords. -
If you want to enable multi-factor authentication, select Require Multi-Factor Authentication. Set your MFA Type as HOTP (HMAC-Based) and TOTP (Time-Based).
Learn more about the MFA settings
Field Details Require Multi-factor Authentication Requires users to enter a multi-factor authentication (MFA) token in addition to their password to log in to NiCE CXone. An MFA token is a one-time password generated by a hardware token or virtual MFA device (for example, an app like Google Authenticator) that you provide. When you enable MFA, users with the affected profile must configure an MFA secret key the next time they log in.
You should not enable MFA for the master administrator in your organization. If the device or secret is lost, the only way to reset the MFA secret is to file a ticket with NiCE CXone Support.
MFA Type Specifies whether you want to enable TOTP (Time-Based) or HOTP (HMAC-Based) MFA. -
Set your password policy.
Learn more about fields in this step
Field Details Password Length Enter the minimum number of total characters users must include in their passwords. For example, if you enter12, users must include at least 12 total characters in every password. The characters required in the Password Complexity settings count towards the total character count. You can set the password length to any number between 12 and 24. Enable Password Age Enables a text box where you can enter the maximum number of days a user can keep a password. After the specified number of days, the user must change their password. You can set the password age anywhere from 14 to 365 days. Enable Password History Enter the number of unique passwords a user must set before they can reuse an old one. You can set the password history anywhere from 4 to 50. For example, if you enter 10, users assigned to the login authenticator cannot use any of their last 10 passwords as their new password. Password Attempts Enter the maximum number of times a user can enter an incorrect password before the system locks them out of their account. The range is three to ten attempts and the default is six. -
Click Save & Activate.
Set Up an External Login Authenticator with SAML 2.0
You can use external authentication when you want a user's password to be managed by another system or identity provider. NiCE CXone currently supports SAML 2.0 and OpenID Connect federation protocols.
You can set up IdP-initiated authentication or SP-initiated authentication with the steps in this section.
IdP-Initiated Authentication: IdP stands for identity provider. IdP-initiated authentication means that the external identity provider starts the login process.
SP-Initiated Authentication: SP stands for service provider. SP-initiated authentication means that NiCE CXone starts the login process.
If you are using Salesforce Agent, then the external identity provider (IdP) must be configured for SP-initiated authentication.
- Ensure that you have access to the external identity provider. You will need to create an integration specific to NiCE CXone.
- Create the integration in the external identity provider. Different systems use different names for these integrations, see specific instructions for Okta or Azure.
- You will need to provide an Entity ID which you don't know at this point. Use https://need_to_change as a placeholder.
- You will need to provide an ACS URL which you don't know at this point. Use https://need_to_change as a placeholder.
- The identity provider will generate a specific URL where SAML requests must be sent. Copy and save this URL to a place where you can find it. You will need to enter this value in later steps.
- The identity provider will generate a public signing certificate for the integration. Download the certificate. You will need to use it in later steps.
- If you want to enable SP-initiated login, complete this step. Copy the URL used to log in to the external identity provider with an SP-initiated login flow.
- Create an external login authenticator in NiCE CXone.
- Click the app selector and select Admin.
- Click Security > Login Authenticator.
- Enter the Name and Description of the login authenticator.
- Select SAML as the Authentication Type.
If you want to require that users log in from a certain IP address, select the Location you set up in the preceding section.
- If you select FICAM, the SAML response must have a single AuthnContextClassRef entry. Also, the NamespaceURI of the assertion subject must be: urn:oasis:names:tc:SAML:2.0:assertion. The AuthnContextClassRef and NamespaceURI fields are controlled by the identity provider.
- Enter the SAML request Endpoint you received from your provider above as the Endpoint URL.
- Click Choose File and select the public signing certificate you received from your provider. This file must be a PEM file. It will be a text file and the first line will contain BEGIN CERTIFICATE with some other text.
- If you want to enable service provider (SP)-initiated login for this login authenticator, complete this step. In the Endpoint URL field, paste the Login URL value you copied from your external identity provider.
Select the Assigned Users tab. Select the users that you want to assign to the login authenticator you are creating. You can also assign users directly to the login authenticator in their employee profile.
- Click Save and Activate.
- Open the login authenticator.
Note the Entity ID and ACS URL. You will need them when updating your IdP settings.
- Click the app selector
-
Update your identity provider settings, replacing the placeholders used above with the values you just noted.
-
Ensure that the External Identity for each user that uses the login authenticator is set to the correct value. This field can be accessed in the security section of the employee's profile.
Your identity provider determines the value that must be used. The value must match exactly what you put in the External Identity field in NiCE CXone.
-
Have the user log in. They must use the latest login URL. After entering their username they will be directed to the external identity provider if needed.
Create External Login Authenticators with OpenID Connect
Required permissions: Login Authenticator Create
You can use external authentication when you want a user's password to be managed by another system or identity provider. NiCE CXone currently supports SAML 2.0 and OpenID Connect federation protocols.
You can set up SP-initiated authentication with the steps in this section. SP-initiated authentication means that NiCE CXone (the service provider) starts the login process.
If you are using Salesforce Agent, then the external identity provider (IdP) must be configured for SP-initiated authentication.
Front-End Authentication with Client Secret or PKCE
OpenID Connect offers two options for front-end authentication:
- Client secret: A client secret is included in the token exchange. This presents a security risk, as it requires coding the secret into the web application.
- PKCE (Proof Key for Code Exchange): Creates a unique, temporary secret for every login request. This increases the security of the authentication flow because attackers won't be able to obtain the one-time key that the application creates.
NiCE CXone supports both options. The end-user experience is the same no matter which option you use. However, PKCE is more secure. Using a PKCE authorization flow requires a custom API integration. The client secret-based authorization flow is the default.
To set up a PKCE authentication flow, refer to the Getting Started  and API Authentication and Authorization pages in the NiCE CXone developer portal.
Linking New Users with Claim-based OpenID Connect
NiCE CXone can use a different claim value, like an email address, to establish the user's identity at their first login. NiCE CXone then automatically switches to the unique OpenID Connect subject identifier. This allows you to pre-configure a user's federated identity.
Create an External Login Authenticator
- Ensure that you have access to the external identity provider. You will need to create an integration specific to NiCE CXone.
- Create the integration in the external identity provider.
- You will need to provide a Sign-in Redirect URI which you don't know at this point. Use https://cxone.niceincontact.com/need_to_change as a placeholder.
- You may need to provide a Sign-out Redirect URI which you don't know at this point. Use https://cxone.niceincontact.com/need_to_change as a placeholder.
- The identity provider will generate a Client ID and a Client Secret. Copy and save these values where you can find them. You will need to enter them in later steps.
- Create an external login authenticator in NiCE CXone.
Click the app selector
and select Admin.Go to Security Settings > Login Authenticator.
- Click New Login Authenticator or select the login authenticator you want to edit.
- Enter the Name and a Description of the login authenticator.
- Select OIDC as the Authentication Type.
If you want to require that users log in from a certain IP address, select the Location you set up in the preceding section.
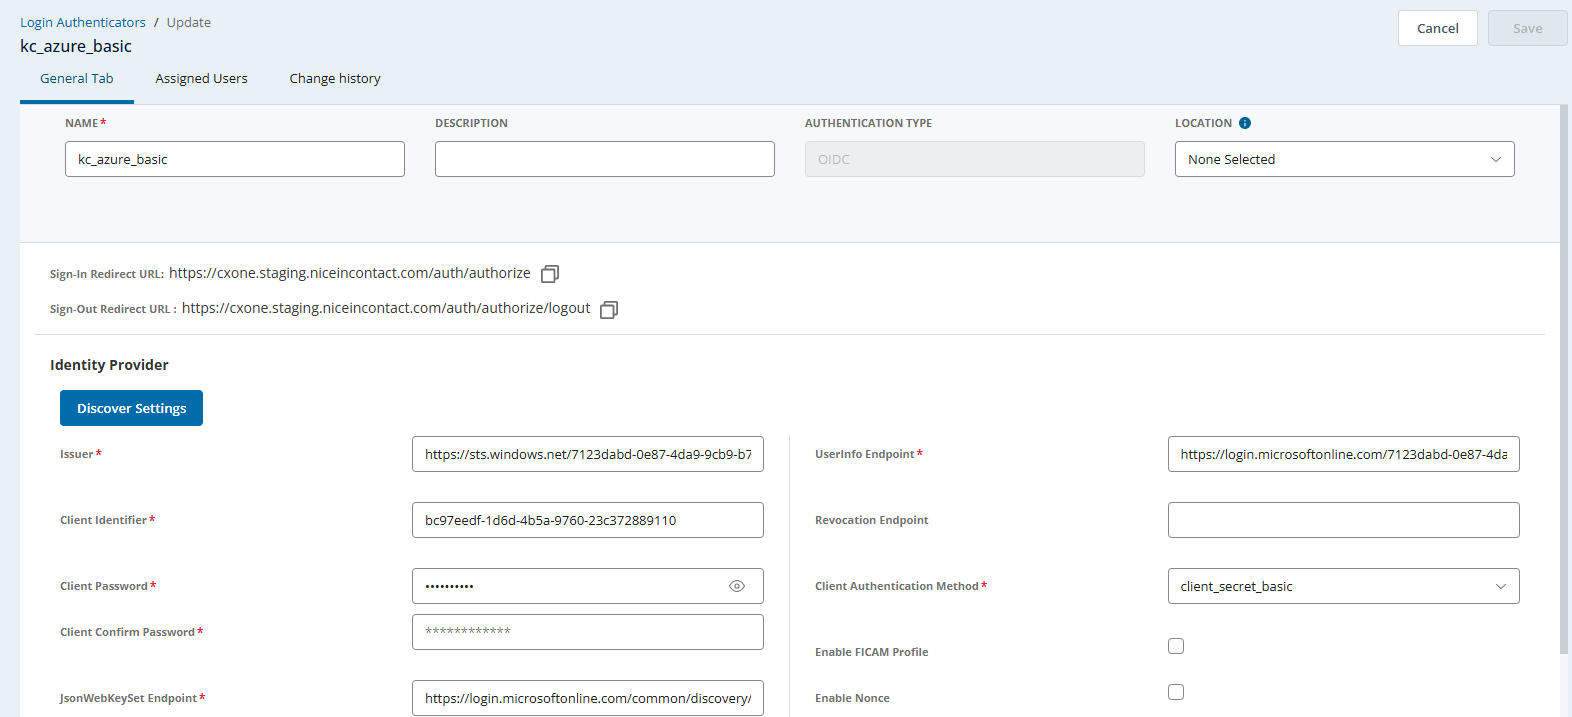
- If you have a discovery endpoint for your IdP, click Discover Settings. Enter your discovery endpoint and click Discover. The remaining fields are populated for you. Discover Settings does not work with Salesforce discovery endpoints.
- Enter your Client Identifier and Client Password. Re-type the password in Client Confirm Password. The Client Identifier is the login ID assigned to your account by your IdP.
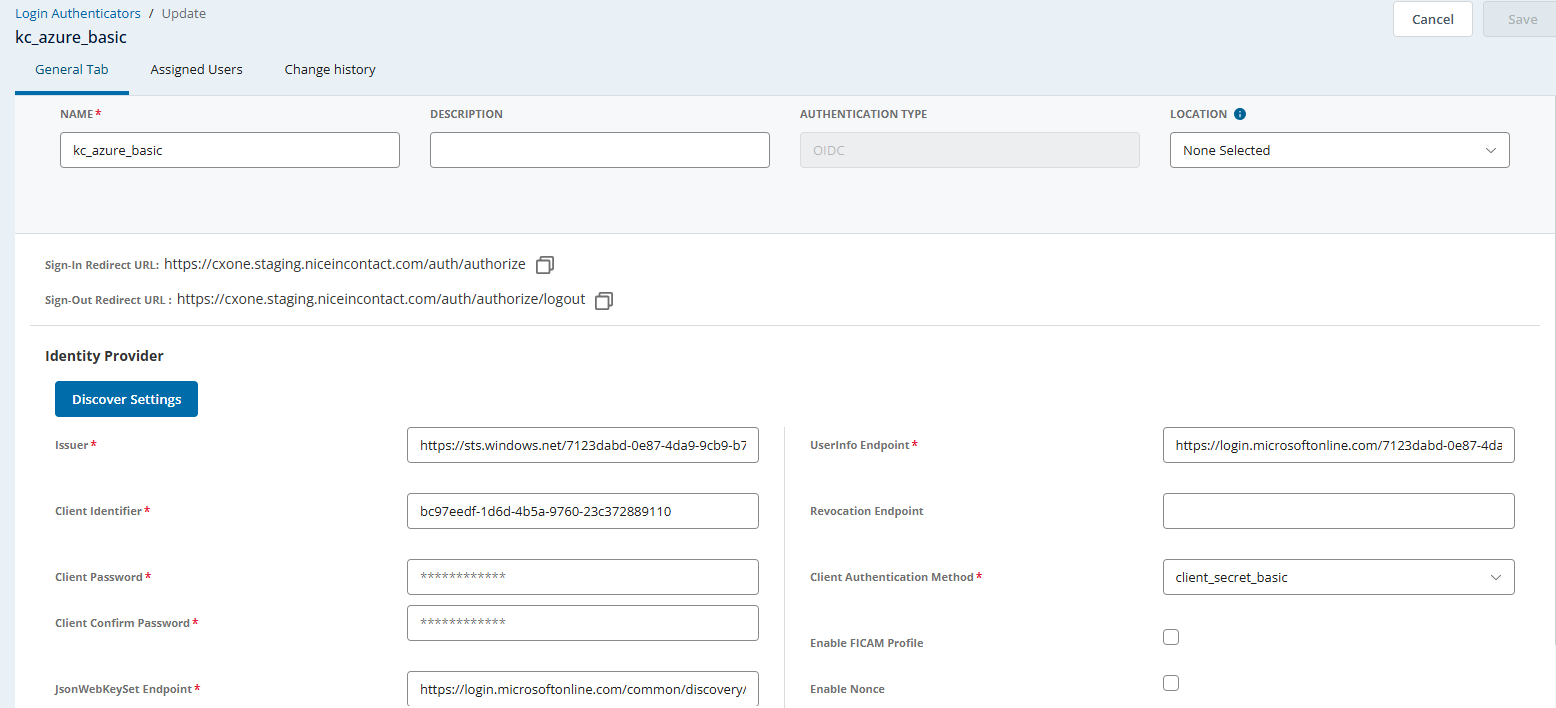
If you don't have a discovery endpoint for your IdP, enter your IdP-provided Issuer, JsonWebKeySet Endpoint, Authorization Endpoint, Token Endpoint, UserInfo Endpoint, Revocation Endpoint, and End Session Endpoint.
Learn more about fields in this stepField
Details
Issuer The URL of your IdP without any parameter.
JsonWebKeySet Endpoint The URL of your IdP's JWK Set. Authorization Endpoint The URL of your IdP's OAuth 2.0 Authorization Endpoint. Token Endpoint The URL of your IdP's OAuth 2.0 Token Endpoint. UserInfo Endpoint The URL of your IdP's UserInfo Endpoint. Revocation Endpoint The URL of your IdP's Revocation Endpoint. End Session Endpoint The URL of your IdP's End Session Endpoint. This field allows you to create a single logout experience for your users. If configured, when they log out of NiCE CXone, they will also be logged out of their IdP account. For single logout to work, you must whitelist the Sign-out Redirect URI in your IdP. - Select a Client Authentication Method. The method you select must be an authentication method that your IdP supports. If you select private_key_jwt, you must enter your Client Private Key.
- You can select Enable FICAM Profile to turn on U.S. government-specific settings.
Select the Assigned Users tab. Select the users that you want to assign to the login authenticator you are creating. You can also assign users directly to the login authenticator in their employee profile.
- Click Save & Activate to validate the provided information and to link your NiCE CXone account to your IdP account.
- Open the login authenticator.
Note the Sign-in Redirect URI and Sign-out Redirect URI. You will need them when updating your IdP settings.
-
Update your identity provider settings, replacing the placeholders used above with the values you just noted.
-
Ensure that the External Identity for each user that uses the login authenticator is set to the correct value. This field can be accessed in the security section of the employee's profile.
Your identity provider determines the value that must be used. The value must match exactly what you put in the External Identity field in NiCE CXone. The value for this field must be in this format: claim(email):{email configured by your IdP}. For example, if the user's email in the IdP is nick.carraway@classics.com, you would enter claim(email):nickcarraway@classics.com.
-
Have the user log in. They must use the latest login URL. After entering their username they will be directed to the external identity provider, if needed.
- When your IdP asks you to authenticate, do so as the user on the IdP you want associated with your currently logged in NiCE CXone account.
- If your OpenID Connect settings in NiCE CXone don't show as validated, use your IdP logs to diagnose the problem.
Add or Remove Users Assigned to a Login Authenticator
You can add users to or remove users from a login authenticator. You can also assign a login authenticator to a user directly on the Security tab of their employee profile.
- Click the app selector and select Admin.
-
Click Login Authenticator.
-
Select the login authenticator that you want to work with.
-
On the login authenticator's page, click the Assigned Users tab.
-
To add users to this login authenticator:
-
Click Add Users.
-
Enter a user's name in the search bar. You can filter results by clicking the filter
 , then selecting one or more Teams, Scheduling Units, or Groups.
-
Select the checkbox next to each user you want to assign to this login authenticator.
-
Click Confirm.
-
- To remove a single user from this login authenticator:
- Click the X in the user's row in the table.
- Select a different login authenticator to assign the user to. Without a login authenticator, the user account cannot log in to NiCE CXone.
- Click Yes.
-
To remove more than one user from this login authenticator:
-
Select the checkbox next to each user you want to remove.
-
Click Remove Users at the top of the page.
-
Select the login authenticator you want to assign the selected users to. Without a login authenticator, these user accounts cannot log in to NiCE CXone.
-
Click Yes.
-
-
Click Save.
Manage SAML 2.0 Login Authenticator Certificates
A Login Authenticator establishes a secure relationship between NiCE CXone and your Identity Provider (IdP) for Single Sign-On (SSO) using SAML 2.0. When creating a new authenticator or rotating an existing certificate, NiCE CXone enforces pre-ingestion validation checks to verify that the uploaded certificate meets structural, cryptographic, and security standards before it enters the authentication pipeline.
Certificate Requirements and Guidelines
Before uploading an IdP certificate to NiCE CXone, verify that your certificate file meets the following specifications:
| requirement | specification |
|---|---|
| Supported File Formats | .pem, .cer, .crt |
| Encoding Format | Base64-encoded ASCII (PEM format). Binary formats (such as .der, .pfx, .p12) are rejected. |
| Header and Footer | Standard PEM headers and footers must be present on separate lines: -----BEGIN CERTIFICATE----- -----END CERTIFICATE----- |
| Certificate Structure | Upload a single certificate only. Multi-certificate chains or bundles within a single file are rejected. |
| Integrity & Whitespace | The file must contain valid Base64 characters with no leading/trailing whitespace and no blank lines within the certificate body. |
| Cryptographic Standards | Public Key Algorithm & Key Length: RSA $\ge$ 2048-bit. - Signature Hash Algorithm: SHA-256 or higher (SHA-384, SHA-512). Deprecated or weak algorithms (such as MD5, SHA-1, or RSA keys under 2048-bit) are rejected. |
| Validity Period | The certificate must be currently active (NotBefore $\le$ current date/time $\le$ NotAfter). Expired certificates or certificates with future effective dates are rejected. |
Upload or Rotate an IdP Certificate
Required permissions: Login Authenticator
Obtain an active, PEM-formatted X.509 certificate exported from your Identity Provider.
- Click the app selector and select Admin.
- Go to Security Settings > Login Authenticator.
- Perform one of the following:
Create a new authenticator: Click Create, then enter a Name and optional Description.
Update an existing authenticator (certificate rotation): Click the authenticator name in the list, then select the General tab.
- In the Authentication Provider Details section, set the Authentication Type to SAML 2.0.
-
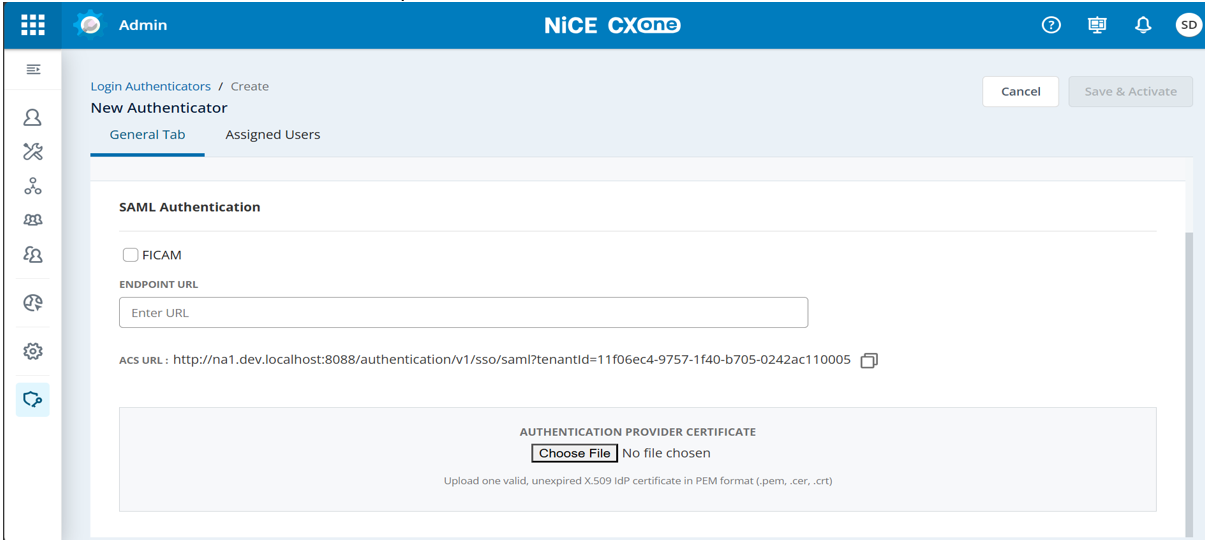
Locate the Authentication Provider Certificate field.
- Click Choose File (or Replace Certificate if updating an existing record) and browse to select your .pem, .cer, or .crt file. NiCE CXone performs real-time pre-ingestion validation immediately upon file selection. The system inspects file extension, PEM headers, cryptographic strength, structure, and validity period before enabling you to save.
-
Review the validation result:
-
Validation Success: The filename and parsed expiration date appear beneath the field.
-
Validation Failure: An inline red error banner appears directly below the upload button detailing the validation defect. The Save & Activate button remains disabled until a compliant certificate is uploaded. Refer to Certificate Upload Error Reference to troubleshoot the issue.
-
-
Complete any remaining required SAML configuration fields (such as Entity ID, Sign-In URL, and Sign-Out URL).
-
Click Save or Save & Activate.
Field Descriptions: Authentication Provider Details
The following table describes the fields and controls related to certificate management on the SAML 2.0 Login Authenticator page:
| Field / UI Element | TYPE | description |
|---|---|---|
| Authentication Provider Certificate | File Upload (Required) | The public X.509 signing certificate provided by your Identity Provider. Guidelines & Constraints: - Accepts .pem, .cer, and .crt files. - Must contain standard -----BEGIN CERTIFICATE----- and -----END CERTIFICATE----- boundary markers. - Must contain a single certificate only (no certificate chains). - Requires RSA $\ge$ 2048-bit and SHA-256 or higher. - Must be currently valid at the time of upload. Upload one valid, unexpired X.509 IdP certificate in PEM format (.pem, .cer, .crt)" |
| Expiration Date | Read-Only Display | Displays the NotAfter expiration date extracted from the uploaded certificate. Use this date to track upcoming certificate lifecycles and schedule rotations. |
| Replace Certificate | Button | Allows administrators to select and upload a renewed PEM certificate for an active authenticator without re-creating the authenticator configuration. |
Certificate Upload Error Reference
If an uploaded certificate fails pre-ingestion validation, NiCE CXone displays an inline error message and blocks saving. Use the table below to resolve the error:
| Error Message & UI View | Cause | Resolution / Administrator Action |
|---|---|---|
| Invalid certificate: Certificate is expired or not yet valid. | The certificate is outside its validity window (current time < NotBefore or current time > NotAfter). | Check the certificate dates. If expired, generate and export a renewed certificate from your IdP. If the start date is set in the future, wait until the effective start time or reissue a certificate that is active immediately. |
| Unsupported format. Upload an X.509 PEM file (.pem, .cer, .crt). | The file fails PEM formatting rules (for example: missing BEGIN/END CERTIFICATE boundaries, unexpected blank lines, multiple certificates in a chain, or illegal characters outside the Base64 set). | Open the certificate file in a plain text editor to verify standard headers and footers with no extra blank lines or whitespace. Remove certificate chains so only the leaf/signing certificate remains, or re-export as PEM from your IdP. |
| File unreadable. Ensure it's a valid PEM certificate. | The file is corrupted, zero-byte/empty, or unparseable by the cryptographic validation engine. | Confirm the file is not 0 bytes and has not been corrupted during download/transfer. Re-export a fresh copy from your IdP and upload again. |
| Unsupported type. Upload a valid IdP certificate. | An invalid file type or binary format (such as .pfx, .p12, .der, .txt, .png) was selected. | Ensure your certificate is exported in Base64/PEM format with a supported extension (.pem, .cer, or .crt). Convert binary formats (.der, .pfx) to PEM before uploading. |
Certificate Expiry Alerts in Login Authenticators with SAML 2.0
This feature introduces proactive monitoring for SAML identity provider (IdP) certificates. By surfacing certificate status directly in the NiCE CXone interface, administrators can rotate certificates before they expire, preventing authentication outages and reducing emergency support incidents.
Required permissions: Login Authenticator Create, to view detail-page alerts and update certificates.
- Click the app selector and select Admin.
-
Click Login Authenticators list.
-
Locate the Certificate column to view the current status of each SAML authenticator.
-
Hover over the status icon to see the exact expiry date and days remaining.
-
If a status shows Near expiry or Expired, click the authenticator to open the detail page.
-
Review the alert banner for impact details and follow your IdP's process to generate a new certificate.
-
Upload the new certificate using the existing Choose File control and Save the changes.
Examples:
-
Near Expiry: A SAML authenticator shows an amber icon. The tooltip indicates "Expires in 14 days."
-
Expired: A SAML authenticator shows a red icon. Sign-in for users assigned to this authenticator will fail until the certificate is updated.
-
Deactivate Login Authenticators
Required permissions: Login Authenticator Disable
You can deactivate system and SAML 2.0 login authenticators on the Login Authenticator Page.
All users assigned to a deactivated login authenticator lose access to NiCE CXone. These users also won't be able to use the Forgot Password link to activate their account or change their password. Users won't be notified of their loss of access. They won't be able to regain access until you:
-
Assign them to an active login authenticator.
-
Reactivate their assigned login authenticator.
To avoid revoking access from your users, assign them to a different login authenticator before you deactivate.
- Click the app selector and select Admin.
- Go to Security Settings > Login Authenticator.
- Locate the login authenticator you want to deactivate.
- Click actions
 .
- Click Deactivate.