

You can create views to control access to the following kinds of data:
-
Evaluations
-
Hours of operation
-
Interactions
-
Roles
-
User data
You can choose how access to ACD data is restricted. You can restrict it by teams or by campaigns.
Only employees you assign to a view have access to the data specified in that view. Each view can manage access to one type of data. The default setting allows users to view all the data available. By assigning a view to a user, you are removing their access to all data except what is specified in the view. Users can have multiple views assigned to them.
Create Evaluation-Based Views
Create evaluation-based views to restrict access to data related to evaluations. For example, this limits access to data from interactions and quality plans. Only select the evaluations you want your assigned users to be able to view. All the evaluations not included in the view will be hidden from the assigned users.
Evaluation-Based Views takes preference over any other views that may have been created, such as Interaction-Based View or User-Based View.
- Click the app selector
 and select Admin.
 - Go to Security Settings > Views.
- Click New View.
- Enter a View Name and a Description. For the description, use plain text only. URLs or markup such as HTML will not be saved.
- Select Evaluation as the Type to restrict access to data related to evaluations.
- In the Teams drop-down, select each team whose data you want employees to be able to access when they are assigned to this view.
- Click Create.
Tips for QM Flows
This view sets the controls based on which evaluations are done, by which supervisor:
In this example:
-
Supervisor One from Team One will only evaluate interactions from Team One.
-
Supervisor Two from Team Two will only evaluate interactions from Team Two.
To do this, you create an Evaluation-Based View and assign teams:
-
Evaluation One View - Team One is assigned to this view.
-
Evaluation Two View - Team Two is assigned to this view.
Each agent's NiCE CXone employee profile will need to be assigned the relevant view.
With this in place:
-
Manager One can assign interactions from Team One to Supervisor One, these being evaluations for Agent One and Two.
-
On-the-fly evaluations can be done by Supervisor One for the Agents from Team One, namely Agent One and Two.
-
Manager Two can assign interactions from Team Two to Supervisor Two, these being evaluations for Agent Three and Four .
-
On-the-fly evaluations can be done by Supervisor Two for the Agents from Team Two, namely Agent Three and Four.
View the Evaluation-based view the video clip
Follow the next step in the RBAC Use Case: Quality Plan
View the full RBAC Evaluation Views video
To review the RBAC Use Case navigate to either of the following:
-
Using only the Evaluations view:
-
Will restrict evaluations.
-
Will enable the playback of the associated interactions.
-
Will not restrict the interactions the user will see in the Interactions application, but will restrict the "on the fly" quality-related actions that could be triggered from the Interactions. An example would be where supervisors can play back all interactions but only take the quality action for the interactions that belong to their teams.
-
-
In addition, if you want your agents to see only their own interactions in their Interaction application use Interaction View.
-
Minimize the maintenance of multiple QPs and let Role-Based Access Control (RBAC) restrict who is doing what with one or more QPs.
As an example:
-
3 supervisors or evaluators
-
3 teams defined
-
3 views—one per team
-
Associate the relevant view to the appropriate supervisor by the relevant team.
-
-
1 QP with all the supervisors and all the teams. RBAC will make sure each supervisor is getting only the evaluations relevant to their team.
-
-
Users are not be able to evaluate themselves since they don't usually have the Evaluation view on their own team.
Create Hours-of-Operation-Based Views
Create views based on hours of operation to restrict access to those records. Only select the records you want users assigned to the view to be able to access. All the records not included in the view will be hidden from those assigned users.
- Click the app selector and select Admin.
- Go to Security Settings > Views.
- Click New View.
- Enter a View Name and a Description. For the description, use plain text only. URLs or markup such as HTML will not be saved.
- Select Hours of Operation as the Type to restrict access to hours of operation records.
- In the Hours of Operation drop-down, select the records you want users to be able to view.
- Click Create.
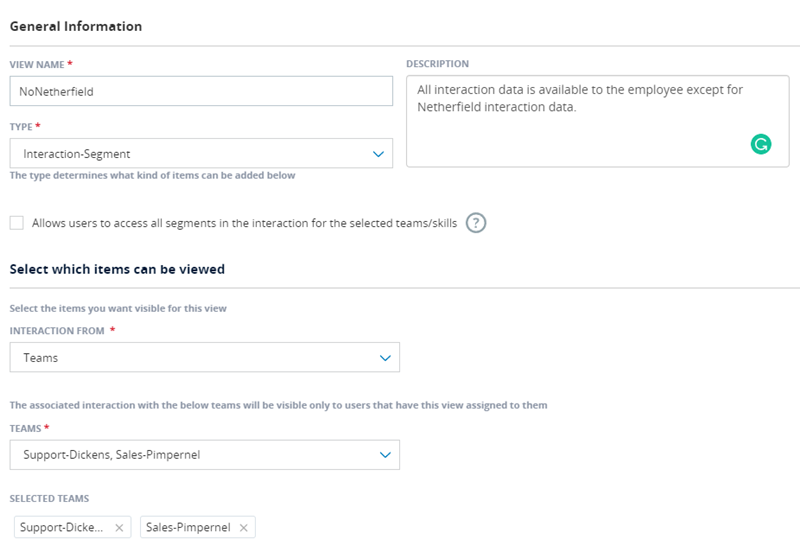
Create Interaction-Segment-Based Views
Create views based on interaction segments to restrict access to data related to segments![]() A stage in the interaction, such as when a call is transferred to another agent, or agents speak internally to consult.. This includes recordings and chat transcripts routed through ACD as well as data from any digital channels in Digital Experience (DX). Only select the segments you want users assigned to the view to be able to access. All the segments not included in the view will be hidden from those assigned users.
A stage in the interaction, such as when a call is transferred to another agent, or agents speak internally to consult.. This includes recordings and chat transcripts routed through ACD as well as data from any digital channels in Digital Experience (DX). Only select the segments you want users assigned to the view to be able to access. All the segments not included in the view will be hidden from those assigned users.
- Click the app selector and select Admin.
- Go to Security Settings > Views.
- Click New View.
- Enter a View Name and a Description. For the description, use plain text only. URLs or markup such as HTML will not be saved.
-
Select Interaction-Segment as the Type to restrict access to data related to segments
 A stage in the interaction, such as when a call is transferred to another agent, or agents speak internally to consult..
 - In the Interaction From drop-down, select Teams or Skills.
- In the Teams drop-down, select each team whose data you want employees to be able to access when they are assigned to this view.
- In the Skills drop-down, select each skill whose data you want employees to be able to access when they are assigned to this view.
- Click Create.
Create Role-Based Views
Create views based on roles to restrict access to data related to roles, such as Supervisors or Agents. Only select the roles you want users assigned to the view to be able to access. All the roles not included in the view will be hidden from those assigned users.
- Click the app selector and select Admin.
- Go to Security Settings > Views.
- Click New View.
- Enter a View Name and a Description. For the description, use plain text only. URLs or markup such as HTML will not be saved.
-
Select Role as the Type to restrict access to data related to roles.
- In the Roles drop-down, select each role whose data you want employees to be able to access when they are assigned to this view.
- Click Create.
Create Script Folder-Based Views
These views allow you to restrict access to the folders in NiCE CXone where Studio scripts are stored. For each view, only select the folders that you want to be accessible to users assigned to that view. Use views in combination with workflow stage permissions to manage the security of your scripts. Users can see scripts and script folders they have access to on the Scripts page in Studio.
Views are only supported in NiCE CXone Studio. They are not supported in Desktop Studio.
- Click the app selector and select Admin.
- Go to Security Settings > Views.
- Click New View.
- Enter a View Name and a Description. For the description, use plain text only. URLs or markup such as HTML will not be saved.
- Select Script Folders as the Type.
- Click Open Script Folder Options.
- On the Select Script Folders window, click each script folder that you want users with this view to be able to access.
- Click Confirm.
- Click Create.
Create User-Based Views
Create views based on users to restrict access to data related to other employees in your organization, such as their names. You can control access according to hierarchies, scheduling units, or teams. Only select the hierarchy or node, scheduling unit, or team you want users assigned to the view to be able to access. Everything not included in the view will be hidden from those assigned users.
- Click the app selector and select Admin.
- Go to Security Settings > Views.
- Click New View.
- Enter a View Name and a Description. For the description, use plain text only. URLs or markup such as HTML will not be saved.
-
Select User as the Type to restrict access to data related to users.
- In the Users From drop-down, select Hierarchies, Scheduling Units, or Teams.
- In the Hierarchies / Nodes drop-down, select which parts of the hierarchy you want employees to be able to access when they are assigned to this view. You can expand or collapse each section of the hierarchy until you find the part that you need. Selecting a parent node will provide access to that node and all of its descendant nodes. The number of subnodes is listed next to each parent node in the drop-down.
- In the Scheduling Units drop-down, select each scheduling unit whose data you want employees to be able to access when they are assigned to this view.
- In the Teams drop-down, select each team whose data you want employees to be able to access when they are assigned to this view.
- Click Create.
Create Workflow-Data-Based Views
Create views based on workflow data to restrict access to those records. Only select the records you want your assigned users to be able to view. All the records not included in the view will be hidden from those assigned users.
- Click the app selector and select Admin.
- Go to Security Settings > Views.
- Click New View.
- Enter a View Name and a Description. For the description, use plain text only. URLs or markup such as HTML will not be saved.
- Select Workflow Data as the Type to restrict access to data related to workflow data.
- In the Workflow Data Items drop-down, select the records you want users to be able to view.
- Click Create.
Create Global View
The Global View is designed to enforce data accessibility by Teams and Skills. It ensures users have access only to the data they are allowed to view, regardless of which entity they are querying about.
Data access is restricted by Teams and Skills. This ensures users can only access data relevant to their assigned teams and skills as defined in the User Hub.
Global View is applicable to NiCE CXone Actions, Copilot for Supervisors and Dashboard.
This view provides a streamlined and secure way to manage data visibility. It ensures users have access only to the data they need.
To create a Global View
-
Click the app selector
and select Admin. -
Navigate to Security Settings > Views.
-
Click New View.
-
Enter a View Name. Optionally, add a Description.
-
From the Type drop-down, select Global.
-
Choose Skills or Teams from the View Data From drop-down to limit data access.
-
Click Create. The new view appears in the Views list.
A Global View takes around 45 minutes to become effective after an assignment.
Users can access data from various NiCE CXone applications, such as QM, PM, and Interaction Analytics (CXone), without being limited by individual application restrictions. However, accessing data from Copilot for Supervisors and Actions depends on the Global View configuration in the Admin application.
Assign Views to Employees
You can assign views to employees manually in the employee profile. You can also assign them with the bulk upload employee template.
- Click the app selector and select Admin.
- Click Employees.
- Locate the employee you want to assign a view to. Click to open the employee profile.
- Click Security.
-
In the Views drop-down, select the views you want to give the employee.
- Click Apply, then click Save.
- Continue assigning views to employees as needed.
