

Hierarchies let you create visual representations of your organization. They show the relationships between organizational units (OUs) and teams using a tree structure. This enables your users to see how separate entities work together in your organization. You can also use primary hierarchy data to filter in BI reports and recordings.
Key Facts About Hierarchies
-
You can create two types of nodes in your hierarchy chart: organizational units and teams.
-
Each type of node has a different color assigned to it by NiCE CXone, so you can more easily identify the nodes in your hierarchy.
-
Team nodes automatically include all users assigned to them as members of the node.
-
Organizational units (OUs), unlike teams, are unique to hierarchies. They are used to represent different units within your organization. For example, you could set up different OUs for your Product and Services teams. You can add members to OUs, but each user may only belong to one OU per hierarchy.
-
You can create multiple hierarchies for your environment. For example, you could have one hierarchy for your current organizational structure, then set up a separate one to test out other structures.
-
You can set one of your hierarchies as primary. You can use your primary hierarchy to filter data in BI Reports and Recording Management (CXone). You can only have one primary hierarchy. Setting a primary hierarchy is permanent.
-
If you have to edit your primary hierarchy, you should do so on a regular cadence to avoid data discrepancies.
-
You can create views based on hierarchies.
-
You can search for specific nodes within your hierarchy using the Search bar. If found, the node you search for is automatically placed in the center of the hierarchy window. For the search to yield results, you must type the name of the node exactly. Search is case-sensitive and must contain the entire node name. If you have multiple nodes with the same name, the first search result will be placed in the center of the window. For this reason, you shouldn't create multiple nodes with the same name.
-
Hierarchies are limited to 5,000 nodes and 12 levels.
Complete each of these tasks in the order given to set up a hierarchy.
Create a Hierarchy

- Click the app selector
 and select Admin.
 - Click Hierarchies.
-
Click New Hierarchy.
-
Enter a Name for the hierarchy.
-
In the hierarchy chart, click Edit
 in the toolbar to the right of the Untitled1 organizational unit node.
 -
Enter a descriptive Name for the main organizational unit node (OU). Click Save.
-
Click Create.
Add a Child Node
You can only add child nodes to organizational unit nodes. You cannot add child nodes to a team node.
- Click the app selector and select Admin.
- Click Hierarchies.
-
Click the hierarchy that you want to edit or click New Hierarchy.
-
Click the organizational unit node you want to add a child node to.
-
In the toolbar to the right of the node, click Add Child
 ic.
ic. -
Add the type of node you want in your hierarchy:
-
Add Organizational Unit: After you add an organization unit node (OU), enter a unique Name for the node. Adding multiple nodes with the same name makes it difficult to use search and can confuse the system.
-
Add Team: After you add a team node, select the team you want the node to represent from the Add Existing Team drop-down.
-
-
Click Add.
Assign Users to a Node
When you add a team node, the users who belong to that team are automatically added to the node as members. If you want to add other members to an organizational unit node (OU), you must do so manually.
Each user may belong to only one OU. If you add a user to an OU who is already part of another one, the user is automatically removed from the old OU and added to the new one.
- Click the app selector and select Admin.
- Click Hierarchies.
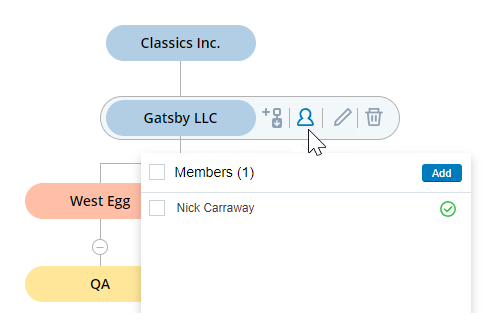
- Click the organizational unit node you want to add members to.
- Click the Members
 in from the toolbar to the right of the node.
 - Click Add.
- Select the users you want to assign to the node.
- Click Save.
Set a Primary Hierarchy
You can only set one hierarchy as primary. This action is permanent. Once set, you cannot change it back to a non-primary hierarchy, but you can still edit it. You can use data from your primary hierarchy in BI Reports and Recording Management (CXone). Before you can do so, you have to set your primary hierarchy so NiCE CXone can send data to those applications.
- Click the app selector and select Admin.
- Click Hierarchies.
-
Click the hierarchy that you want to set as primary.
-
Select Set as Primary Hierarchy.
-
Click Save.
Edit a Primary Hierarchy
You can edit your primary hierarchy after you set it. You should only do so on a regular cadence because editing it can result in data discrepancies in reporting. For example:
-
You filter a report by hierarchy to analyze data across several months. Halfway through that time period, someone on your team adds two new users to the organizational unit node you're reporting on. In this case, the second half of the report would include data from two additional users, potentially skewing your results.
-
A member of your team deletes a level in your primary hierarchy. This level will no longer appear in reports and searches because the hierarchy only shows it as it is currently. However, if the date range you are searching with includes a time when the deleted level did exist, the user may see it in the results.
Edit a Hierarchy with Drag and Drop
You can drag and drop branches to different parts of the hierarchy. Only the selected node and its descendants move when you drag and drop. You can manually delete and re-add child nodes under other parents if necessary.
- Click the app selector and select Admin.
- Click Hierarchies.
-
Click the hierarchy that you want to edit.
-
Find the node you want to move. If you have trouble finding a node, enter the exact name of the node in the Search bar at the top of the screen, and click Search. The first search result found will automatically be placed in the center of the screen. You can also collapse and expand sections on your hierarchy and zoom in and out to make finding nodes easier.
-
Click and drag the node. All the node's descendants will move with it.
-
Drop the selected node on the parent node you want to assign it to. You cannot drop branches on a team node. Team nodes cannot have descendants.
-
Click Save.