

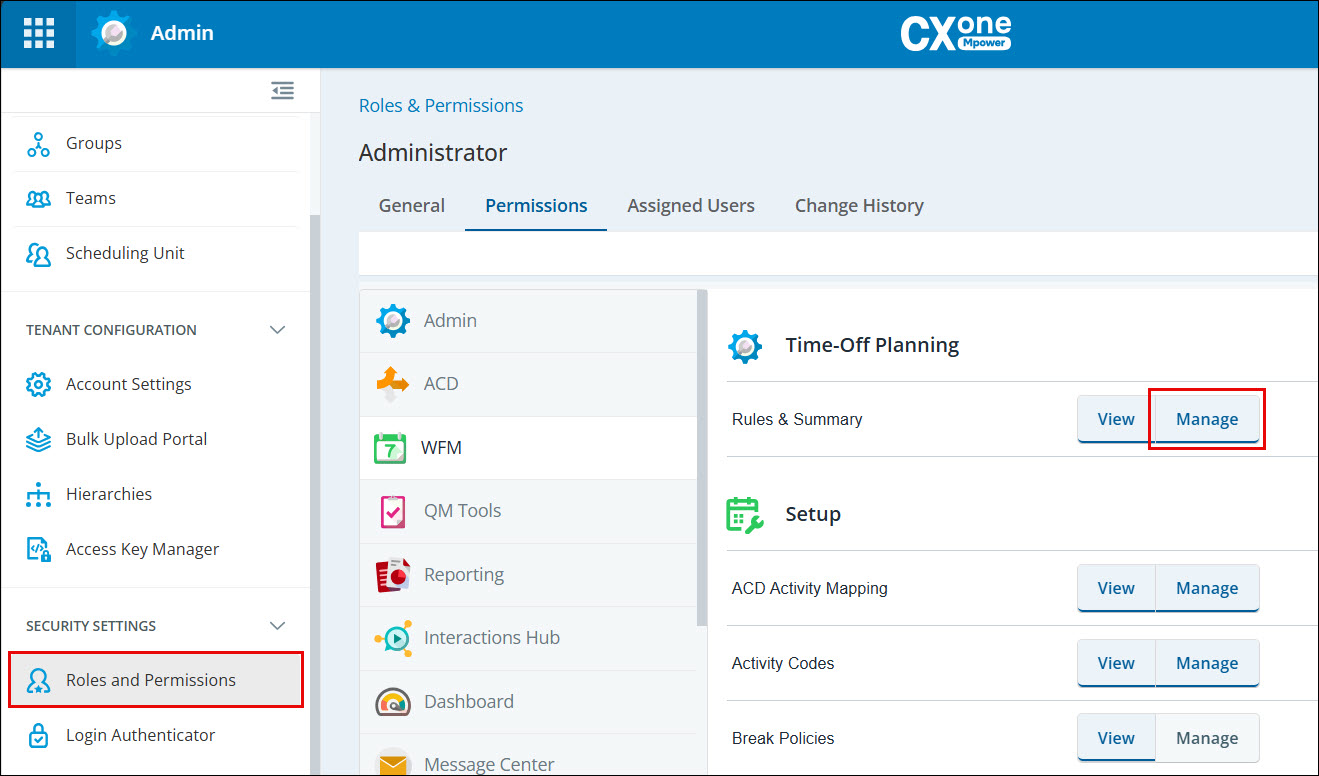
As part of managing your employees, you will receive requests for time off, schedule changes, and shift trades. In the Manage Requests page, you can manage the pending requests, and review what was approved and declined. When an agent submits a request, a notification is sent to all managers who have the Manage option enabled in the Permissions tab (see the screenshot for details). This option must be enabled for managers to receive notifications.
When you review time-off requests, you must have come across some that you know you'd accept. Or maybe an agent asked for time off on a day that you need every employee from your staff. Why waste time handling these requests? With the auto-approval rules, you can set rules that will trigger an automated response for them.
Based on conditions you define in the rules, the requests are automatically approved or declined. You can also define that certain requests are handled manually.
Manage Requests
The Manage Requests page displays requests made by agents, with 10 requests shown per page. Use the pagination controls to navigate through the list of requests. Here you can manage the pending requests, and review what was approved and declined in the selected duration.
When the Manage Requests page opens, it automatically selects a default scheduling unit. If a default scheduling unit is not defined, the page shows the scheduling unit or group that is assigned to the manager.
In the Activity Requests tab, the requests are grouped by dates. Six date tiles are shown at a time. To view additional dates, use the arrows at the end of the tiles. The left arrow will not appear unless there are date tiles available to scroll left. You can filter the requests by scheduling units, skills, activity codes, agent name, and date. By default, only pending requests appear. If an agent has multiple statuses for their requests (e.g., approved, pending), only the requests matching the selected filter will be shown. For example, if the manager selects the ‘pending’ filter, only the pending requests will be visible, and approved requests will not be shown.
If an agent has made multiple requests for the same day, the requests are grouped together only if they are consecutive. For example, an agent asked for time off between 10 and 11 and then asked for time off between 11 and 12. Both requests are grouped together, asking for time off between 10 and 12. If the requests aren't consecutive, each one is presented separately. You can approve or decline each request individually.
Requests have different statuses based on the action performed or not performed on the requests:
-
Pending: Request pending action from the supervisor.
-
Approved: Request approved by the supervisor.
-
Declined: Request declined by the supervisor.
-
Discarded: This status is related to schedule change requests. If an agent has a pending request and the schedule is modified so that the request is no longer valid, the request is discarded. The agent receives a notification.
-
Canceled—Approved Request: Approved time-off request canceled by an agent. This status is created as a new status over the related time-off request.
Requests that are canceled post-approval appear individually along with the submitted request.
When an agent submits a schedule request and the schedule is modified before the request is approved, the request remains in Pending status as long as it is still valid.
If a manager adds, removes, or edits an in-office activity and the requested change still applies, the manager can approve the request without asking the agent to submit a new one. If the schedule change makes the request invalid, the request is discarded.
Click between the dates to see the requests and the net staffing for that day. Employees with pending requests are listed first, from newest to oldest.
Note that, for inactive agents, only the date tile of the pending request will be visible without any details below.
The date and time are adjusted according to the selected time zone, except for full-day requests. When you look at a full-day request, you'll always see the date the agent requested to take off.
If you approve a request, your employee's schedule gets updated with the change. If you decline, their original schedules will remain unchanged.
You can only see the users in the scheduling units (or teams) you have permission to see in the view assigned to you.
When you search for an agent after selecting a scheduling unit, the agent will be shown only if they belong to the selected scheduling unit. If you are unsure about the scheduling unit to which the agent belongs, search for the agent without selecting a scheduling unit.
Instead of reviewing out-of-office requests one by one, you can create Approval Rules that will handle them.
Time-off requests can be approved only if the schedule is generated with a weekly rule. If an agent's schedule changes after approving a partial time-off request, the time off is adjusted to the new schedule. Keep in mind, if the schedule changes again, review the requested time off to make sure that the full requested time is considered.
John is scheduled to work from 9:00 to 17:00. His request for time off between 14:00 and 17:00 was approved. However, you generated a new schedule, and now John is supposed to work from 8:00 to 16:00. In this case, only two hours are deducted from John's allocation instead of three.
When you perform an action on the Manage Request page, all other actions are disabled until the data loads. This ensures optimal page performance.
Approve or Decline Activity Requests
-
Go to WFM > Requests > Manage Requests. Select the Activity Requests tab.
-
Click on the date with the request. By default, only pending requests appear.
From each row, you can find additional information about the request:
-
Click on the activity name to compare the requested schedule with the current one. The date and time are adjusted to the selected time zone.
-
The icon next to each activity displays the type of change the agent requested.
 See icons
Icon Meaning 
The agent edited the time for this activity. 
The agent added this activity. 
The agent removed this activity. -
If the agent added a comment to the request, hover over the comment icon
 to view it.
 -
To open the Schedule Manager to the request date, with all agent schedules visible, click View in scheduler. The date and time are adjusted to the selected time zone.
-
-
Click either Approve or Decline for the request.
-
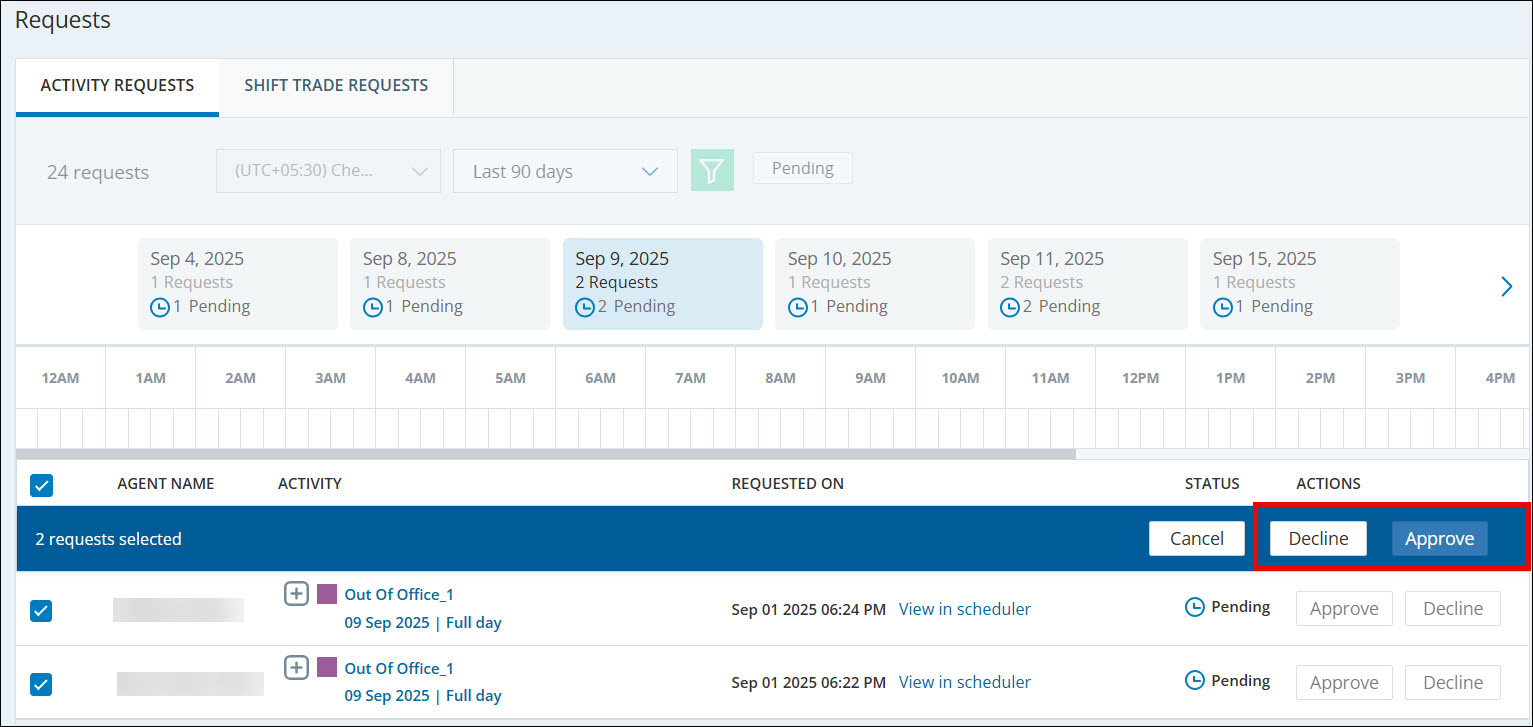
You can approve or decline multiple requests in one action using checkboxes in the visible list of requests in Activity Requests grid, as follows:
-
Click the Select All checkbox in the header row or select individual checkboxes for the requests you want to process.
-
After selecting more than one request, the Approve and Decline buttons appear below the header.
-
Click Approve or Decline to apply the action to all selected requests.
If a request fails during a bulk operation, it returns to the Pending state. A warning icon appears, and hovering over it displays the reason for the failure.
-
-
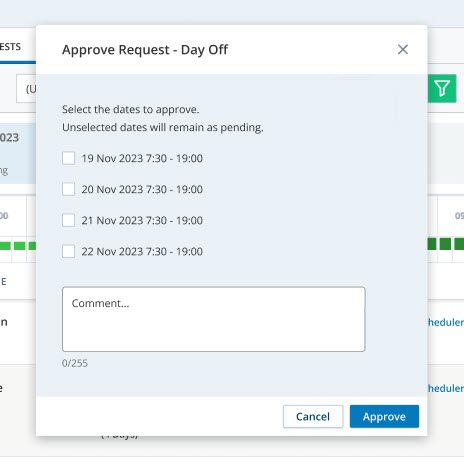
If the request spans multiple days, you can select one or more than one dates to cancel or approve. You can add a comment for the agent.
-
Select the dates you want to approve or decline. Unselected dates are considered as pending.
The agent receives a notification and an email that the request status was updated in their schedule.
Shift-Trade Requests
-
Click the app selector
 and select WFM.
 -
Go to Requests > Manage Requests.
-
Select the Shift-Trade Requests tab.
The pending requests are listed first. You'll see the last 100 requests, sorted from newest to oldest. - Requests have statuses depending on the action performed or not performed on the it.
New: Request pending action from the supervisor.
Approved: Request approved by the supervisor.
Declined: Request declined by the supervisor.
-
Click View trade to see the shifts each agent wants to trade, side by side.
-
For partial-day shift trades, the portion of the shift being traded must be equal in length for both agents, a one-to-one match. The overall shift lengths can differ, and the start and end times don’t need to match.
-
For full-day shift trades, shifts can vary in length and timing, as long as each agent is available to work the assigned shift.
-
-
Click either Approve or Decline for the request.
Each agent receives a notification and an email that the request status was updated in their schedule.
Full-Day Out of Office
When employees take a day off, the hours that are reduced from their time-off balance are based on the definition of a full workday. You define the length of a full-day activity when you create a weekly rule.
Let's say you defined that your shifts are eight hours long. When an employee is out of office for a full day, eight hours will be reduced from their balance.
Defining the length of a full-day activity is effective in many cases, such as:
For example, the shift length of your full-time employees is eight hours. But you also have five-hour shifts for students. When the full-time employees take a day off, eight hours are reduced from their balance, while five hours are reduced for the students.
The shift is removed from the agent's schedule. The out-of-office hours are calculated from the defined shift in weekly rules, minus the non-working activities (such as lunch breaks).
For example, John has an eight-hour shift scheduled for next Monday. He has an hour-long break during that shift.
John requested to take Monday off, and the manager approved. Instead of eight hours being reduced off John's balance (the hours of his shift), seven hours are reduced (the hours of his shift minus the non-working activities).
For example, Jane has an eight-hour shift scheduled from 10 in the evening on Monday, until 6 in the morning on Tuesday.
Jane requested to take Tuesday off. If her manager approves, Jane's schedule will show that she is out of office on Monday between 10 until midnight, and on Tuesday until 6 in the morning.
If Jane had a non-working activity in her scheduled shift, such as a lunch break, her out-of-office hours are calculated from the defined shift in weekly rules, minus those non-working activities.
Keep in mind, if you don't define the full-day settings for a weekly rule, the hours of a full-day activity are taken from the scheduling unit's operating hours. You can see the hours in Admin > Scheduling Unit.