

My Zone is your space to perform tasks such as:
-
View schedule
-
Schedule requests
-
Add/edit activities
-
Set shift preferences
-
Trade shifts
-
Bid on shifts
-
See notifications
-
Check your time-off balance
-
Request self-service
My Zone pages are accessibility compliant with the VPAT document (Voluntary Product Accessibility Template) available on request.
View Your Schedule
You'll be notified when your manager has a new schedule for you. The new schedule will appear on the My Schedule page in My Zone. You can filter your schedule based on a date or an agenda and view the schedules of other employees.
To view your schedule:
-
Go to My Zone > My Schedule, or from MAX, go to WEM > My Schedule.
-
Select daily or weekly view.
 How to read your schedule
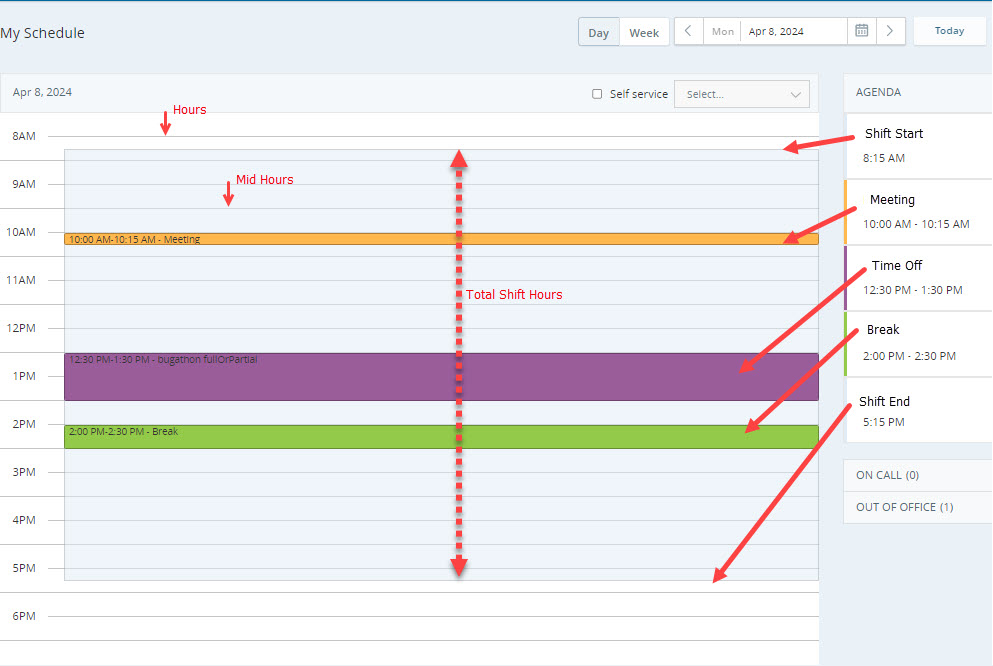
Your shift is marked shaded on the My Schedule page. Hours are displayed from top to bottom. Each hour has an hour line next to it. Mid-hours also have distinct lines. Activities within the shift are marked in different shades, depending on the activity. You can find details of all activities during the shift under the Agenda.
-
Select a date using the date picker. This lets you check your schedule for any upcoming day or week depending on selected view. The days with the published schedule are marked with the green dot in the date picker.
-
Click Today to move quickly back to the current schedule date.
-
Click On Call to view employees who are currently on-call. This is especially useful if you need to forward or escalate a ticket.
-
Click Out of Office to view which employees are not working that day. This can help if you're planning to request days off. You may be more likely to be approved for time- off if other employees are available to replace you.
-
Define Your Preferences
You can define your preferences for shifts and time-off directly from the My Schedule page.
To define preferences:
-
Go to My Zone > My Schedule, or from MAX, go to WEM > My Schedule.
-
Click Options
 > Shift Preferences.
 -
Select your preferred shift from the drop-down list for each day in the Shift Preferences.
-
In the Time-Off Preferences area, drag and drop the listed days of the week to the available priority spots.
For example, if your preferred day off is Monday, drag and drop the Mon date to the Priority 1 slot. If your next preference is Wednesday, drag the Wed date to the Priority 2 slot, and so on.
-
Click Save.
Your preferences will be saved and taken into account when schedules are generated.
Schedule Request
You can view the status of your request here. The request status you can see based on the action performed on your request:
-
Pending: Request pending action by the supervisor.
-
Approved: Request approved by the supervisor.
-
Declined: Request declined by the supervisor.
-
Discarded: This status is related to the schedule change request. If an agent has a pending request and the schedule gets changed, the request is discarded, and the agent is notified.
-
Canceled: Request canceled by an agent before approval by the supervisor.
-
Canceled-Approved Request: Approved time-off request canceled by an agent.
Trade and Accept Shifts
You can send shift trade requests to other employees. An employee who receives the request can accept or decline the shift trade request.
Your manager needs to enable shift trading for your account. Then only you can do shift trading with an agent from your or another scheduling unit.
For example, you have a morning shift coming up on Monday. You need that morning for personal reasons and don't want to take a vacation day. A fellow employee doesn't mind trading their shift with yours. You both need to meet validations for the trade to succeed.
In addition to trading shifts, you can trade your weekly day off with another agent. This allows you more flexibility without affecting the staffing needs.
Trade a Shift
You can trade a full-day or partial-day shift. Different options for trading a shift are available based on your organization’s configuration.
You can trade shifts with agents who:
-
Having shifts falling on the same day as yours or on different days.
-
Belong to your scheduling unit or other scheduling units.
Shift trades must be enabled in the configuration and meet the required validations to use it.
Required validations based on the configuration:
-
Valid minimum time between the trade request and the shift start time.
-
Valid maximum days between the trade request and the shift start time.
-
Shift to trade must not contain non-tradable activities. In this case, a partial-day trade could be possible if it is enabled in the configuration.
-
When you do a full-day trade request, the maximum difference between the shift lengths must be valid as per the configuration.
-
Partial-day trades must be of equal length.
You can make only full-day trade requests when:
-
Partial-day trades are disabled from the configuration.
-
Full-day trade request is pending for the same shift.
You can send multiple trade requests for the same shift based on the configuration. You need not cancel the previous request.
You can make only partial-day trade requests when:
-
There is a pending partial-day trade request for the same day.
Based on the configuration, you can send multiple trade requests for the same shift hours. You need not cancel the previous request.
-
The shift you are trading contains non-tradable activities.
In this case, a partial-day trade can be submitted. You can trade segments of the schedule that do not contain non-tradable activities.
-
Not all the hours from your shift meet the minimum advance notice validation.
Let’s say the minimum advance notice is configured as 3 hours. Your shift is from 1:00 PM to 8:00 PM on a particular day. You make a shift trade request on the same day at 12:00 PM. In this case, you won’t be able to trade the first 2 hours of the shift because of the minimum advance notice validation. This means you can trade partial-day, not full-day.
For trading a shift:
-
Go to My Zone > My Schedule, or from MAX, go to WEM > My Schedule.
-
Use the date picker to go to the shift date you would like to trade.
-
Click Options
> Trade Shift. The trade shift window pops up. Trading shift details are selected by default. -
Define your preferences for the shift you want in exchange in the Preferred shift day and time:
-
From the drop-down, select your preferred days.
-
Set the preferred time.
-
-
Click Find Matching Shifts.
You will get the corresponding validation error message if there are validation issues with your shift selection or the Preferred shift and time preferences. Modify your preferences based on the error message.
If all the trade preferences are valid, all matching shifts appear in the results area.
All of the search results from the current search are disabled when you modify:
-
Preferred shift and time preferences
-
Trading shift details
The number next to the Search agents field is the total number of matching shifts available to trade, based on your preferences. You can search for the specific agents you want to send the shift trade request using the Search agents field.
-
-
Select the agents you want to send the trade request by selecting the check box next to the agent’s name. The maximum number of agents you can choose depends on the shift trade configuration. The administrator sets this configuration.
-
To view selected agents only, switch the toggle on Show selected only.
-
Click the Submit Trade Request button to send the request to the selected target agents. A message shows the status of the trade request.
Based on the trade request submission status, messages:
-
Trade request sent successfully to all the selected agents.
This message is generated when a trade request is sent to all the selected agents.
-
Trade request sent successfully to <number of agents> agents.
This message is generated when a trade request is sent to a few of the selected agents.
Suppose there is a schedule change by the time you select target agents to send the trade request. The target agents whose schedules got changed might not receive your trade request. This means not all the target agents you select get the trade request. This is a case of partial success.
Technical exceptions can also be responsible for partial success.
-
Trade request failed.
This message is generated when a trade request is not sent to any of the selected agents due to a technical exception.
All target agents who receive the trade request get the notification.
You can see your pending shift trade request under the Schedule Request page of the corresponding date.
Once any target agent accepts your request, a manager must approve the trade.
After approval, you get the notification of the shift trade acceptance in My Zone.
You can cancel your shift trade request at any time before any of the target agents accepts it.
-
-
To cancel the request:
-
In My Zone > My Schedule, go to the date on which you made the shift trade request.
-
Go to Schedule Request.
-
Select the shift trade request and click Cancel.
-
Accept a Trade
-
Click the notification to see the received trade request.
This takes you directly to the day of the shift that your fellow employee requested.
-
Click View Request to see the two shifts side-by-side. This shows you which shift you'll be giving and which shift you'll be getting in return.
-
Accept or Decline the request.
Keep in mind that the trade will not be finalized until your manager has reviewed it and approved it. Once it has been approved, you'll get a notification letting you know.
Trade the Weekly Day Off
The key features of this trade are:
-
Automatic and Manual Approval Processes: The system supports both automatic and manual approval workflows.
-
Auto Approval: If auto-approval is enabled, the first target agent who accepts the trade triggers automatic approval, and all other pending requests are declined.
-
Manager Approval: If manager approval is required, all accepted requests are sent to the manager for final approval. The manager can view trade details and approve or deny the request.
-
-
Skill Matching: Ensures that agents with the required skills are matched during the trade process.
-
Comprehensive Notifications: Both source and target agents receive notifications at various stages of the trade process.
To trade a weekly day off:
-
Go to My Zone > My Schedule, or from CX Agent WEM > My Schedule.
-
Use the date picker to select the shift date you would like to trade.
-
Click Options
> Trade. The trade shift window pops up. Trading shift details are selected by default. -
Select Day-off as Trade Type and select a date you want as day off to trade.
-
Define your preferences for the shift you want in exchange in the Preferred shift day and time:
-
From the drop-down, select your preferred day off.
-
Set the preferred time frame for shift.
-
-
Click Find Matching Shifts.
You will get the corresponding validation error message if there are validation issues with your shift selection or the Preferred shift and time preferences. Modify your preferences based on the error message.
If all the trade preferences are valid, all matching shifts appear in the results area.
All of the search results from the current search are disabled when you modify:
-
Preferred shift and time preferences
-
Trading shift details
The number next to the Search agents field is the total number of matching shifts available to trade, based on your preferences. Use this field to search for specific agents to send the shift trade request.
-
-
Select the agents you want to send the trade request to by checking the box next to their names.
-
Click Submit Trade Request to send the request to the selected target agents.
All target agents who receive the trade request get the notification.
You can see your pending shift trade request under the Schedule Request page of the corresponding date.
After approval, you get the notification of the shift trade acceptance in My Zone.
You can cancel your shift trade request at any time.
-
To cancel the request:
-
In My Zone > My Schedule, go to the date on which you made the shift trade request.
-
Select the shift trade request and click Cancel.
-
Request Schedule Changes
You can make changes to your schedule and submit them as a request. The requested changes are sent to your manager. When the manager approves, you'll see the updates in your schedule.
You will be notified once your request gets approved. The notification is sent even if the schedule for that date is not published.
Add Activities
-
Go to My Zone > My Schedule, or from MAX, go to WEM > My Schedule.
-
Click Add Activity.
You can only add activities to the published days unless you request time off.
-
Select an activity from the drop-down list in the New Activity window.
-
Define the Start and End times for the activity.
-
If you're requesting time off for one or more full days, select the All day checkbox and define the Start and End dates.
Keep in mind:
-
You won't be able to request time off at all (partial or full) if there are no days left in your time-off balance.
-
You can request partial or full day time-off that fall within your schedule. If you are requesting a partial or full day time-off which is not inside your schedule, it will be discarded.
-
Partial time off is deducted according to the start of interval (such as 12:00, 12:30, and 12:45). If your time off starts in the middle of an interval, you may be charged for the full interval. For example, you took partial time off from 9:20 until 12:00. The deducted time off is from 9:15.
You can choose to enter a Comment. You might use the comment box to explain why you are requesting the change.
-
-
Click Add.
The change you made will be blocked off in your schedule pending approval.
Keep in mind, if your manager sets an automatic decline rule for the activity you're requesting, you won't be able to complete your request. The Add button will be grayed out.
-
Click Submit Request at the top of your schedule. The changes are sent to your manager.
You can add several activities before finalizing the request and submitting it.
You'll get a notification when your manager approves or declines the request. If your changes are approved, they'll be added officially to your schedule. If they are declined, the pending change will be removed.
Click View Requests to view your schedule before and after the changes. You can also view the status of all of your requests on the Schedule Requests page.
Cancel pending requests from your schedule by clicking Cancel All.
If you want to cancel changes after approval, speak to your manager.
Your schedule only displays one hour before the first activity in a day, and one hour after the last activity.
If you want to add an activity on an hour you cannot see, click Add Activity anywhere else on the schedule and change the hour manually in the New Activity window.
Edit, Delete, Remove and Cancel Activities
-
Go to My Zone > My Schedule, or from MAX, go to WEM > My Schedule.
-
Use the date picker to open the day you want to edit.
-
To delete a partial day off activity, click on the activity and select Remove Activity. In the remove activity window, click Remove.
-
To cancel a request, click on the activity and select Cancel Request. This applies to both pending and approved time-off requests.
-
To edit an activity, click on the activity and select Edit Activity Time.
-
In the Edit Activity window, update the Start and End times.
-
You can choose to enter a Comment. You might use the comment box to explain why you are changing the time slot for this activity.
-
Click Save.
The changes you made will appear in your schedule, pending approval.
-
Click Submit Request at the top of your schedule to send your changes to your manager.
You can edit or remove several activities before finalizing the request and submitting it.
You'll get a notification when your manager approves or declines the request. If your changes are approved, they'll be finalized in your schedule. If declined, the pending change will be removed.
Click View Requests to view your schedule before and after the changes. You can also view the status of all of your requests on the Schedule Requests page.
Cancel pending requests from your schedule by clicking Cancel All. You can cancel the request for a particular day or if it's a multi-day request, you can cancel all pending requests.
If you want to cancel changes after approval, speak to your manager.
Check Your Time-Off Balance
If you try to request time off and cannot, or are just curious about how many days you have remaining, you can check your balance from your schedule page.
-
Go to My Zone > My Schedule, or from MAX, go to WEM > My Schedule.
-
Click Options
> Time-Off Balance. Your Time-Off Balance window opens. The grid shows you a breakdown of each Time-Off Activity, along with how many days you have available in Total, how many days you've Taken, and how many you have Scheduled and Remaining.
Bid on Shifts
Your managers can create weekly shift patterns for you to bid on. These are combinations of shifts for possible weekly schedules. Each possible weekly schedule is made up of a collection of different shifts. You can bid on which schedule you want the most.
When your manager opens a bid, you'll receive a notification. You can then bid on the available weekly schedules.
Once the bid is closed, you'll be scheduled based on the priorities you set in your bid, as well as your rank and seniority.
If two agents request the same shift, the one with the higher rank will have preference. If the agents have the same rank, the one with the greater seniority will have preference. If they also have the same seniority, the one who sent the first bid will have preference.
To bid on shifts:
-
Go to My Zone > Shift Bidding, or from MAX, go to WEM > Shift Bidding.
-
Each week available for bidding is made up of rows, with each row displaying a different possible weekly schedule. Drag and drop the rows in the order of your preference from top to bottom.
-
Click Submit Bid.
Your bid will be submitted to your supervisor and considered when assigning your schedule.
Interval Level Self-Service Requests
This feature is available to WFM Advanced license users. Self-service requests are available for:
-
Future times or dates.
-
Published days.
Self-service allows you to request time off, work extra hours, and self-swap when available. It automatically alerts you of available time off, extra hours, and self-swap opportunities. Upon availing of a self-service, all your relevant interconnected schedules are automatically updated.
Based on staffing conditions, self-service intervals are either auto-approved or require manager approval. Learn more about Approval Rules.
Permissions for Self-Service
For time-off
-
Personal time off request must be ON. Learn more in WFM Permissions
For extra-hours and self-swap
-
View personal schedule must be ON
-
Personal time off request must be ON
Learn more about these in WFM Permissions
-
Add/edit activity be enabled. Learn more in Activity Codes
-
Agents must have the required skill to work extra hours or do self-swap
Self-Service: Time-Off Requests
This feature requires the advanced license.
Use this self-service to add available time-off intervals to your schedule.
Let us consider a case.
Emma works as a call center agent. She receives a call from her family about a family emergency. Emma needs to head home to attend to the situation. However, she doesn’t want to take the entire remaining day off. Emma requires a flexible solution to handle the emergency without disrupting her work schedule. Emma utilizes the time-off self-service feature provided by the call center. Here’s how it works:
a. Short Time-Off: Emma can request a short time off based on her needs. Instead of taking the entire day off, she specifies the duration required (e.g., a few hours). This allows her to attend to the family emergency without affecting her entire workday.
b. Instant Approval: Emma doesn’t need to wait for manual approval. If the time-off request meets predefined conditions (e.g., availability of backup agents), it is auto-approved. This ensures swift resolution and minimizes disruptions.
c. Breaks During Shifts: Emma can also use the self-service feature to take short breaks during her shifts. Whether it’s a quick breather or a personal matter, she can manage it seamlessly. The system ensures that staffing remains adequate during peak hours.
Benefits: Emma balances work and personal emergencies efficiently. On the other hand, call center maintains staffing levels without compromising service quality. In summary, the time-off self-service feature creates a win-win situation for Emma and the call center, allowing flexibility while ensuring operational continuity.
All the self-service time-off intervals are 30 minutes by default.
To add the time-off self-service:
-
Go to My Zone > My Schedule.
-
Select Day for daily view or Week for weekly view.
-
Click the Self service check box to activate the associated drop-down menu. From the list of options in the self-service drop-down menu, choose Time-off. All available time-off intervals appear on your schedule
Intervals are auto-approved or need approval depending on the conditions set in the Approval Rules:
-
 : Auto-approved
 -
 : Need approval
Each time-off interval is 30 minutes.
-
-
Click the time-off interval you want to add to your schedule. The Select Time-Off window opens.
-
In the Select Time Off window, select the required Activity type from the drop-down menu.
-
Select the time-off Start time. The default is the start time of the selected time interval. The End time is automatically set based on the start time.
You can take time off for as little as 15 minutes.
You can extend your time off beyond 30 minutes if:
-
The time-off intervals are continuous and
-
Set validations are met
See example
You selected an auto-approved time-off interval of 11:00-11:30. You decide to extend this time-off by another 30 minutes. So, you enter the End time as 12:00. Your time-off extension is successful only when:
-
The 11:30-12:00 interval is available for self-service time-off.
-
The 11:30-12:00 time-off interval is also auto-approved.
-
The 11:30-12:00 time-off interval has the same selected Activity code.
-
-
Click Add. The time-off interval is added to your schedule or sent for approval depending on the type of selected time-off interval.
You can add as many time-off intervals as you want from the available self-service intervals. The added self-service time-offs are reflected in your schedule.
If the time-off interval needs approval, the time-off request is added to the Schedule Requests page.
Self-Service: Extra Hours Requests
Use this self-service to work extra hours in addition to your scheduled shifts.
Consider a case. Emma, a call center agent, enjoys the benefits of the extra hours facility. Here’s how it works:
Extra Earnings: Emma can work additional hours whenever she has an opportunity, earning extra money.
Time-Off Balance: When Emma needs time off but has no balance left, she can compensate by working extra hours and getting paid.
Win-Win: The call center also benefits by having adequate staffing during peak hours.
All the extra hour intervals are 30 minutes by default.
If there is any pending request for a day, then slots are not shown for that day.
To add the extra hours:
-
Go to My Zone > My Schedule
-
Click the Self service check box to activate the associated drop-down menu. From the list of options in the self-service drop-down menu, choose Extra hours. All available extra hours intervals appear on your schedule.
Intervals are either auto-approved or need approval depending on the conditions set in the Approval Rules:
-
 : Auto-approved
 -
 : Need approval
-
-
Click the extra hours interval you want to add to your schedule. The Add Extra Hours window opens.
-
In the Add Extra Hours window, select the Start time. The default is the start time of the selected time interval. The End time will be automatically set based on the start time.
Keep in mind:
-
The extra hours must be out of the shift hours.
-
If you have set maximum hours in a day or week
-
You can work extra time for as little as 15 minutes.
If you want to extend extra hours interval beyond 30 minutes, if:
-
The extra hours intervals are continuous.
-
Set validations are met.
See example
You selected an auto-approved extra hours interval of 11:00-11:30. You want to extend extra hours by 30 minutes. So, you enter the End time as 12:00. Your extra hours extension is successful only when:
-
The 11:30-12:00 interval is available for extra hours.
-
The 11:30-12:00 extra hours interval is also auto-approved.
-
-
Click Add. Depending on the type of extra-hours interval selected, the interval is added to your schedule or sent for approval.
You can add as many extra hours intervals as you want from the available extra hours intervals. The added extra hours are reflected in your schedule. This also covers overnight shifts.
Self-Service: Self-Swap Requests
Self-swap lets you fine-tune your schedules by trading hours from the shifts. You give up some intervals from your shift and take an equal number of intervals from outside of the shifts. This way, the total work hours stay the same. Self-swap gives you more control over your schedules without affecting the overall workload. Accepted swaps automatically update the schedule.
Self-swaps are auto-approved and do not need manager involvement.
All the self-swap intervals are 30 minutes.
If there is any pending request for a day, then slots are not shown for that day.
To add the self-swap self-service:
-
Go to My Zone > My Schedule
Self-swap is available in both day and week view.
-
Click the Self service check box to activate the associated drop-down menu. Choose Self swap from the list of options in the self-service drop-down menu. Your schedule displays all the available self-swap intervals. All intervals are auto-approved.
-
Select one or more self-swap intervals
 based on your requirements. The self-swap dialog opens. You can view here the number of intervals removed and added for swapping.
In case you want to clear the selected intervals, use Clear to discard the selected intervals.
-
Click Next. You can see the available intervals that can be taken in exchange. The intervals shown are outside scheduled shifts to ensure that total working hours won't be affected.
Select the intervals you want to take in exchange.
You must add the same number of intervals that you removed. Once you do so, the Request button is enabled.
Clicking Go Back will return you to the previous dialogue. In this case, the added intervals in exchange will be cleared, if any.
-
Click Request. If all the selections align with the set guidelines, self-swap is auto-approved. The new intervals are added as per the selected slots on the My Schedule page.
A notification is sent whether a self-swap is approved or auto-declined. For example, net staffing has been changed, and the slot is no longer available, but the request has already been submitted.
Keep in mind that if one or more agents are trying to swap the same intervals while you are trying. The intervals are assigned on a first-come, first-served basis. In such cases, you might see intervals available for swapping, but the request gets auto-declined later upon validation.
Editing or Canceling Self-Service Requests
You can edit or cancel the pending self service requests on the My Schedule page.
To cancel or edit the pending self service requests:
-
Go to the My Schedule page.
-
Click the pending request you want to edit or cancel.
-
Select Cancel or Edit from the menu.
-
To cancel all pending requests of the day, Select Cancel all at the top of the schedule.