

This page is:
-
For administrators. If you're an agent, see the online help page for using Omilia Voice Biometrics (DEVone) in MAX or NiCE CXone Agent Workspace (Agent).
-
About Omilia Voice Biometrics (DEVone), an agent assist application. NiCE CXone also supports Omilia text and voice virtual agents.
Omilia Voice Biometrics (DEVone) allows you to authenticate contacts in real time as they speak with a human agent or an Omilia virtual agent![]() A software application that handles customer interactions in place of a live human agent.. Omilia uses voiceprints to authenticate contacts over the phone. Every person has a unique voiceprint, just as they have unique fingerprints. It only takes 0.5 to 3 seconds of normal, conversational speech for Omilia to determine if the caller is who they claim to be.
A software application that handles customer interactions in place of a live human agent.. Omilia uses voiceprints to authenticate contacts over the phone. Every person has a unique voiceprint, just as they have unique fingerprints. It only takes 0.5 to 3 seconds of normal, conversational speech for Omilia to determine if the caller is who they claim to be.
Contacts must enroll to use voice biometrics for authentication on future calls. This establishes their baseline voiceprint. It also gives your organization permission to use their voiceprint for authentication. The enrollment process only requires 10-20 seconds of natural conversation. Omilia can identify a voiceprint no matter what language is being spoken.
Omilia Voice Biometrics (DEVone) is a product from Omilia, an industry leader in conversational AI solutions. Omilia Voice Biometrics (DEVone) integrates with NiCE CXone using Studio scripts and Agent Assist Hub.
Components of an Integration
The integration of Omilia into NiCE CXone involves the following components:
- NiCE CXone: NiCE CXone must be configured to use the voice channels
 Various voice and digital communication mediums that facilitate customer interactions in a contact center. you want to use with the integration.
 - Agent Assist Hub: Agent Assist Hub holds the configuration information for connecting your Voice Biometrics Hub profile with the agent application to your agent assist provider.
- Omilia: A connection to Omilia Voice Biometrics is automatically created when you set up the integration in NiCE CXone.
- Agent application: This is the client that your agents use to handle contacts. Voice biometric authentication is supported in MAX and Agent Workspace (Agent).
- Studio scripts: You need at least one script that includes the Agent Assist action. The action is the connection between NiCE CXone and the agent application your Omilia agent assist application.
Custom Scripting Guidelines
Integrating an agent assist![]() Software application that provides context-specific help to the agent. application requires custom scripting. Before beginning the integration setup, you should know:
Software application that provides context-specific help to the agent. application requires custom scripting. Before beginning the integration setup, you should know:
- Which scripts you want to add the agent assist application into. You can modify existing scripts or create new ones. You may need to add the application to more than one script. For example, you need different scripts for inbound and outbound phone interactions The full conversation with an agent through a channel. For example, an interaction can be a voice call, email, chat, or social media conversation..
- Where the Studio action Performs a process within a Studio script, such as collecting customer data or playing music. must be placed in your script flow.
- The configuration requirements specific to the application you're using. The application in Agent Assist Hub needs to be configured. The actions in your Studio scripts must also be configured. Refer to the online help for each action for more information.
- What parameters the script needs to send to the agent assist provider, if any.
- How to complete the script after adding the action. You may need to:
- Add initialization snippets to the script using Snippet actions. You can do this to customize your agent assist application.
- Reconfigure the action connectors to ensure proper contact flow and correct any potential errors.
- Complete any additional scripting and test the script.
If you need assistance with scripting in Studio, see the Technical Reference Guide section in the Studio online help, or visit the NiCE Community ![]() site for NiCE CXone. For additional assistance with your script, you may want to contact NiCE CXone Expert Services.
site for NiCE CXone. For additional assistance with your script, you may want to contact NiCE CXone Expert Services.
Contact Enrollment
Before Omilia Voice Biometrics (DEVone) can verify the identity of contacts, each contact must enroll. This is how the contact gives your organization permission to record their voice and use it for authentication. Contacts are enrolled by associating their voiceprint with the phone number they're calling from (ANI![]() Also known as caller ID. Listed phone number of an incoming voice call.) and a user ID, which can be an account number.
Also known as caller ID. Listed phone number of an incoming voice call.) and a user ID, which can be an account number.
User IDs must be unique for each contact. ANIs can have more than one user associated with them. You can use any number or string as the user ID. For example, you can use the contact's account number. However, if an account can have more than one person on it who might call in, you need to use something else as the user ID with Omilia.
The flow of enrollment is:
- At the start of a call, Omilia checks for the ANI or user ID in the voice biometrics profile. The voice biometrics profile is designated in the Omilia app that's assigned to the Agent Assist action in the script.
- If a voiceprint profile exists, Omilia verifies the contact.
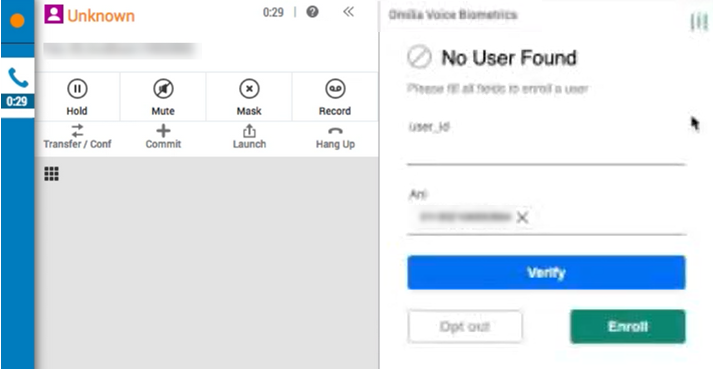
- If a profile isn't found for the ANI, the agent assist panel displays the enrollment form.
- The agent discusses it with the contact, then clicks Opt Out or Enroll. If the contact wants to enroll, the agent must enter a unique user ID before clicking Enroll.
- For enrollment, a short recording of the contact's voice is saved. Enrollment requires 10-20 seconds of natural, conversational speech. The contact doesn't need to say specific words for the recording.
- When the call ends, the script sends either the recording or the opt-out request to Omilia. Omilia creates the voiceprint profile for the contact. If the contact opted out, the profile indicates that they have opted out.
Enrollment is per ANI. If a contact calls from a different phone number, they won't be authenticated. If they want to be authenticated from both numbers, they must enroll again. If more than one user is registered for the ANI,
You can view all of the enrolled contacts in the Voice Biometrics Review section of the Omilia Cloud Platform Console. The Enrollments page also shows contacts who have opted out of voice authentication. For more information about Voice Biometrics Review, refer to the Omilia Cloud Platform documentation.
Agent Experience with Omilia
By default, agents see the results of Omilia voice verification on the agent assist panel. When you use the custom URL provided during the implementation process, the results appear on a page that comes directly from Omilia.
Omilia works with MAX and the NiCE CXone Agent Workspace (Agent) applications. Online help about using Omilia is available for MAX and Agent Workspace (Agent).
When Omilia verifies the identity of a contact at the start of a new call, it displays the result on the agent assist panel in MAX:
For agents using Agent Workspace (Agent), you can configure the voice biometric status and options to appear as a screen pop![]() A pop-up window with information about the contact that appears on an agent's screen after an event such as connecting to a contact. or in the custom workspace.
A pop-up window with information about the contact that appears on an agent's screen after an event such as connecting to a contact. or in the custom workspace.