

This is the third and final step of setting up Copilot for Agents.
You need to create or modify at least one Studio script to set up Copilot for Agents in your contact center. You must add an Agent Assist action to it and assign the Copilot for Agents profile you created previously. The script must be designed to route interactions![]() The full conversation with an agent through a channel. For example, an interaction can be a voice call, email, chat, or social media conversation. by skills
The full conversation with an agent through a channel. For example, an interaction can be a voice call, email, chat, or social media conversation. by skills![]() Used to automate delivery of interactions based on agent skills, abilities, and knowledge. to the agents you want Copilot for Agents to be available for.
Used to automate delivery of interactions based on agent skills, abilities, and knowledge. to the agents you want Copilot for Agents to be available for.
Complete each of these tasks in the order given.
Add Actions to Your Script
Required permissions:
-
In Studio, open the script you want to use.
-
If your Copilot for Agents profile uses Journey Summary, you must add a CC Create action to the script for voice interactions.
-
Add the CC Create action before the
-
Preferably place it before
-
-
Add an Agent Assist action after the
-
If you're working with a voice script, add a CONTINUOUS TRANSCRIPTION action immediately after the AGENT ASSIST action. Select your transcription service in this action's wizard. Then configure the following properties:
-
Transcription Profile Name should be set to the Copilot for Agents profile you created.
-
Enabled should be set to True.
-
Participants should be set to Patron or Both. Use Patron to have CONTINUOUS TRANSCRIPTION transcribe only the contact's
 The person interacting with an agent, IVR, or bot in your contact center. side of the conversation. Use Both to have it transcribe both the agent's and the contact's utterances State that allows an agent to complete work requirements after finishing an interaction..
 -
Generate Utterance Events should be set to False.
-
-
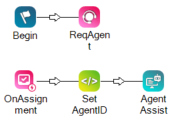
If you're working with a digital script, add a SNIPPET action before the AGENT ASSIST action. Give this SNIPPET action a Caption of Set AgentID. Copy the following line of code and paste it into the Text View tab of the Editor window.
ASSIGN global:__AgentId = "{AGENTID}" -
To complete the configuration of your script:
- Add initialization snippets to the script using Snippet actions. You can do this to customize your agent assist application.
- Reconfigure the action connectors to ensure proper contact flow and correct any potential errors.
- Complete any additional scripting and test the script.
Assign a Profile to a Studio Script
Required permissions:
Use these example scripts for voice and digital.
- In Studio, open the script you want to use.
-
 on the Agent Assist action.
 -
In the left column, click the checkmark
 next to the agent assist application or profile you want to assign to this script.
An alternative to using the checkmark is to create a variable in your Studio script. Use the variable to pass the app or profile name into the Assign Launch Config Name property of the AGENT ASSIST action.
- Click Close.
Assign Multiple Profiles to a Studio Script
Required permissions:
You can use Studio variables to assign multiple Copilot for Agents profiles to one Studio script. You then use logic code that determines when each profile is used.
Use these example scripts for voice and digital.
These steps describe a simple example of assigning two Copilot for Agents profiles to one script. Your script might be more complex. Contact NiCE CXone Services for the best design and implementation.
-
In Studio, open the script you want to use.
-
If you haven't done so already, add an AGENT ASSIST action to the correct location in your script.
-
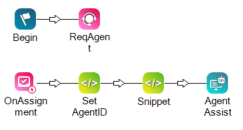
Add a SNIPPET action before the AGENT ASSIST action and connect them.
-
Double-click the SNIPPET action.
-
In the Snippet editor window, create three variables. You need two variables to hold the Copilot for Agents profile names, and one variable to hold the name of the profile you want the script to use when it runs.
View example code
ASSIGN profile1="Profile1" ASSIGN profile2="Profile2" ASSIGN profileToUse = "profile2" -
Underneath those variables, enter logic code that determines when each profile is used. This code changes the value of the profileToUse variable.
-
Double-click the AGENT ASSIST action to open Agent Assist Hub.
-
For each Copilot for Agents profile you want to use:
-
Click the profile name in the left column.
-
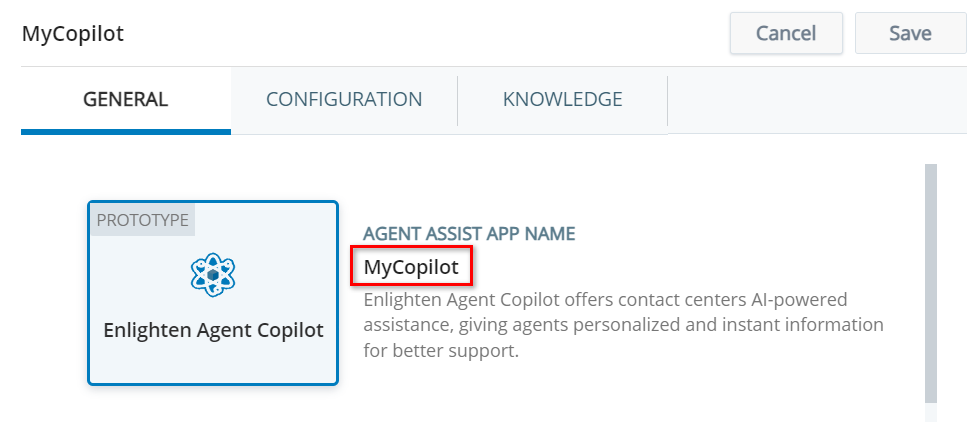
Copy the profile name from the General tab.
-
Paste it into the snippet code you created previously as the value of one of the profile name variables. In the previous example code, the variable names are profile1 and profile2.
View example code
ASSIGN profile1="MyCopilot"
ASSIGN profile2="MyCopilot2"
ASSIGN profileToUse = "profile2"
-
-
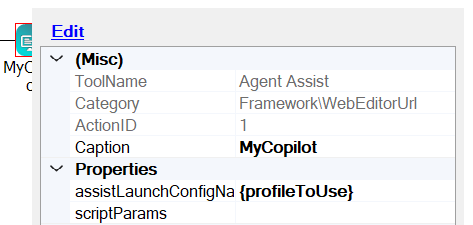
Right-click the AGENT ASSIST action. In the assistLaunchConfigName property, enter {profileToUse}. This is the name of the variable that holds the profile you want the script to use, enclosed in curly brackets.
-
Save your script.
Filter KB Answers by Knowledge Management (Expert) Tags
Required permissions:
If you've integrated an Knowledge Management (Expert) knowledge base, you can optionally use NiCE CXone Knowledge Management (Expert) tags ![]() to filter KB answers. To do this, you can configure two kinds of tag lists:
to filter KB answers. To do this, you can configure two kinds of tag lists:
-
Standard tag list: The Copilot for Agents profile can only access KB articles with the tags in this tag list. It generates KB answers using only those KB articles.
-
Custom tag list: There are two types of custom tags:
-
Filter: Setting type to filter adds the selected tag values to the Knowledge Hub filter criteria for the KB Answer configuration. It then limits the article results to those that have been explicitly tagged in the knowledge base. This approach is useful for limiting the set of articles to consider for generating KB Answers, but it does come with the overhead of having to tag articles. Agents can select the tags from a custom tag list to filter KB answers. You can specify up to five custom tag lists per Copilot for Agents profile.
-
Append: Setting type to append adds the selected tag values to the query as a supplemental context. This option does not require tagging articles. It considers all articles filtered by the Copilot for Agents profile and relies on Copilot to identify the relevant articles based on the query plus the supplemental context. For example, consider a question "When should I plant my vegetables?" where the selected Append value for "Plants" is "Carrots, Potatoes". The actual query submitted to Copilot for a KB Answer is "When should I plant my vegetables? Plants include Carrots, Potatoes."
Example using the filter option:
-
In Studio, open the script you're configuring for Copilot for Agents.
-
If you haven't already, add an Agent Assistaction after
-
Select the Agent Assist action.
-
Configure the Agent Assist action's scriptParams property with a list of the Knowledge Management (Expert) tags you want to filter by, in this format:
{"expertTags":{"standard":["Tag1","Tag2","Tag3","Tag4","Tag5"],"custom":[{"name":"NameofTagList1","type":"Filter","values":["Tag1","Tag2"],"default":["Tag1"]},{"name":"NameofTagList2","type":"Filter","values":["Tag3","Tag4"],"default":["Tag4"]}]}}View an example tag list
{"expertTags":{"standard":["2021","2022","2023","2024","2025"],"custom":[{"name":"PlanYear","type":"Filter","values":["2024","2025"],"default":["2025"]},{"name":"PlanLevel","type":"Filter","values":["Platinum","Gold","Silver","Bronze"],"default":["Gold"]}]}}Where default is the tag that's automatically selected from the custom tag list. Make sure the names of the tags you enter exactly match the names of the tags in your Knowledge Management (Expert) knowledge base.
-
Save your script.
-