

In an upcoming release, disposition-based TTL will be removed from Cloud Storage Services. If you're using this feature, be prepared to update your system to maintain this functionality using Interactions Hub Data Policies.
Content on this page is for a product or feature in controlled release (CR). If you are not part of the CR group and would like more information, contact your account representative.
This page is for Cloud Storage in AWS. If you use Cloud Storage Cloud Storage in Azure, see the Azure storage section of the Cloud Storage Services online help.
Disposition![]() Result assigned by the agent or system at the end of a voice (disposition) or digital (status) interaction.-based TTL
Result assigned by the agent or system at the end of a voice (disposition) or digital (status) interaction.-based TTL![]() The period of time these interactions are retained and the timing of their deletion. You define the TTL settings for your interactions. lets you create life cycle rules that only apply to files with a certain disposition applied to them. You must purchase a license to use disposition-based TTL.
The period of time these interactions are retained and the timing of their deletion. You define the TTL settings for your interactions. lets you create life cycle rules that only apply to files with a certain disposition applied to them. You must purchase a license to use disposition-based TTL.
You can change the disposition applied to an interaction before its life cycle process begins. This gives you more control over this feature when:
- Agents apply dispositions incorrectly.
- You want to categorize interactions differently for other reasons.
When you edit the disposition of a file, the original disposition is still stored with it for reporting purposes. The new Life Cycle Management disposition is applied separately. Its only purpose is to override the original disposition for applying Life Cycle Management rules.
Key Facts About Disposition-Based TTL
- Disposition
 Result assigned by the agent or system at the end of a voice (disposition) or digital (status) interaction.-based TTL The period of time these interactions are retained and the timing of their deletion. You define the TTL settings for your interactions. is only available for call recording and screen recording files.
 - You can select only one disposition for a Life Cycle Management rule. If you want the same life action and retention period to apply to multiple dispositions, you must create separate rules for each disposition.
- You can edit the disposition of a file if the agent didn't set a disposition or the life cycle process for the file hasn't begun. If a file has been processed by an existing rule, you cannot change the disposition.
- When you edit a disposition, the disposition the agent applied during the interaction is still stored with the file. NiCE CXone continues to use the original disposition for reporting purposes. Your change instead updates a separate Life Cycle Management disposition that specifies which life cycle rule to apply. By default, the Life Cycle Management disposition carries the same value as the original disposition the agent set.
-
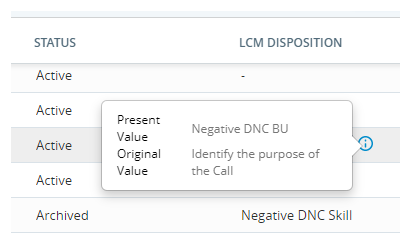
In the Search page, an icon
 indicates the interaction's disposition has been changed. To see the icon, click the Column drop-down in the top right corner of the Search page. Enable the Disposition column. When you hover over the icon, you see both the original disposition and the new Life Cycle Management disposition applied to the file.
Create a Disposition-Based Life Cycle Management Rule
To use disposition![]() Result assigned by the agent or system at the end of a voice (disposition) or digital (status) interaction.-based TTL
Result assigned by the agent or system at the end of a voice (disposition) or digital (status) interaction.-based TTL![]() The period of time these interactions are retained and the timing of their deletion. You define the TTL settings for your interactions., create a Life Cycle Management rule with these required settings:
The period of time these interactions are retained and the timing of their deletion. You define the TTL settings for your interactions., create a Life Cycle Management rule with these required settings:
- Set the Media Type to Call Recordings or Screen Recordings.
- Select Custom in the Filter criteria section. Then, select the Disposition you want the rule to apply to.
- If any interactions with the chosen disposition shouldn't follow the life cycle rule, edit the Life Cycle Management dispositions for those interactions.
Edit the Life Cycle Management Disposition
You can apply a Life Cycle Management disposition![]() Result assigned by the agent or system at the end of a voice (disposition) or digital (status) interaction. to override the one applied to it by the agent. This gives you more control over which rule applies to your files. This gives you more control when:
Result assigned by the agent or system at the end of a voice (disposition) or digital (status) interaction. to override the one applied to it by the agent. This gives you more control over which rule applies to your files. This gives you more control when:
- Agents apply dispositions incorrectly.
- You want to categorize interactions differently for other reasons.
When you edit the disposition of a file, the original disposition is still stored with it for reporting purposes. The new Life Cycle Management disposition is applied separately. Its only purpose is to override the original disposition for applying Life Cycle Management rules. You can change a disposition on a file up until its life cycle process begins. After that point, you can no longer edit the disposition.
- Click the app selector
 and select Admin.
 -
Go to Cloud Storage > Search.
-
On the Search tab of the page, type a contact ID or comma-separated (no spaces) list of contact IDs to search by and select a date range from the drop-down. Alternatively, you can select a date range without any contact IDs.
-
If you want to filter your search results more, click Advanced Search. Select any Agent, ACD Skill, Team, and DNIS you want the search results to match.
Searches with multiple filters assume an AND operator between each filter type and an OR operator between each selection in an individual filter. For instance, you select:
- Lydia Bennet and Kitty Bennet in the Agent filter.
- OBPredDialer and InboundVoice in the Skill filter.
- Nothing in the Team and DNIS filters.
The search finds interactions that either Lydia Bennet or Kitty Bennet handled using either the OBPredDialer or InboundVoice ACD skill
Used to automate delivery of interactions based on agent skills, abilities, and knowledge.. -
Click Search.
-
Enable the Disposition column. To do so, click the Column drop-down in the top right corner of the page. Select Disposition.
-
Click the filter button
 . Since you can only modify dispositions for unprocessed files, select Active for Status. Select any other filters you want to use to refine the search. The same rules explained in the previous tip apply. When you're satisfied with your filters, click Apply. Learn more about the filters
Field Details Type The type of files you want to find. The only two that support dispositions are Call Recordings and Screen Recordings.
Status
The current status of the files you want to find. You can only edit the dispositions of Active files.
LCM Disposition The disposition applied to the file. Agent The agents associated with the files you want to find. DNIS For call recording and screen recording files only, the DNIS associated with them Skills The ACD skills associated with the files you want to find. Team The teams associated with the files you want to find. -
Click the actions button
 for the individual file you want to edit. In the drop-down, click Edit LCM Disposition.
 -
In the Edit LCM Disposition window, specify the new disposition you want to apply to the files using the Select Disposition drop-down. Type a Reason for Your Action. Read the About Disposition Process information and select I understand the above information. Click Confirm.
-
The disposition change request appears in the Request Tracker tab until processing completes. The file should show the changed disposition icon
in the Disposition column within a few minutes. When you hover over the icon, you should see the disposition you chose as the Present Value and the disposition the agent applied as the Original Value.