

This page is for Cloud Storage in AWS. If you use Cloud Storage Cloud Storage in Azure, see the Azure storage section of the Cloud Storage Services online help.
Required permissions: Life Cycle Management Edit
Life Cycle Management lets you create rules that determine what happens with files stored in Cloud Storage.
Create Rules
- Click the app selector
 and select Admin.
 - Click Cloud Storage > Life Cycle Management.
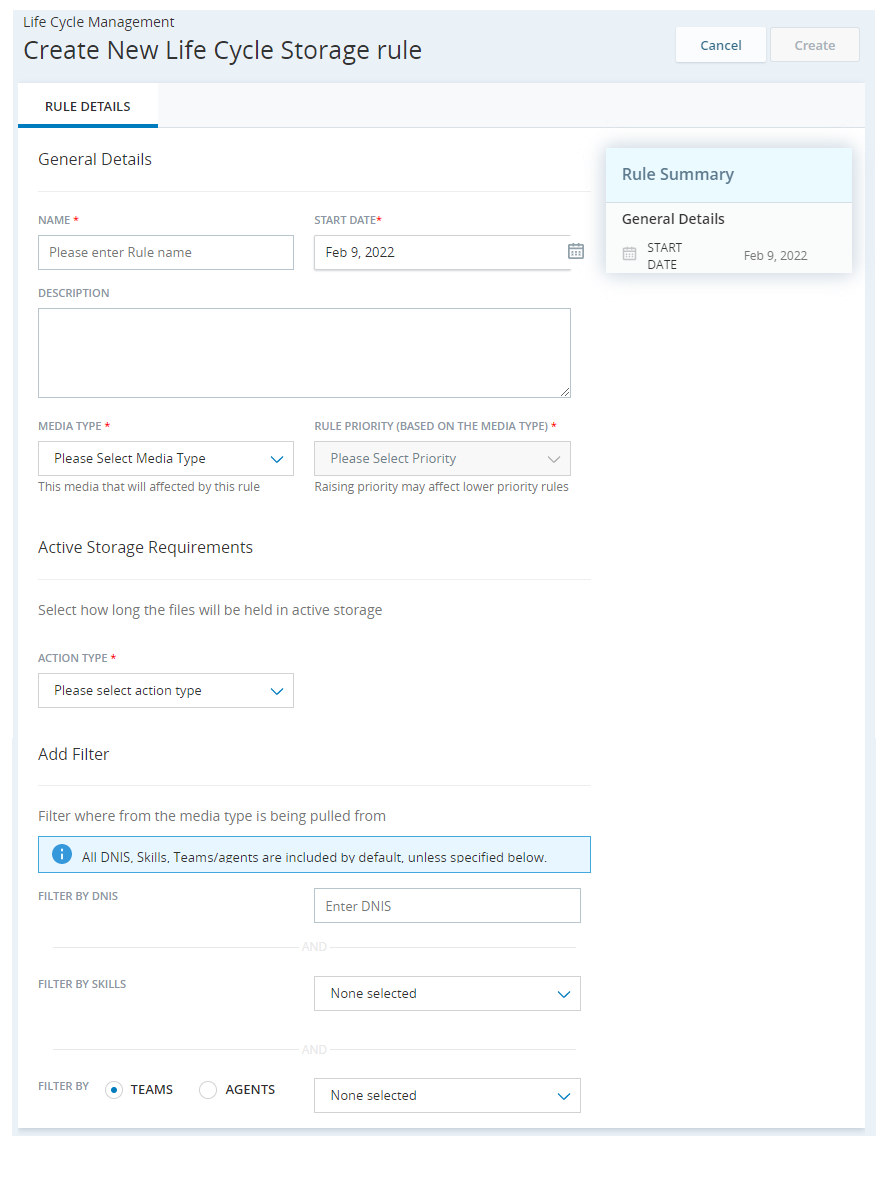
- Click New Rule.
-
In the General Details section, enter a Name for this rule and select its Start Date, Media Type, and Rule Priority.
If you Archive digital or Interaction Analytics (CXone) files in long-term storage, they can only be retrieved using the date range criteria. They currently lack the metadata to be retrieved using other criteria.
Cloud Storage supports attachments from digital interactions but not digital transcripts. Any action you take to digital files will only apply to attachments. See the Media Type description in the following drop-down for more information.
 Learn more about fields in this step
Field
Details
Name Enter a unique name for the rule. The name should help you recognize what the rule is created for and what it applies to. For example, Compliance regulation - 7 years or Team A, B, and C calls. Start Date
Select the date on which the rule becomes active. This can be today's date or a future date.
Description Describe the rule, so that you or someone else could understand the context and the conditions in the rule. Media Type Select the type of files you want this rule to apply to. The options available to you depend on your license. possible types are:
-
Call Recordings
-
Chat Transcripts
-
Digital: This type manages the life cycle of attachments from Digital Experience (DX) interactions. You can manage the transcripts of digital interactions using WFA jobs.
-
Email
-
IA Report (for Interaction Analytics (CXone))
-
Screen Recordings
Rule Priority Select the priority level for the rule. P1 is the highest priority. Plan rule priority carefully to avoid having a general rule with a higher priority than a specific rule.
If multiple rules apply to the same files, the rule with the highest priority applies.
The system does not allow you to create a rule with no filtering criteria if its assigned priority ranks it higher than a rule that has filtering criteria.
Each rule must have a different priority. If you give a new rule a priority that another rule already has, the existing rule and all rules with lower priorities are reduced by one level each.
-
-
Under Active Storage Requirements, select the Action Type for this rule.
Learn more about available actions in this step
Action
Details
Keep Files Forever Stores the files in active storage indefinitely. You can choose to Copy to Secure External Access when you keep files in active storage. Delete Deletes the files from active storage after the number of days you specify in After (# of Days). You can choose to Copy to Secure External Access when you delete files from active storage. Move To Long Term Storage Moves the files to long-term storage after the number of days you specify in After (# of Days). You can choose to Copy to Secure External Access when you move files to long-term storage.
When you select this option, you need to choose what happens to files when they move to long-term storage:
- Delete: Files are deleted from long-term storage after the number of days you specify in the After # of Days field that appears.
- Keep Files Forever: Files stay in long-term storage.
Move to Secure External Access Moves the files to SEA after the number of days you specify in After (# of Days). This action doesn't leave a copy in cloud storage. Files are automatically deleted from SEA after 30 days if you haven't already moved or deleted them manually.
When you edit a rule, you can add this option. It's not recommended, however, because it can result in files being managed by the same rule but processed in different ways.
- If the action you select supports it, enter a value for After # of Days and select whether you want to Copy to Secure External Access.Learn more about fields in this step
Field
Details
Copy to Secure External Access Select to have the files copied to secure external access (SEA) in addition to the Action you choose. This option appears after you select the Active Storage action in the life cycle rule. It is not available if you choose Move to Secure External Access from the Action drop-down list.
Files can be copied to SEA one time only. If you copy a file to SEA as a test, you won't be able to copy it to SEA again in the future.
After # of Days The number of days a file remains in long-term storage before it's deleted. The minimum number of days is 0 and the maximum is 9999 days. The day a file moves into long-term storage counts as day one. If you select 0, the file is deleted immediately.
This field is not available for the Keep action.
It can take up to 24 hours for the selected action to run on the affected files. The timing depends on factors including the number of files impacted and the size of the backlog on the server.
-
If you chose Call Recordings, Chat Transcripts, Emails, or Screen Recordings as the Media Type and want to refine the rule to apply to only certain files, create a filter in the Filter criteria section. If your rule applies to Call Recordings or Screen Recordings and you have disposition-based TTL
The period of time these interactions are retained and the timing of their deletion. You define the TTL settings for your interactions. enabled in your environment, first select Standard as the filter type. By default, a rule applies to all skills
Used to automate delivery of interactions based on agent skills, abilities, and knowledge., DNIS The number dialed on inbound or outbound voice calls., teams, and agents. Learn more about fields in this step
Field
Details
Filter By DNIS Enter the DNIS that you want this rule to apply to. If you want to add more than one DNIS, separate them with commas. Don't include spaces after the commas.
This option is available only for Call Recording and Screen Recording media types.
Filter By Skills Click each of the skills you want this rule to apply to. You can select up to 10 skills. Filter By Teams/Agents Click Teams or Agents to limit this rule by that option, then select up to 10 teams or agents from the drop-down list. -
Click Create.
Retag Files
Retagging allows you to have Cloud Storage Services assess all files currently managed by the default system rule. Before retagging files, create or modify rules to address the reasons files are falling through to the default rule.
- Click the app selector and select Admin.
- Click Cloud Storage > Life Cycle Management.
- Click the three vertical dots icon (
 ) at the top right corner of the screen and select Process Default System Rules Files.
 -
In the pop-up message, select I Understand The Above Information and click Confirm. The retagging process begins. You can view the progress on the File Activity tab.
Deactivate Rules
It is strongly recommended that you do not deactivate Life Cycle Management rules. Since deactivated rules cannot be edited or reactivated, files tagged with a deactivated rule will continue to follow the life cycle rules of the deactivated rule indefinitely.
Instead of deactivating a rule, keep it active and lower its priority. This allows you to still edit the life cycle rules for those files in the future. Create a new rule with a higher priority to replace the old one. Note that only new files will be tagged with the new rule, since old files cannot be retagged.
If you still choose to deactivate an existing rule, follow these instructions:
-
Create a new rule to replace the rule you want to deactivate.
-
Open the rule you want to deactivate. Change the Rule Priority to the lowest priority. Click Update.
-
Wait until all files assigned to the old rule finish processing.
-
When all the files assigned to the old rule have completed their life cycle, deactivate the rule.
-
On the Life Cycle Management page, locate the old rule.
-
In the top right corner of the rule, click the Options
icon. -
Click Deactivate.
-
Read the message in the confirmation window and click Yes.
-