

If you aren't sure how to implement Guide on your website, refer to these use cases for the high-level steps on implementing Guide engagements.
Offer Chat When Agents Are Available
Struggle: Hilary, the e-commerce sales manager at Classics, Inc., is expecting record sales for Cyber Monday. She will be fully staffed with agents to assist customers as they shop. She would like the chat button to appear on the home page of the website, but only when agents are available to assist shoppers.
Solution: Hilary creates a Guide rule to display the chat button on the home page of the website when agents are available to assist visitors:

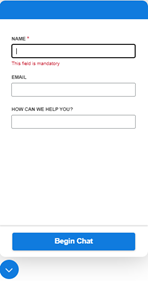
If the visitor clicks the chat button, the chat channel appears in the Guide widget:
Requirements: Guide and chat
|
step |
details |
|---|---|
| Define the buttons and branding. |
If not done already:
|
| Create a chat entry point. |
Create a chat entry point. |
| Create a single-button template to display the Chat button. |
Create a single-button template:
|
|
Create an engagement rule that displays the template on the home page of your website. |
Create an engagement rule that displays the template with the chat button.
|
|
Embed Guide on your website. |
Embed Guide on your website by copying the JavaScript code and pasting it on the home page of your website. |
|
Verify the template appears on the home page. |
Go to the home page of your website and make sure that the chat channel appears. The chat channel only appears if agents are available due to the Chat Is Active condition. |
Offer Email When Agents Are Unavailable
Struggle: Hilary wants to also support customers in the case agents are unavailable. She would like to offer an email button when agents are busy.
Solution: Hilary creates a Guide rule to display the email button on the home page of the website when agents are unavailable to assist visitors.

Requirements: Guide and email
|
step |
details |
|---|---|
| Define the buttons and branding. |
If not done already:
|
| Create an email entry point. |
Create an email entry point. |
| Create a single-button template to display the email button. |
Create a single-button template:
|
|
Create an engagement rule that displays the template on the home page of your website. |
Create an engagement rule that displays the template with the email button.
|
|
Embed Guide on your website. |
Embed Guide on your website by copying the JavaScript code and pasting it on the home page of your website. |
|
Verify the template appears on the home page. |
Go to the home page of your website and make sure that the email channel appears when no agents are available. |
Highlight Preferred Digital Channels
Struggle: Contact center administrator Akela Wolfe is working with a limited number of agents and prefers visitors to start a chat or send an email instead of using voice to contact agents.
Solution: Akela creates a Guide multi-button template that highlights the preferred channels![]() Various voice and digital communication mediums that facilitate customer interactions in a contact center. to use. The template first displays a menu button of a bell alerting the visitor that they can get assistance on the page:
Various voice and digital communication mediums that facilitate customer interactions in a contact center. to use. The template first displays a menu button of a bell alerting the visitor that they can get assistance on the page:

When the visitor clicks the menu button, the chat and email buttons appear:

If the visitor clicks the chat button, the chat channel appears in the Guide widget:
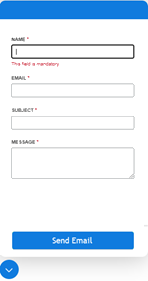
Or if they click the email button, the email channel appears in the Guide widget.
Requirements: Guide, chat, and email
|
step |
details |
|---|---|
| Define the buttons and branding. |
If not done already: |
| Create a chat entry point. |
Create a chat entry point. |
| Create an email entry point. |
Create an email entry point. |
| Create a multi-button template that defines two buttons. |
Create a multi-button template:
|
|
Create an engagement rule that displays the template on the home page of your website. |
Create an engagement rule that displays the template.
|
|
Embed Guide on your website. |
Embed Guide on your website by copying the JavaScript code and pasting it on the home page of your website. |
|
Verify the template appears on the home page. |
Go to the home page of your website and make sure that the Guide widget appears with the chat and email channels. |
Welcome New Visitors with a Proactive Offer
Struggle: Mary Bonnet, the marketing manager at Classics, Inc., wants to advertise an upcoming webinar with a popular author to all first-time visitors on the website. She would like guests to register prior to the event.
Solution: Mary creates a proactive offer that announces the webinar and includes a link to register for the webinar. The offer appears the first time the visitor lands on a page where Guide is embedded. The offer includes a URL link to the registration page for the webinar. It also includes a button that displays a NiCE CXone Knowledge Management (Expert) article with information about payment options and a button to dismiss the proactive offer.

Requirements: Licenses for Guide with Offers and Knowledge Management (Expert)
|
step |
details |
|---|---|
|
Create an engagement rule that displays a proactive offer. |
Create an engagement rule that displays a proactive offer.
|
|
Embed Guide on your website. |
Embed Guide on your website by copying the JavaScript code and pasting it into the header of each page where you want to offer Guide. |
|
Verify that the proactive offer appears. |
Because this offer is just for new visitors, testing may require that you use a different browser or computer so that Guide considers you a new visitor. Visit a page on your website where Guide is embedded to see the proactive offer. |
| Check the Guide engagement data. |
Use the Dashboard to monitor the success of your proactive offer. For example, configure the Metrics Interval widget to monitor the success of your proactive offer over a period of time. |
Reduce Agent Load by Displaying a Proactive Offer
Struggle: As a contact center administrator, Akela Wolfe knows that visitors often forget how to use their annual birthday discount. They may require assistance from agents to apply the discount when checking out online.
Solution: Akela requests the agent named Fran, who has access to the Knowledge Management (Expert) knowledge base, to write an article that addresses the frequently asked questions. Akela then uses Guide to create a proactive offer that assists the visitor with the birthday discount when they type birthday in the Discount Code field on the check out page. The proactive offer includes a button to view the Knowledge Management (Expert) article written by Fran and a button to view the registration page on the Classics website to register for the discount.

Requirements: Licenses for Guide with Offers and Knowledge Management (Expert)
|
step |
details |
|---|---|
| Define the buttons and branding. |
If not done already:
|
| Create an article in Knowledge Management (Expert). |
In Knowledge Management (Expert), write an article that highlights the common questions about using the birthday discount. |
| Create an entry point for the birthday article and other related articles. |
Create a knowledge base entry point:
|
| Use the Web Assistant to map the value birthday in the Discount Code field. |
To map a field, first install the Web Assistant. Then, go to the checkout page on your website site and do the following:
|
|
Create an engagement rule that displays a proactive offer. |
Create an engagement rule that uses the mapped element with a value of birthday in the Discount Code field to display the proactive offer.
|
|
Embed Guide on your website. |
Embed Guide on your website by copying the JavaScript code and pasting it into the header of the check out page of your website. |
|
Verify that the proactive offer appears in the correct cases. |
On your website, go to the page identified by the rule and frantically click or scroll down the page. The proactive offer should appear and have buttons for learning more about the discount or linking to the registration website. |
| Check the Guide engagement data. |
Use the Dashboard to monitor the success of your proactive offer. For example, configure the Metrics Interval widget to monitor the success of your engagement rule over a period of time. |
Assist Struggling Visitors by Displaying Proactive Offers
Struggle: Akela Wolfe, contact center administrator, wants to provide proactive assistance when visitors are struggling to use her website. She identifies the following visitor behaviors as indicative of struggling:
-
Clicking frantically on any page.
-
Spending a long time on the checkout page and scrolling around the checkout page.
Solution: Akela creates two engagement rules:
-
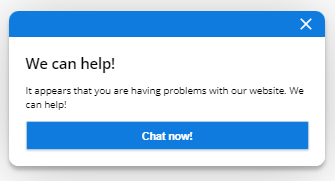
Frantic clicking: This rule watches for frantic clicking on any page and displays a proactive offer with a chat button to assist the frustrated visitor.
-
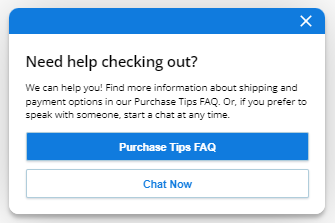
Long checkout: This rule watches for visitors who spend a lot of time on the checkout page and scroll to the bottom of the page. It displays a proactive offer that includes a Knowledge Management (Expert) article with details about checking out. It also offers a chat button.
Requirements: Chat, license for Guide with Offers, and a license for Knowledge Management (Expert)
|
step |
details |
|---|---|
| Create an article in Knowledge Management (Expert). |
In Knowledge Management (Expert), |
| Create entry points. |
Create a chat entry point that can be used for both rules. Create a knowledge base entry point that contains the article to offer shoppers stuck on the check out page. It might include information on using discount codes, choosing a payment option, or choosing a shipping method. |
|
Create the frantic clicking engagement rule. |
Create an engagement rule that displays a proactive offer.
|
| Create the long checkout engagement rule. |
Create another engagement rule that displays a proactive offer.
|
|
Embed Guide on your website. |
Embed Guide on your website by copying the JavaScript code and pasting it into the header of each page where you want to offer Guide. |
|
Verify that the proactive offers appear. |
Visit any page on your website and frantically click with the mouse. After several seconds, the Frantic clicking offer should appear. Then, on the checkout page, scroll to the bottom of the page. After 5 minutes, the Long checkout offer should appear. |
| Check the Guide engagement data. |
Use the Dashboard to monitor the success of your proactive offers. For example, configure the Metrics Interval widget to monitor the success of your proactive offers over a period of time. |
Provide Self-Service Assistance When Contact Center Is Closed
Struggle: The contact center is open 7:00 AM to 7:00 PM on weekdays. Contact center administrator Akela Wolfe would like to provide more support for website visitors on the home page while agents are unavailable.
Solution: Akela creates two Guide templates and two engagement rules:
-
Weekday rule: When it is a weekday, and the hours are between 7:00 AM and 7:00 PM, display the template with the chat channel.
-
Weekend and evening rule: When it is a weekend, or it is a weekday and the hours are between 7:01 PM and 6:59 AM, display a portal template with five articles that answer the most common questions and offer the email channel.

Requirements: Guide, Knowledge Management (Expert), Chat, and Email
|
step |
details |
|---|---|
| Define the buttons and branding. |
If not done already: |
| Create the articles. |
In Knowledge Management (Expert), write the five articles that answer the common most common questions visitors have when using your website. |
| Create an entry point for the portal of articles to offer. |
Create a knowledge base entry point:
|
| Create a chat entry point. |
Create a chat entry point. |
| Create an email entry point. |
Create an email entry point. |
| Create a single-button template to display the Chat button on week days, while agents are available. |
Create a single-button template:
|
| Create a customer portal template to display at night and on weekends while agents are unavailable. |
Create a customer portal template:
|
|
Create the engagement rule to display the single-channel template weekdays 7:00 AM to 7:00 PM. |
Create an engagement rule that displays the single-channel template. This is the template that should appear while the contact center is open and offer the chat button.
Engagement rules that use the Date and Time condition are based on the time zone set for your tenant. |
| Create the engagement rule to display the portal template on weekends and weekdays 7:01 PM to 6:59 AM. |
Create an engagement rule that displays the portal template. This is the template that should appear while the contact center is closed and offer the portal with alternative digital channels.
|
|
Embed Guide on your website. |
Embed Guide on your website by copying the JavaScript code and pasting it on the home page of your website. |
|
Verify that the templates appear. |
On the home page of your website, confirm that the correct Guide template appears at the correct times. |