

Google Business Messages is being discontinued. As of 31 July 2024, Google Business Messages will no longer be available. As of 1 July 2024, you cannot receive new messages. You have 30 days to open or close message threads or move them to another messaging option. You should update your welcome message in Google Business Messages so contacts are aware of this change. If you use Google entry points for business messaging, you need to have removed or replaced the entry point with another messaging channel by 15 July 2024. Review the official Google documentation for more information on the discontinuation of Google Business Messages.
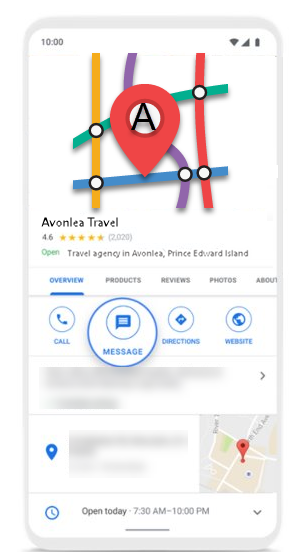
Google Business Messages is a chat-based channel![]() Various voice and digital communication mediums that facilitate customer interactions in a contact center.. It allows customers to chat with your agents directly from Google search results, Google Maps, iOS Maps, or other locations. Customers can start a chat right from your organization's listing, making it convenient for them to connect and get answers.
Various voice and digital communication mediums that facilitate customer interactions in a contact center.. It allows customers to chat with your agents directly from Google search results, Google Maps, iOS Maps, or other locations. Customers can start a chat right from your organization's listing, making it convenient for them to connect and get answers.
When you've set up a Google Business Messages channel, your business listing in Google search results, Google maps, or iOS Maps will include a Message or Chat button, depending on how you configured it. You can also define other locations, such as on your company website, to include chat buttons for this channel.
After you configure a channel, you can set up rich messages. Rich messages allow you to create rich links with images and titles or lists that contacts can pick from. These capabilities make it easy for agents to assess and meet a contacts' needs quickly. Your agents may send the same type of message, like links to the same resource, many times every day. With rich messages, you can ensure that your agents all send messages the same way.
Supported rich content for Google Business Messages:
-
Rich links
-
List picker
Key Facts about Google Business Messages Channels
- Chatting on a Google Business Messages channel
 Various voice and digital communication mediums that facilitate customer interactions in a contact center. is asynchronous. This means that the customer sends a message to your organization, then leaves the conversation. When an agent answers, a notification appears on the customer's device. When the customer replies, Digital Experience notifies the agent.
 -
When a customer contacts you via Google Business Messages, any previous conversation that you've had with them on that channel loads into the chat. It's available for the agent and the customer. Digital Experience stores the conversation, so it displays in a new chat even if the customer has deleted the conversation.
- Google Business Messages is compatible with Android and iOS devices. It only works on mobile devices.
- The customer can send attachments to the agent over a Google Business Messages chat.
-
Google Business Messages refers to channels as "agents." In the Digital Experience online help for Google Business Messages channels, "agent" refers to the person handling interactions.
- Setting up a Google Business Messages channel may require multiple verifications. Your organization's representative needs to verify the authenticity of the channel ("agent"). Then, as your Account Representative sets up locations and non-local entry points, your organization's representative must verify each entry point. Verification takes place by email.
- It can take up to 24 hours for messaging icons to appear after your channel is completely set up and enabled.
- Setting up a Google Business messages channel requires assistance from your Account Representative.
Requirements
- A Google My Business account with at least one verified location. This is required if you want a messaging button to appear in your Google listings. Without verified locations, you can only use non-local entry points with your Google Business Messages channel.
- A Google Business Messages account.
- A logo for your organization. The logo must be 1024 px 1024 px, a maximum of 50 KB, and JPG, JPEG, or PNG format. The logo does not need to be publicly hosted, as you will upload it to Digital Experience when you create the channel.
- A privacy policy. You will need the URL to your organization's privacy policy when you create the channel.
- A contact person in your organization that Google can contact to verify the authenticity of the channel and of the locations you set up. The contact person must use an email address with your organization's official domain name.
Google Business Messages Entry Points and Locations
Google Business Messages supports different kinds of entry points. Entry points are places where a chat or messaging button appears so customers can start conversations with your agents. Some entry points rely on verified locations configured in your Google My Business account. Other entry points are not dependent on locations.
Location-based entry points include any Google listing that's tied to a physical location, such as on Google Maps. Location-based entry points require that you have a Google My Business account. The account must have at least one verified location defined in it. Locations in Google My Business represent actual, physical locations of your offices, stores, and so on. These locations are what appear in Google Maps.
Your Account Representative uses a verified location from your Google My Business account when they configure your Google Business Messages channel in Digital Experience. You only need one verified location to use the Digital Experience Google Business Messages channel![]() Various voice and digital communication mediums that facilitate customer interactions in a contact center.. If you have more than one verified location, only 1 of them is used in the Google Business Messages channel.
Various voice and digital communication mediums that facilitate customer interactions in a contact center.. If you have more than one verified location, only 1 of them is used in the Google Business Messages channel.
When your Google Business Messages channel is set up, the chat or messaging button appears for all locations defined in your Google My Business account. You cannot have the chat option appear for some locations and not for others. For example, if you have 3 verified locations, a customer will see a messaging button on the listing for each location if they tap the location pin icon on Google Maps for any of the locations.
Non-Local Entry Points
Entry points that don't require verified locations are called non-local entry points in Google Business Messages. Non-local entry points include:
- Widgets on your website: You can set up a widget on your website that allows visitors to chat with your agents via the Google Business Messages channel.
- URLs: You can define specific URLs that start a conversation when a user clicks them.
- Phone: You can configure your Google Business Messages account with a phone number. When customers dial that number, a Chat button appears next to the Call button in the phone app.
Add a Google Business Messages Channel
After you add the channel![]() Various voice and digital communication mediums that facilitate customer interactions in a contact center., you need to contact your Account Representative to complete the setup process. They will configure the channel's entry points.
Various voice and digital communication mediums that facilitate customer interactions in a contact center., you need to contact your Account Representative to complete the setup process. They will configure the channel's entry points.
Before you complete the verification process, double check that all information and locations in your Google Business Messages account is correct. After your channel is verified, you must contact Google Business Messages support if you need to change anything related to your account.
- Click the app selector
 and select ACD.
 -
Go to Digital > Points of Contact Digital and click Google Business Messages.
-
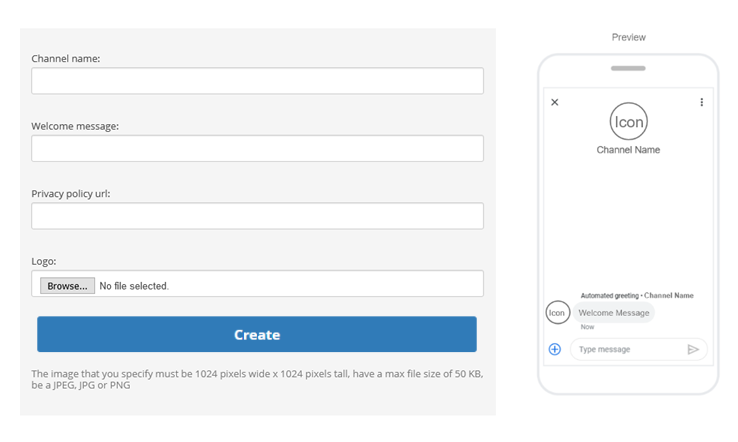
Click Create Channel.
- Enter the Channel name.
- Enter a Welcome message. This is the first message that customers see when they start a conversation with your organization on this channel.
- Enter the URL for your organization's privacy policy.
- Click Browse and select the Logo that you want to use in your Google Business Messages channel.
- Click Create. Shortly after you create the channel, it appears in your Google Business Messages account. Notify your Account Representative so they can set up your channel's entry points.
After you've created a Google Business Messages channel, you can go to Rich Message Settings to create rich content. There you can enable agents to send rich messages in any Google Business Messages channel.
Configure Roles and Permissions
You need to add this channel![]() Various voice and digital communication mediums that facilitate customer interactions in a contact center. to each role that will use the channel. When you add a channel to a role, you need to configure permissions. These determine what users assigned to the role can do when interacting with the channel.
Various voice and digital communication mediums that facilitate customer interactions in a contact center. to each role that will use the channel. When you add a channel to a role, you need to configure permissions. These determine what users assigned to the role can do when interacting with the channel.
You can add this channel to existing roles or create a role in the CXone Mpower Admin application specifically for this channel. Digital Experience users can only have one role.
If you create a new role for this channel, be sure to include any necessary permissions from the Digital Engagement list on the Permissions tab in the CXone Mpower Admin application. When you save the new role, it appears in the ACD > Digital > Roles list, where you can add channels and permissions, as well as assign the role to digital agents![]() An agent who handles digital interactions, such as those on email, chat, social, messaging, and SMS channels. . Agents using Agent need to have the Digital Engagement attribute enabled and be assigned to a digital skill to handle digital interactions. Agents using MAX can handle digital interactions if they have either the Digital Engagement attribute or a digital skill assigned to them. Agents either need the Digital Engagement attribute enabled or a digital skill assigned to them to handle digital
An agent who handles digital interactions, such as those on email, chat, social, messaging, and SMS channels. . Agents using Agent need to have the Digital Engagement attribute enabled and be assigned to a digital skill to handle digital interactions. Agents using MAX can handle digital interactions if they have either the Digital Engagement attribute or a digital skill assigned to them. Agents either need the Digital Engagement attribute enabled or a digital skill assigned to them to handle digital![]() Any channel, contact, or skill associated with Digital Experience. interactions. However, if you want agents to be able to use other features like searching posts, cases, or messages, you must enable the corresponding permissions.
Any channel, contact, or skill associated with Digital Experience. interactions. However, if you want agents to be able to use other features like searching posts, cases, or messages, you must enable the corresponding permissions.
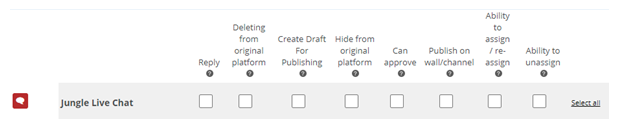
Be sure to add the Reply permission for all roles that need to interact with contacts![]() The person interacting with an agent, IVR, or bot in your contact center.. Without this permission, users with the role can't reply to interactions. In addition to this permission, you must also enable the Skills View permission in the Admin application to allow agents reply to messages.
The person interacting with an agent, IVR, or bot in your contact center.. Without this permission, users with the role can't reply to interactions. In addition to this permission, you must also enable the Skills View permission in the Admin application to allow agents reply to messages.
- Click the app selector and select ACD.
-
Go to Digital > Roles.
- Click the Edit icon for the role you want to use.
- In the Channels section, locate the channel you want to configure permissions for and click Edit permissions.
-
Select the checkboxes in the channel's row for each permission you want to add to the selected role.
Learn more about channel permissions
Depending on how Digital Experience is configured, some permissions may not be available.
Permission
Details
Reply
When selected, users can write replies that are published Posting directly to a social media wall, feed, or account. on behalf of the channel. Users without this permission can write drafts of messages. The drafts must be approved before they can be sent or published. Deleting from original platform When selected, users can delete a message or post A social media thread stems from one original post. A post can result in multiple threads from various contacts. from its original platform (for example, from Facebook or Twitter). Hide from original platform When selected, users can hide a message or post on its original platform (for example, Facebook or Twitter). Can approve When selected, users can approve drafts of replies written by other users. Ability to assign/re-assign When selected, users can assign or re-assign any conversation to themselves or other users. Ability to unassign When selected, users can unassign a conversation from themselves or other users. - Click Save. Continue adding permissions for other channels, as needed.
Configure Routing and Queues
You must create new digital skills in ACD. Using digital scripts is the recommended method for routing digital contacts. It's easier to build and troubleshoot the routing workflow using the visual interface of a Studio script. With routing queues, it can be a challenge to keep track of the many rules required to route contacts. You can also use Workflow Automation to create rules that work with digital skills.
You can still use these steps to configure existing routing queues, but queue creation has completely migrated to ACD skills.
You need to select a default Studio script and a default skill for each channel you create. To configure this for existing channels go to ACD> Digital > Points of Contact Digital.
You need to define how Digital Experience routes messages that come in through this channel![]() Various voice and digital communication mediums that facilitate customer interactions in a contact center.. You can modify the filters for existing routing queues
Various voice and digital communication mediums that facilitate customer interactions in a contact center.. You can modify the filters for existing routing queues![]() Determine which agents to route digital cases to, using criteria such as the agent having expertise in that type of case. to also route for this channel. Routing queues in Digital Experience are similar to skills
Determine which agents to route digital cases to, using criteria such as the agent having expertise in that type of case. to also route for this channel. Routing queues in Digital Experience are similar to skills![]() Used to automate delivery of interactions based on agent skills, abilities, and knowledge. in ACD.
Used to automate delivery of interactions based on agent skills, abilities, and knowledge. in ACD.
- Click the app selector and select ACD.
-
Go to Digital > Routing Queues.
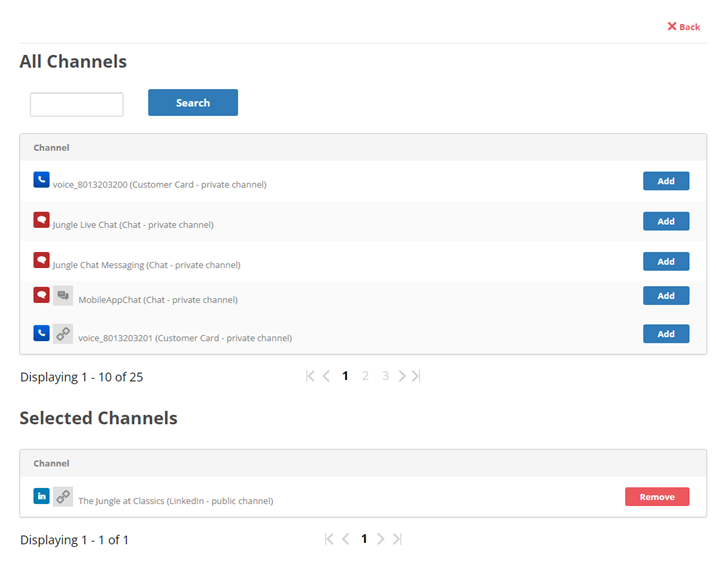
- In the table, locate the routing queue you want to work on and click Filters.
- Locate the filter you want to use and click Conditions. You can also add a new filter.
- Click Add condition.
- Use the drop-down to select Included channels rule, then click Create condition for selected type.
- Click Add for each channel you want in the routing queue. Review the Selected Channels section when you're done, then click Back. Changes are saved automatically.
Create a Digital Skill
Required permissions: Skills Create and Skills Edit
Agents using Agent need to have the Digital Engagement attribute enabled and be assigned to a digital skill to handle digital interactions. Agents using MAX can handle digital interactions if they have either the Digital Engagement attribute or a digital skill assigned to them.
If your agents use SFA Classic, do not select the Accept/Reject option in this setup. This feature is not currently supported for digital channels and attempting to enable it will result in the contact being automatically refused.
The name of a skill should be meaningful. It's helpful to be consistent when naming skills. Decide on a standard format for skill names that works for your organization.
A skill name must have a minimum of 2 characters and a maximum of 30. Skill names may only contain letters, numbers, and these special characters:
- Hyphens (-)
- Underscores (_)
- Periods (.)
- Colons (:)
-
Click the app selector
and select ACD. -
Go to Contact Settings > ACD Skills.
-
Click Create New > Single Skill.
- Set the Media Type to Digital. Digital Any channel, contact, or skill associated with Digital Experience. skills will always be Inbound unless you are using Personal Connection or BYOC.
- Enter a Skill Name.
- Select the Campaign you want the skill to be part of.
- To use rich content in your outbound message, select a Message Template.
- To add a sub-skill to this skill, select the checkbox. This only applies if you use digital routing queues for contact skill assignment. This is not the recommended routing method. Using Studio scripts is the recommended method to manage contacts and assign skills.
-
Configure the remaining optional fields in the Skill Information section as needed.
Learn more about fields in this step
Field Details Agentless Don't select for agent dialing.
When this is selected, Workforce Intelligence Minimum Agents and Workforce Intelligence Minimum Available Agents are not available.
Sub-Skill Allows you to add a sub-skill to a skill. This lets you apply additional filters to match a skill if you use digital routing queues for contact skill assignment. However, using Studio scripts is the recommended method to manage contacts and assign skills. Sub-skill is not compatible with Studio, so it's not recommended to be used. - If you want to use screen pops A pop-up window with information about the contact that appears on an agent's screen after an event such as connecting to a contact. for this skill, use the action in Studio. This capability is only supported for the Agent suite.
-
If your organization uses dynamic delivery, use the Routing Configuration section to customize the routing experience for this skill. To do so, select an Evaluation Criteria and configure any related settings.
-
Skill Proficiency: This is the default setting. Routing decisions prioritize the agent with the highest configured proficiency level for the skill.
-
Preferred Agent: Routing decisions prioritize the agent who last handled the same case or contact. If you select this option, you must configure these settings:
-
Focus Metric: Specifies which agent is the preferred agent. Choose between:
- Per Case: The agent who most recently handled an interaction linked to the customer case.
- Per Customer: The agent who most recently worked on the interaction with the contact The person interacting with an agent, IVR, or bot in your contact center..
-
Focus Lock: Specifies what happens when the preferred agent is unavailable. Choose between:
-
When Offline: The interaction waits in queue until the preferred agent becomes available or the Fallback Time is exceeded. When the Fallback Time is exceeded, the interaction routes to another agent based on skill proficiency. The receiving agent becomes the new preferred agent for the case or contact.
-
When Available: An agent may be in an available state, but still not be immediately available. For example, they may have an available status, but be handling ACW
State that allows an agent to complete work requirements after finishing an interaction., responding to a message from another contact, or otherwise busy. In this case, you must also configure Fallback Time to determine how long to wait for the preferred agent. When the Fallback Time is exceeded, the interaction routes to another agent based on skill proficiency. The receiving agent becomes the new preferred agent for the case or contact.
-
-
Fallback Time: The number of seconds to wait for the preferred agent to become available. For example, if you enter 900 seconds, the system will wait 15 minutes before routing the contact to another agent. If you choose to use Preferred Agent to route contacts, you must enter a value between 1 and 5,256,000. If you leave this field blank, you receive an error message.
Any interaction that enters the queue without an applicable contact or interaction history routes to an available agent based on skill proficiency.
-
-
Least Occupied: Contacts route to the agents with the lowest number of active contacts and who have not already met their total contact limit. This option helps to evenly distribute contacts among your agents.
-
Most Occupied: Contacts route to the agents with the highest number of active contacts and who have not already met their total contact limit. This option helps to maximize agent effectiveness.
-
-
If you want to change the default service level settings for this skill, modify the fields in the Service Level section.
Learn more about fields in this step
Field
Details
Service Level Threshold The number of seconds agents have to respond to meet an SLA Commitment between service provider and customer with defined service level thresholds including quality, availability, and responsibilities.. For example, if your SLA for this skill is to respond to 80% of contacts within 20 seconds, enter a value of 20.Service Level Goal
The percentage of contacts agents must respond to by the Service Level Threshold to meet the SLA. For example, if the SLA for this skill is to respond to 80% of contacts within 20 seconds, enter a value of 80
- To require agents to manually accept or reject interactions for this skill, select the Accept / Reject checkbox. If an agent rejects an interaction, it returns to the queue.
-
To enable a countdown timer for agent responses, go to Agent Response section. This capability is only supported in Agent. You can also do this later.
Learn more about fields in this step
Field Details Enabled Check the box to make the timer appear in the agent console. Clear the box to hide it. Agent First Response Enter how long you want to set the timer for. The countdown timer starts when a contact is assigned to the agent. The countdown ends when the agent sends the first message. Follow on Response
Enter how long you want to set the timer for. The countdown timer starts again when a customer responds to the agent. It ends when the agent sends a reply.
-
To unassign contacts after a timer expires, go to the Customer Response section. This capability is only supported in Agent. You can also do this later.
Learn more about fields in this step
Field Details Enabled Check the box to unassign contacts when the timer expires. Clear the box to have no idle time limit. Customer Idle Time The countdown timer starts when the agent sends the first message to the customer. The contact will automatically unassign the contact from the agent when the timer expires. Time Extension
Check the box to let an agent give the customer more time to respond. This enables a button the agent can click to reset the customer idle timer.
- Click Create. Complete additional configurations to customize or manage your skills.
Configure Default Skill and Studio Script
You need to select a default Studio script and a default skill for each channel you create. To configure this for existing channels go to ACD> Digital > Points of Contact Digital.
-
Click the app selector
and select ACD. -
Go to Digital > Points of Contact Digital.
-
Select the channel you would like to configure and click Edit.
-
Select a Studio script from the drop-down.
-
Select a default skill from the drop-down.
-
Click Save.
Configure Service Level Agreement (SLA) for this Channel
SLAs help you track how effective your agents are in managing their cases![]() The full conversation with an agent through a channel. For example, an interaction can be a voice call, email, chat, or social media conversation.. Digital Experience lets you configure SLAs globally and per channel. The speed of communication can vary widely from channel to channel, so you might want different SLAs for channels with slower communication speed. For example, a live chat
The full conversation with an agent through a channel. For example, an interaction can be a voice call, email, chat, or social media conversation.. Digital Experience lets you configure SLAs globally and per channel. The speed of communication can vary widely from channel to channel, so you might want different SLAs for channels with slower communication speed. For example, a live chat![]() Agents and contacts interact on a real-time basis. takes place in real time, but an email or SMS conversation may take days of back-and-forth between the agent and the customer.
Agents and contacts interact on a real-time basis. takes place in real time, but an email or SMS conversation may take days of back-and-forth between the agent and the customer.
SLAs are only calculated during your configured business hours.
Agents can see the current SLAs for a case display when they click in the reply field.
If you want to configure an SLA for this channel, complete this task. Otherwise, you can skip it.
- Click the app selector and select ACD.
-
Go to Digital > SLA.
- Locate the channel you want to configure and click Edit.
- Set the toggle to YES if you want the channel to follow the global SLA or to NO, DIFFERENT to configure a specific SLA for this channel.
-
Use the drop-downs to set the number of days, hours, and minutes to set the First Response Time and Solution Time for this channel.
Learn more about these metrics
Field
Details
First Response Time (FRT) FRT starts counting the second a contact The person interacting with an agent, IVR, or bot in your contact center. creates a request (for example, sends you a message or comments on a post) and runs until an agent replies.Solution Time (ST)
ST is the total amount of time it takes to resolve a case. It starts at the same time as FRT, and runs until the case is marked Resolved by an agent. In reports, ST is sometimes referred to as RT
Resolution time, sometimes called solution time.. - Click Save.