

ScreenAgent ![]() NiCE ScreenAgent is a service that runs on agent desktops that require screen recording. is available if you have these licenses:
NiCE ScreenAgent is a service that runs on agent desktops that require screen recording. is available if you have these licenses:
Install ScreenAgent![]() NiCE ScreenAgent is a service that runs on agent desktops that require screen recording. on computers to record or monitor activity on an agent's screen during an interaction. ScreenAgent runs in the background and automatically records according to the recording policies. Supervisors and evaluators can also monitor an agent’s activity during an interaction.
NiCE ScreenAgent is a service that runs on agent desktops that require screen recording. on computers to record or monitor activity on an agent's screen during an interaction. ScreenAgent runs in the background and automatically records according to the recording policies. Supervisors and evaluators can also monitor an agent’s activity during an interaction.
You can install ScreenAgent on agents' computers with Mac operating system. Make sure you're using ScreenAgent version 2.1.75 and later. The supported Mac OS versions are 10.15 macOS Catalina, 11 macOS Big Sur, and later.
To ensure that Recording Management (CXone) Workforce Engagement (WEM) delivers a seamless customer experience that utilizes the most up-to-date technology, make sure you are using the supported ScreenAgent versions:
-
ScreenAgent for Windows versions 3.0.22 or later
-
ScreenAgent for MAC versions 3.0.1 or later
If you are using older ScreenAgent versions, you will need to upgrade all your users to ScreenAgent 3.0.x versions. Older versions are not supported and might not record your agents' screens.
You can find the latest version of ScreenAgent in the downloads page.
Keep in mind:
-
ScreenAgent on Mac OS supports up to three screens recordings.
-
ScreenAgent on Mac OS supports screen monitoring differently for desktops and laptops.
-
Mac desktops—Supports up to three screens.
-
Mac laptops—Supports up to three screens if the laptop screen is closed. When the laptop screen is open and it's not the main screen, the ScreenAgent captures all the external screens (up to three). The laptop screen will not be captured.
-
-
After successful installation, you need to manually grant permission to record screen.
For tenants configured with 100% screen recording, the screen recording starts up to 25 seconds after the agent logs in. Screen recording does not work properly during these 25 seconds.
You can watch a video that gives an overview of the installation of ScreenAgent on an agent's computer. The video includes the prerequisites and installation steps.
For a list of features added to previous ScreenAgent releases, see ScreenAgent: Cumulative Release Notes.
Prerequisites
Before starting installing ScreenAgent, make sure to:
-
Check the connectivity wizard.
-
Check the agent's computer configuration.
 Agent computer requirements
-
One of the softphone solutions for agents:
-
Agent Workspace (Agent).
-
Salesforce Agent softphone installed on the same computer as ScreenAgent.
-
MAX softphone.
-
-
Port 31322 open. This port is only used for internal communication between ScreenAgent and /MAX/Agent Workspace (Agent)/Salesforce Agent softphone on the agent's computer.
-
-
Make sure the user who is installing ScreenAgent (for example, the admin) has Admin privileges on the agent's computer.
-
Make sure the user who is installing ScreenAgent (for example, the admin) has these NiCE CXone permissions:
-
Can access support downloads: On—This allows you to access the Supports - Downloads page.
-
Access Key: Create—This is to manage access keys for your organization.
-
-
Follow the below steps in given order to generate an access key for ScreenAgent. You can use the same access key for installing ScreenAgent on all agents' computers in your tenant.
The access key receives all of the permissions of the NiCE CXone user who generates it. If this user is an administrator, then anyone with the access key would have administrator privileges. So for security reasons, first create a NiCE CXone user and role for ScreenAgent, and then generate the key with the ScreenAgent user.
-
Create a role for the ScreenAgent service:
- Click the app selector
 and select Admin.
 -
Go to Security > Roles and Permissions.
-
Click New Role.
-
Give a name for the role, such as ScreenAgent access key.
-
Remove all permissions for the role, except Access Key and My Access Key.
-
Save & Activate the profile.
- Click the app selector
-
Create an employee for the ScreenAgent service:
- Click the app selector and select Admin.
-
Click Employees.
-
Click New Employee.
-
Give a name for the employee, such as ScreenAgent.
-
From the Primary Role drop-down list, select the ScreenAgent access key role you just created.
-
On the General tab, clear all the attributes.
-
Create the ScreenAgent employee. You can generate access keys only after you create the account.
- Click the app selector
-
Open the ScreenAgent employee again and go to the Security tab. Click Add access key to generate an access key.
-
Copy both the Access Key ID and Secret Access Key and save them somewhere safe. If you don't copy the Secret Access Key or if you lose it, you'll need to create a new one. Use this access key ID and secret access key when installing ScreenAgent on all agents' computers.
-
Activate the ScreenAgent employee account by clicking the Activate Account button in the activation email.
-
-
Download the ScreenAgent:
-
Go to NiCE CXone, and log in as a user with the Can access support downloads permission.
-
Click your Username and select Support and Downloads.
-
Download the ScreenAgent DMG. Note where you download the DMG to, you'll need the file location later.
-
Install ScreenAgent
You can install ScreenAgent manually on each agent's computer.
To install ScreenAgent:
-
Make sure all prerequisites are in place.
-
Extract the ScreenAgent-darwin-x64-x.x.x.dmg either via terminal or manually:
To extract the file via terminal:
-
In the Terminal app on your Mac, enter the complete path name where you downloaded the DMG file.
-
To extract the file, type sudo hdiutil attach ScreenAgent-darwin-x64-<enter DMG version, such as 2.1.67>.dmg and press Enter.
-
To move the file to the Applications folder, type sudo cp -R /Volumes/ScreenAgent/ScreenAgent.app /Applications and press Enter.
-
Type sudo hdiutil unmount /Volumes/ScreenAgent/ and press Enter.
To extract the DMG file manually:
-
Go to the location where you downloaded the DMG file, and double-click the ScreenAgent-darwin-x64-x.x.x.dmg file.
-
Copy the ScreenAgent folder and paste it in the Applications directory.
-
-
Step-by-step instructions to install:
-
Go the Terminal app on your Mac.
-
Copy and paste the command into the terminal, and edit the parameters listed in the table.
-
If you don't have a web proxy, use this command:
sh /Applications/ScreenAgent.app/Contents/Resources/install-screen-agent.sh REGION_TYPE=<Enter your region. This is the subdomain (first 3 characters) of the NiCE CXone URL (for example: na1, na2, au1, eu1)> ACCESS_KEY_ID=<paste the access key ID> ACCESS_KEY_SECRET=<paste the secret access key>
Make sure you have the Admin sudo password. This command may prompt you to enter the password.
-
If you have a web proxy, use this command:
sh /Applications/ScreenAgent.app/Contents/Resources/install-screen-agent.sh REGION_TYPE=<Enter your region. This is the subdomain (first 3 characters) of the NiCE CXone URL (for example: na1, na2, au1, eu1)> ACCESS_KEY_ID=<paste the access key ID> ACCESS_KEY_SECRET=<paste the secret access key> WEB_PROXY=<only include if you're using a proxy server to connect to the internet>
Make sure you have the Admin sudo password. This command may prompt you to enter the password.
Installation command parameters
Parameter
Description
Example
ACCESS_KEY_ID
The access key ID created in the Employee account.
ACCESS_KEY_ID=ABCDEF12345====
ACCESS_KEY_SECRET
The secret access key created in the Employee account.
ACCESS_KEY_SECRET=12345ABCDEF
REGION_TYPE
The subdomain (first 3 characters) of your NiCE CXone URL (for example: na1, na2, au1, eu1).
REGION_TYPE=na1
WEB_PROXY
Only include this parameter if you’re using a proxy server to connect to the internet.
Keep in mind:
-
Host can be hostname or IP.
-
Use http or https according to your proxy settings.
-
Use username and password of the server if it’s set in your proxy settings.
For example:
-
http://server_username:server_password@host:port
-
https://server_username:server_password@host:port
-
https://host:port
WEB_PROXY=http://admin:pwd@168.63.76.32:3128
WEB_PROXY=https://proxyserver:8088
-
-
-
The log of the installation progress is displayed in the terminal and saved to the installation log file, InstallationLog.txt. The full path is /Applications/ScreenAgent.app/Contents/Resources/InstallationLog.txt.
-
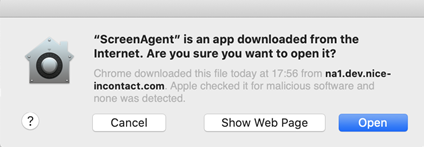
When the installation completes and you're prompted to open ScreenAgent, click Open.
-
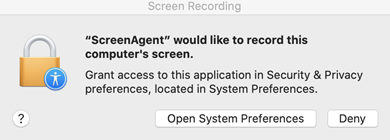
When you're prompted to grant screen recording permission in the ScreenAgent application, click Open System Preference.
-
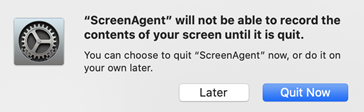
On the System Preferences page, select the ScreenAgent checkbox. A prompt is displayed stating to quit the ScreenAgent to allow it to record the screen. Click Quit Now.
-
Restart the computer or go the Terminal app on your Mac and run the command:
open /Applications/ScreenAgent.app
-
Make sure the agent has the Can be Recorded (Screen) attribute (in NiCE CXone, go to Admin > Employees, and then click on the agent). This attribute is necessary for enabling screen recording, screen monitoring, or both.
-
Record a call and check the ScreenAgent log file. The full path to the ScreenAgent.log file is ~/Library/Application Support/ScreenAgent/ScreenAgent.log. If there were any errors, see Troubleshooting Recordings and FAQs.
You can watch a video that gives an overview of how to improve agent interactions with real-time screen monitoring using ScreenAgent.