

Recording policies let you set up and manage which interactions you want to record. You can create multiple recording policies for your organization. You can also configure recording settings to define when to continue recording an interaction.
You can define 2 types of policies:
-
Recording: Defines the interactions that should be recorded
-
Do Not Record: Defines the interactions that should not be recorded
Do Not Record policies apply to all channel types and are not prioritized. Do Not Record policies take precedence over other recording policies, but if there's a LogRecordingPro action in a Studio script or recording on demand is triggered, the interaction will be recorded.
When a new tenant is created, it is assigned a default recording policy set for 100% of all voice calls.
You can manage your active and long-term storage for recordings with Cloud Storage Services.
How Do Recording Policies Work?
For each recording policy, you define:
-
Channel type: Voice or Digital
 Any non-voice channel such as chat, email, SMS, work item, and messaging channels.Digital channels
-
Chat, email, SMS, work item,
-
Messaging channels such as Apple Messages for Business, Custom, Facebook Messenger, LINE Messaging, Microsoft Teams, Slack, Telegram Messenger, Viber Messenger, and WhatsApp.
-
Public social channels, such as, Apple Reviews, Facebook, Google Places, Google Play, LinkedIn, and YouTube. Screen recording and Quality Management (CXone) are not available for public channels.
-
-
How much to record: including after call work
State that allows an agent to complete work requirements after finishing an interaction. -
Filters: for direction, agents, teams, ACD
System that recognizes, routes, and connects contacts to available agents based on skill and priority. skills, phone numbers, business data values -
The priority of the policy
For voice and dialer interactions, you configure the percentage of calls to record. You can also configure the percentage of calls that should include screen recordings. For dialer calls (with agent or agentless), the interactions are recorded starting the moment the customer answers the call. If a call is less than 4 seconds, it's considered a short call and is not recorded.
For digital channels, transcripts are saved according to your settings in ACD/Digital Experience (DX). You can also configure the percentage of digital interactions to include screen recording.
For screen recording:
-
To record agents' screens, the agents must have ScreenAgent
NiCE ScreenAgent is a service that runs on agent desktops that require screen recording. installed. You can configure policies to record all interactions and limit the screen recording to agents who have ScreenAgent installed. See Examples of Basic Recording Policies. -
Consider your storage limitations when deciding how much screen activity to record.
-
You can define a Deny list of applications and URLs to protect sensitive data. If an application or URL on the Deny list is open on the agent's screen, screen recording stops.
You can continue screen recording for up to 45 minutes (2700 seconds) after the interaction ends to capture the after call work (wrap-up tasks). The agent's screen activity is recorded for the entire duration you select, unless:
-
A new interaction starts
-
The current session times out
-
The agent applies a disposition
-
The agent logs out
Other changes to agent state do not affect ACW recording.
For the system to record the After Call work specified in the recording policy, the user’s skill in the ACD must have either Skill set to Automatic Wrap Up or Disposition enabled.
ACW in complex call scenarios
In recorded segments of a complex call, each agent’s after-call work (ACW) is recorded when they finish their part. The ACW time for each agent is based on the recording policy for the first recorded segment. If a segment has a Do Not Record policy, that segment is not recorded.
-
You can deactivate and reactivate polices. If you reactivate policies, they are automatically saved as lowest priority. You can then change the priority.
Examples of Basic Recording Policies
Let's say you want to record a certain amount of voice and screen for all calls for all agents. If all agents in your organization have ScreenAgent installed, you can create a single policy.
If you have agents who don't have ScreenAgent installed, trying to record them will cause screen recording errors. You can prevent these errors by creating 2 policies:
Create 2 different policies:
Policy 1
-
Priority of P1
-
100% of voice calls
-
Screen recording for 100% of the voice calls
-
After Call Work of 90 seconds
-
Filter on employees or teams, make sure to only select employees/teams of agents who all have ScreenAgent installed
-
You can also filter on direction, skills, and/or phone numbers
Policy 2
-
Priority of P2
-
100% of voice calls
-
Screen recording for 0% of the voice calls
-
Don't select After Call Work
-
Don't filter on teams or employees
-
You can filter on direction, skills, and/or phone numbers
Create 2 different policies:
Policy 1
-
Priority of P1
-
30% of voice calls
-
Screen recording for 20% of the voice calls
-
After Call Work of 90 seconds
-
Filter on employees or teams, make sure to only select employees/teams of agents who all have ScreenAgent installed
-
You can also filter on direction, skills, and/or phone numbers
Policy 2
-
Priority of P2
-
30% of voice calls
-
Screen recording for 0% of the voice calls
-
Don't select After Call Work
-
Don't filter on teams or employees
-
You can filter on direction, skills, and/or phone numbers
If you want to record a combination of teams and employees, you'll need to create multiple policies:
Create 3 different policies:
Policy 1
-
Priority of P1
-
100% of voice calls
-
Screen recording for 100% of the voice calls
-
After Call Work of 90 seconds
-
Filter on employees, selecting the 3 agents of Team 1 you want to record. Make sure each employee has ScreenAgent installed.
-
You can also filter on direction, skills, and/or phone numbers
Policy 2
-
Priority of P2
-
100% of voice calls
-
Screen recording for 100% of the voice calls
-
After Call Work of 90 seconds
-
Filter on teams, selecting Teams 2, 3, and 4. Make sure each employee from these teams has ScreenAgent installed.
-
You can also filter on direction, skills, and/or phone numbers
Policy 3
-
Priority of P3
-
100% of voice calls
-
Screen recording for 0% of the voice calls
-
Don't select After Call Work
-
Don't filter on teams or employees
-
You can filter on direction, skills, and/or phone numbers
If you want to record digital channels:
-
Screen recording for 80% of chat and email interactions
-
After Call Work of 90 seconds
-
Filter on employees or teams, make sure to only select employees/teams of agents who all have ScreenAgent installed
-
You can also filter on direction and/or skills
Create 2 different policies:
Policy 1
-
Priority of P1
-
100% of voice calls
-
Screen recording for 100% of the voice calls
-
After Call Work of 90 seconds
-
Filter on employees (or teams, if the new hire groups are in their own teams), make sure to select employees who all have ScreenAgent installed
-
You can filter on direction, skills, and/or phone numbers
Policy 2
-
Priority of P2
-
100% of voice calls
-
Screen recording for 25% of the voice calls
-
After Call Work of 90 seconds
-
Do not filter on teams or employees in the rule, but make sure all employees have ScreenAgent installed
-
You can filter on direction, skills, and/or phone numbers if needed
Define Recording Policies
- Click the app selector
 and select Admin.
 -
Click Recording > Recording Policies.
-
Click New > Recording Policy.
The options displayed depend on your Recording license configuration and permissions.
-
Enter a Name (and Description).
-
Select channel type.
To record all dialer interactions (with agents or agentless), select channel type as Voice.
-
For voice calls and dialer interactions:
-
Move the slider to select the percentage of Voice only to record.
View image
For example, select 75%:

-
Move the second slider to select the percentage of Voice and screen to record.
View image
For example, select 25%:

-
Select Record After Call Work to continue screen recording after the call ends, and enter the duration, up to 2700 seconds.
-
-
For digital channels:
-
Select the channels for screen recording. Transcripts are saved according to your settings in the ACD/Digital Experience (DX), unrelated to recording an agent’s screen activity.
-
Move the slider to select the amount of Screen recording.
-
Select Record After Call Work to continue screen recording after the interaction ends, and enter the duration, up to 2700 seconds.
-
-
You can add filters to select the interactions to record. By default, no filters are set, and all interactions can be recorded.
-
When you add Directions, Skills, and Phone Numbers filters, interactions are recorded if they match a criteria in all the filters. For example, if you add direction and skill filters, interactions are recorded if they match a specified direction AND skill.
-
When you add both Employees and Teams filters, interactions are recorded if they match an employee OR a team AND a criteria in the other filters.
-
In Phone Numbers, you can add an asterisk after the beginning of the number to include all phone numbers in a country or area code. For example, enter 1800* for all calls from area code 1 (800), or 1212123* for all calls from 1 (212) 123-xxxx, or 01144* for all calls from the United Kingdom.
-
To add a Business Data filter:
-
Select a Business Data Name. The list contains the display names of all active business data fields.
-
Select an Operator and then enter a Value. The available operators depend on the selected business data.
Interactions are recorded if they match all the business data filters, and a criteria in the other filters.
When business data is received after a call starts and matches a recording policy with a Business Data filter, recording starts at that point.
-
View Image
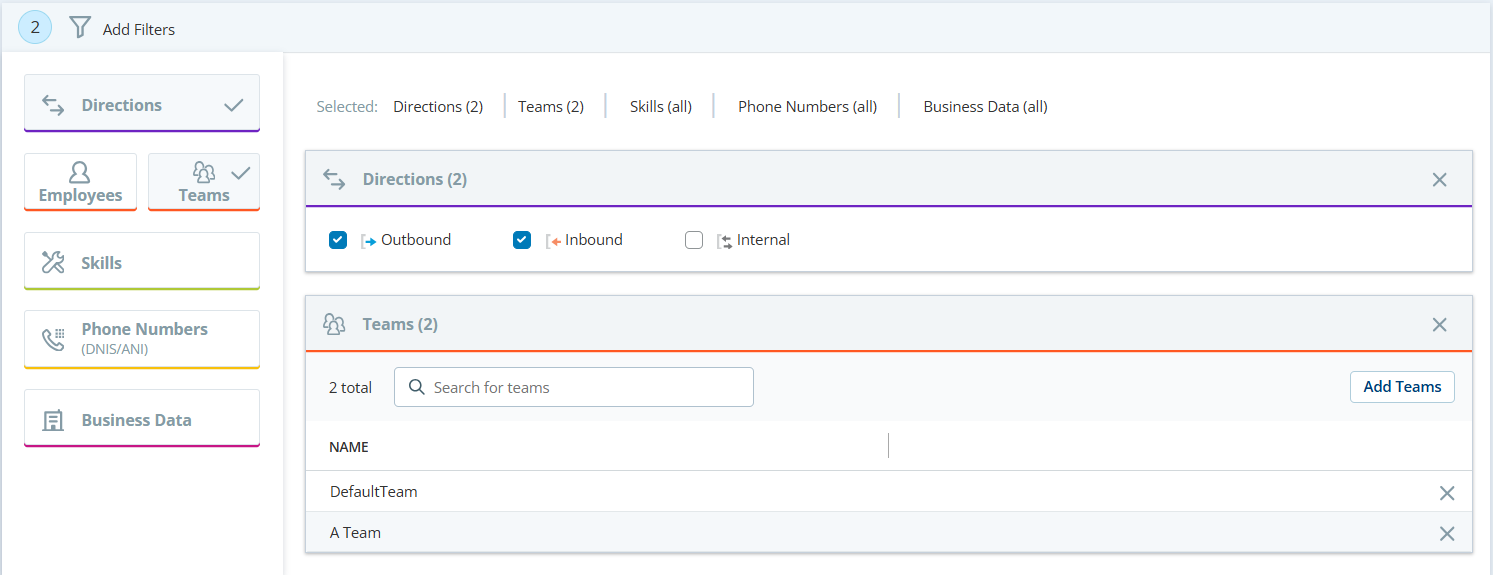
This recording policy includes 3 filters: Directions, Teams, and Business Data. An interaction can be recorded if it matches one of the directions AND one of the teams AND all the business data filters.
-
-
Click Create.
The policy is saved as the lowest priority.
-
To change the priority:
-
Click Prioritize.
-
Rearrange the policies as needed.
-
Click Save.
-
-
After your recording policy has been in place long enough to have a good sampling of segments, verify that interactions are being recorded as you intended. See Troubleshoot Recordings.
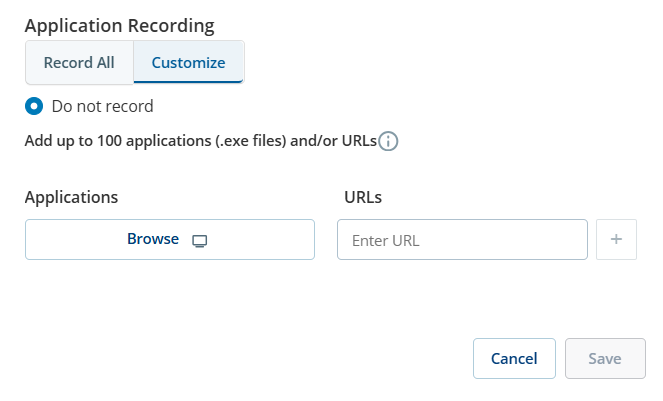
Manage a Screen Recording Deny List
You can configure a Deny list, which will be applied to all calls with screen recording.
-
Screen recording stops when an application or URL on the Deny list opens on the agent's desktop. If the open application or URL window is covered by another window, the recording still stops.
-
If an application or URL on the Deny list is minimized to the taskbar, it’s considered closed and recording continues.
-
Hovering over an application or URL on the Deny list that is minimized to the taskbar and presents the application preview does not stop the recording.
Use the Deny list to prevent the accidental recording of sensitive data. The Deny list can include up to 100 applications and/or URLs.
ScreenAgent receives the latest Deny list when it loads and then every 12 hours.
To create a Deny list:
- Click the app selector and select Admin.
-
Click Recording > Recording Policies.
-
Click Settings
 .
. -
In the Application Recording section, click Customize.
-
Select Do Not Record.
-
Set up the Deny list:
-
To add Applications, click Browse and choose an EXE application file.
-
To add URLs, enter a URL address and click +.
You can use a wildcard (*) at the beginning of a URL to block all pages that end with the same domain or structure. For example, entering *.example.com will block www.example.com, blog.example.com, and any other subdomain.
-
Wildcard support requires ScreenAgent client version 3.2.27 or later.
-
When entering URLs, you do not need to include http://, https://, or www. This applies whether or not you are using a wildcard.
-
You can add up to 100 applications and/or URLs.
-
If you add an explicit NICE.com URL, such as https://www.NICE.com or http://NICE.com, the recording stops when this specific URL opens.
-
If you enter www.NICE.com in the URLs field, the recording stops if any of the following URLs open:
-
http://www.NICE.com
-
https://www.NICE.com
-
-
If you enter NICE.com in the URLs field, the recording stops if any of the following URLs open:
-
http://www.NICE.com
-
http://NICE.com
-
https://www.NICE.com
-
https://NICE.com
-
-
-
Save your settings.
Record Interactions Transferred to External Phone Number
By default, any interactions transferred to external phone numbers are not recorded. You can define whether to continue recording when these calls are transferred.
For example, when the setting is On and an agent transfers a call from your organization's central contact center to a specific branch, the call will continue to be recorded by Recording Management (CXone).
Keep in mind:
-
Do Not Record policies take precedence over other recording settings.
-
The LogRecordingPro actions (Record: Start, Record: Stop) in the Studio script take precedence over other recording settings.
-
For a call transferred to external phone number:
-
When transferring from the IVR, the external interaction is not recorded.
-
When using a cold transfer, the external interaction is recorded, even if there is a Do Not Record policy with the external participant’s phone number.
-
To continue recording calls transferred to external numbers:
- Click the app selector and select Admin.
-
Click Recording > Recording Policies.
-
Click Settings
. Set the Continue Recording Transfers to External Phone Numbers option to On.
Record Interactions After Disposition
This feature is only available for users with the Recording Management (CXone) Advanced and a screen recording license.
By default, recording for any interactions stops when an agent applies disposition![]() Results or tags that the agent or system assigns to the contact with additional information about the call when the interaction ends.. You can choose to continue recording interactions even after an agent applies disposition.
Results or tags that the agent or system assigns to the contact with additional information about the call when the interaction ends.. You can choose to continue recording interactions even after an agent applies disposition.
For example, when the setting is On and an agent applies the disposition, the interaction will continue to be recorded by Recording Management (CXone) until the duration set in the after call work (ACW) field in the recording policy.
To continue recording calls after applying disposition:
- Click the app selector and select Admin.
-
Click Recording > Recording Policies.
-
Click Settings
. Set the Continue recording after applying disposition option to On.
Apply Recording Policies When Leading Agent Changes
This feature is available through Controlled Release. Contact your Account Representative for more information.
This feature is currently offered to users with a Basic or Advanced Recording Management (CXone) license.
By default, the recording policy applied at the start of a call remains unchanged throughout the interaction. When this setting is enabled, the system automatically checks and reapplies recording policies whenever the leading agent changes. This helps ensure the correct policy is used for each team, skill, or business unit.
Each time the policy is checked, a new recording decision is made. Voice or screen recording may start, stop, or change depending on the new agent’s policy.
If a call is transferred from an agent in the Finance team with 100% voice recording to an agent in Tech Support with 50% voice recording, the second part of the call may not be recorded.
If multiple agents are on the same segment and the leading agent drops, the system selects the next leading agent based on who has been on the call the longest.
To apply recording policies when the leading agent changes:
- Click the app selector and select Admin.
-
Click Recording > Recording Policies.
-
Click Settings
. -
Set the Check recording policies when the leading agent changes option to On.
Apply disposition in complex call
- Click the app selector and select Admin.
-
Click Recording > Recording Policies.
-
Click Settings
. -
To apply disposition in complex call. There are two options available:
-
Last segment only: The disposition value is applied only to the last segment in scenarios involving multiple transfers or conference calls.
-
All segments based on the leading agent: The disposition value is applied to every call segment in scenarios involving multiple transfers or conference calls, using the disposition of the segment’s leading agent.
-

How Does Prioritization Work?
When there's an interaction, it runs through the policies by priority. Once an interaction meets the criteria for one of each of the filters in a policy, it is assigned to that policy. The interaction may not be recorded, depending on the recording percentages defined for that policy. If the interaction is not recorded for that policy, it doesn't continue to the other policies.
Changing the priority of recording policies directly affects what gets recorded.
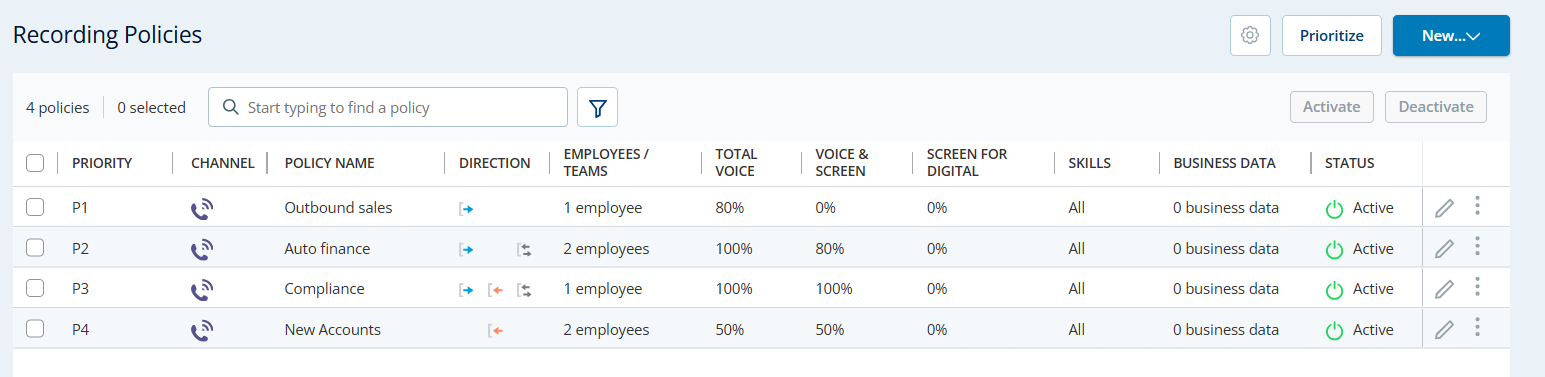
In the screenshot, you can see these policies:
-
The Outbound sales policy is set as priority 1 and records 80% of all outbound calls (without screen recording) for Joan Edwards.
-
The Auto finance policy is set as priority 2 and records all outbound and internal calls for Joan Edwards and Kevin Allen. Screen is also recorded for 80% of their outbound and internal calls.
-
The Compliance policy is set as priority 3 and records all calls for Margaret Rogers, with a priority of 3. All calls will be recorded 100% for both voice and screen.
-
The New Accounts policy is set as priority 4 and records 50% of inbound calls for Margaret Rogers and Timothy Cooper. Screen is also recorded for 50% of their inbound calls.
If Joan:
-
Receives an inbound call, it is not recorded because there are no rules set to record inbound calls for her.
-
Has a call with another agent, it is recorded, and screen is also recorded 80% of the time (by the Auto finance policy).
-
Makes an outbound call and it may be recorded (80% of calls are recorded, but screen is not) by the Outbound sales policy.
The Auto finance policy will never record outbound calls for Joan because the Outbound sales policy takes precedence.
If Kevin:
-
Receives an inbound call, it is not recorded because there are no rules set to record inbound calls for him.
-
Has a call with another agent, it is recorded, and screen is also recorded 80% of the time (by the Auto finance policy).
-
Makes an outbound call, it is recorded, and screen is also recorded 80% of the time (by the Auto finance policy).
If Margaret:
-
Receives an inbound call, both voice and screen are recorded 100% of the time (by the Compliance policy).
-
Has a call with another agent, both voice and screen are recorded 100% of the time (by the Compliance policy).
-
Makes an outbound call, both voice and screen are recorded 100% of the time (by the Compliance policy).
The New accounts policy will never record interactions for Margaret because the Compliance policy takes precedence.
If Timothy:
-
Receives an inbound call, both voice and screen are recorded 50% of the time (by the New Accounts policy).
-
Has a call with another agent, it is not recorded because there are no rules set to record internal calls for him. Keep in mind that the agent Timothy is on a call with may have a policy set to record their internal interactions. In this case, the interaction with Timothy will be recorded according to the policy for the other agent.
-
Makes an outbound call, it is not recorded because there are no rules set to record inbound calls for him.
Define Do Not Record Policies
- Click the app selector and select Admin.
-
Click Recording > Recording Policies.
-
Click New > Do Not Record Policy.
-
Enter a Name (and Description).
-
Select at least one of the Employee, Team, Skill, and/or Phone Number filters. In addition, you can also filter on Direction and Business Data.
-
In Phone Number, you can add an asterisk after the beginning of the number to limit to all phone numbers to a country or area code. For example, enter 1800* for all calls from area code 1 (800), or 1212123* for all calls from 1 (212) 123-xxxx, or 01144* for all calls from the United Kingdom.
-
To add a Business Data filter:
-
Select a Business Data Name. The list contains the display names of all active business data fields.
-
Select an Operator and then enter a Value. The available operators depend on the selected business data.
When business data is received after a call starts and matches a DNR policy with a Business Data filter, recording stops at that point. The recorded part from the call start is saved.
-
-
-
Click Create.
-
After your Do Not Record policies has been in place long enough to have a good sampling of segments, verify that interactions are being recorded as you intended. See Troubleshoot Recordings.