The NiCE CXone WFM Mobile app allows you to:
-
View your schedule, activity notes, and schedule notes.
-
View notifications of schedule updates and trade requests.
-
Trade schedules with other agents.
When you log in to the mobile app for the first time:
-
Make sure you allow NiCE CXone WFM Mobile to send you notifications.
-
Enter the activation key provided by your supervisor and click Activate.
Keep in mind, your agent mobile app session automatically times out after 60 minutes of inactivity.
For newly-activated agents, skills and schedules are reflected on the next day after the nightly job is executed.
Install the NiCE CXone WFM Mobile App
You can install the app on an Android or an iOS device. Minimum Supported OS Versions:
-
Android: 6.0 (Marshmallow) or later
-
iOS: 15.0 or later
Devices running lower OS versions will not be supported starting with the EEM Mobile App 3.7.0 release (December 2025). Users on unsupported versions may experience issues installing or running the app.
To install the mobile app:
-
Go to the App Store on your iOS device or Google Play Store on your Android device.
-
Search for NICE EmployeeEngagement Manager.
-
Select the app and tap Install.
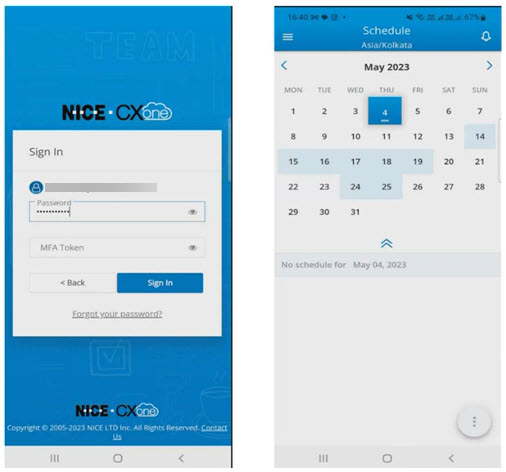
If your organization has set up a third-party IDP, you will be redirected to another login page. You will need to provide the user credentials here to use the app.
If your organization has set up multi-factor authentication, you will need to provide the MFA token when logging in. This authentication is set using global authentication and provides enhanced mobile app security.
Your Schedule
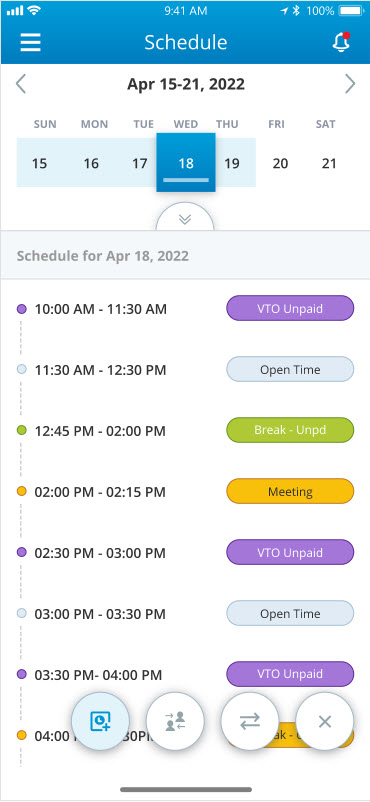
You can get to the Schedule page by navigating to menu  and then tapping Schedule. The schedule for the current day, in dark blue, appears below the calendar. Tap any day to see your schedule for that day.
WFM lets you request schedule changes using the mobile app. You can request schedule updates anytime and anywhere.
To request schedule changes:
-
Navigate to Menu
 > Schedule.
-
Click Add
 to add an activity.
 -
Select an activity code from the drop-down list.
-
Select Start and End times and dates.
Remember, if you open the calendar month viewer to select dates, a green dot under a day indicates that a schedule has already been published for that date.
-
Enter Comments if necessary.
-
Click Submit.
-
Click OK on the pop-up message and you'll see the updated schedule.
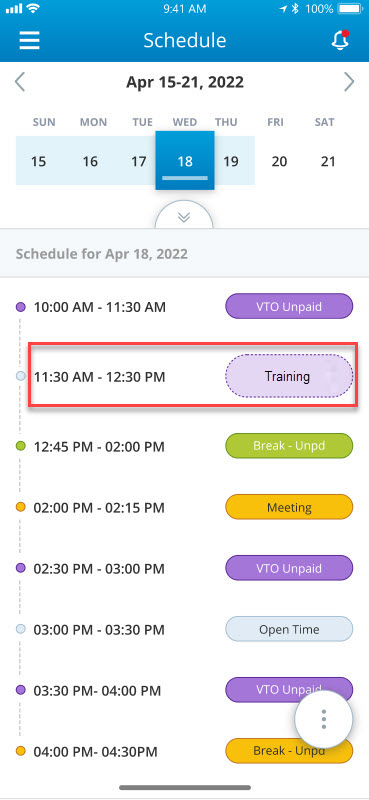
- Click on any scheduled activity to edit or cancel it.
-
You can cancel the request for a particular day even if it's a multi-day request. You can also cancel all pending requests.

Notifications for Schedule Updates
You receive notifications and push notifications whenever there is an update to your schedule or another agent requests to trade with you. You also receive an email notification for these changes.
To view notifications, tap the notification icon  at the top of the screen. This icon includes the number of unacknowledged notifications. You can view notifications for the past 7 days.
In certain wireless network configurations, push notifications on iOS 13 may not work as expected. If this happens, disable the wireless network.
Keep in mind:
-
To respond to a trade offer, tap the notification. To accept a trade, you must respond to the trade request before it expires. You can:
-
Accept the trade by tapping Trade Schedule.
-
Decline the trade by tapping Not Interested.
-
-
To delete a notification after reading it, tap X.
The number of unacknowledged notifications displayed on the notifications icon updates when you return to the Schedule screen.
Request Time Off in WFM
Request Time Off uses the configuration defined for time-off requests in WFM for the agent mobile app. Refer to Time-Off Planning and Approval Rules in WFM for more information.
This allows you to:
-
Submit partial or full day time-off requests using the agent mobile app.
-
View a summary of time-off requests.
-
View time-off balance.
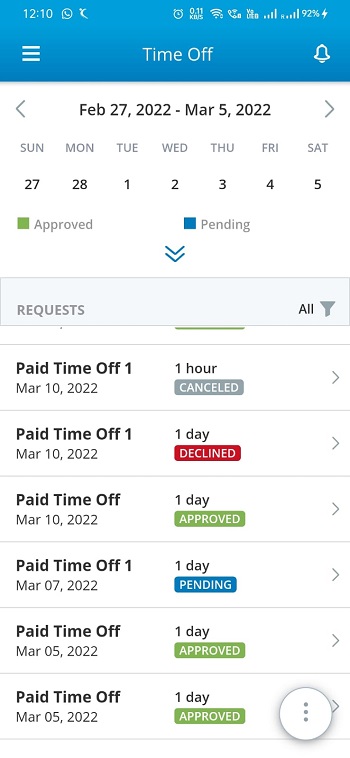
You can access the Time Off screen by navigating to > Adjust Schedule > Time Off. This screen displays the time-off summary for the current month. You can filter the displayed time-off requests by tapping  .
.
To request time off in the mobile app for WFM:
-
On the Time-Off screen, tap
 >
>  .
. -
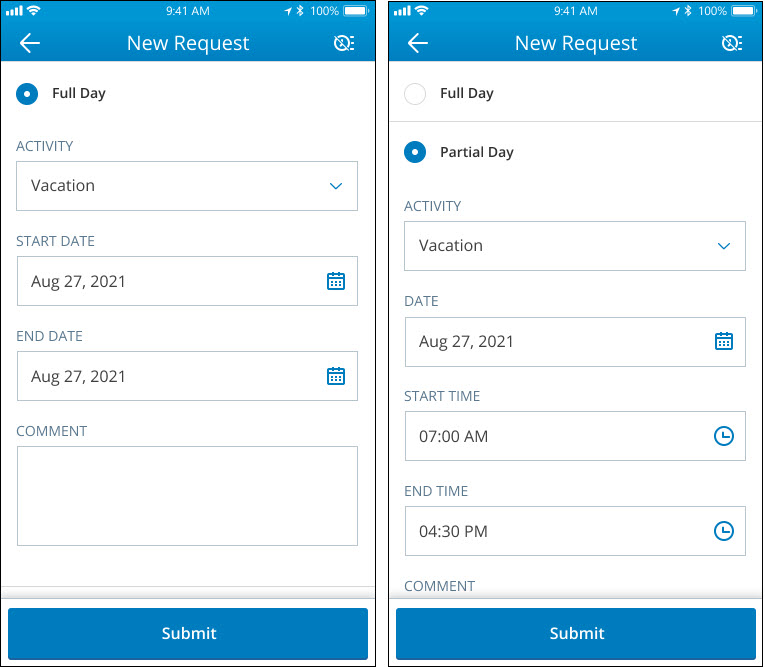
Select Full day or Partial day. You cannot select Partial day if you don't have a published scheduled for the day. In this case you can only select Full day.
-
For Full day, select an Activity, Start Date, and End Date and tap Submit.
-
For Partial day, select an Activity, Date, Start Time, and End Time and tap Submit. The activity lasts between 1 and 8 hours.
You can also check the time-off balance in days and hours by tapping >  .
.
When you request partial day time off, the system calculates the time off in fractions of a day. For example, 1 day is considered equal to 8 hours. So, if you take 1 hour off, it is calculated as: 1/8 = 0.125 days
If you had 1 day of time off and used 1 hour, your remaining balance would be 0.875 days, which may be rounded to 0.88 days in the app.
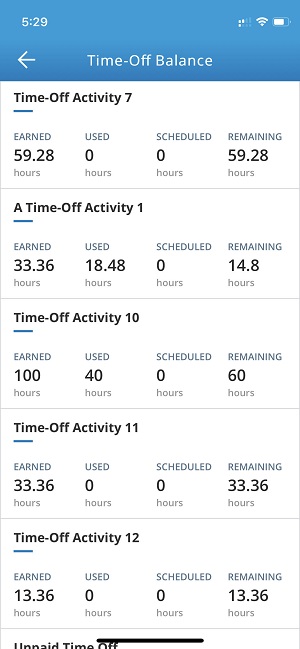
This screen displays the following details of the time-off balance:
-
Earned: Total hours earned by you.
-
Used: Hours consumed by you.
-
Scheduled: Hours approved for future dates.
-
Remaining: Balance hours.
Emma, a call center agent, has planned a mini vacation. She uses the mobile app to request time off for her vacation.
-
Emma logs into the EM app and navigates to "Adjust Schedule" in the menu.
-
She then selects "Time Off" to see her remaining balance of time-off hours.
-
Emma decides to request time off for her vacation. She clicks "New Time Off Request" and fills out the necessary details, including her vacation dates.
-
Once she's done, she clicks "Submit". A pop-up message confirms that her request has been sent.
On the other end, John, her supervisor, receives a notification about Emma's time-off request on his web portal.
-
John logs as an administrator and reviews Emma's time-off request. He checks that Emma has a sufficient time-off balance.
-
John approves the request by clicking "Approve". He also has the option to decline the request if necessary.
Back on her phone, Emma receives a notification that her time-off request has been approved. She is now ready to enjoy her vacation.
Request Interval-Level Time Off
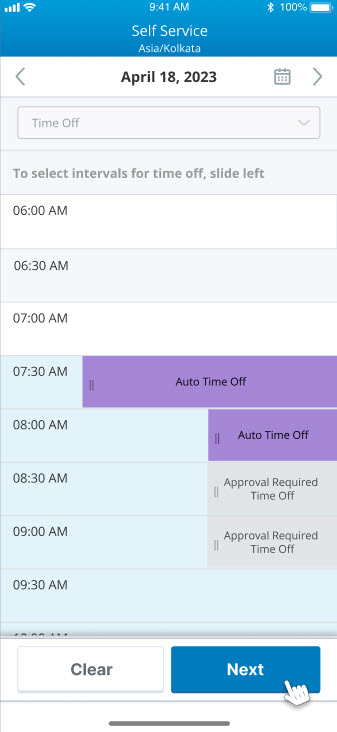
This Self-Service feature allows you to take time off when available. Interval-level time-off opportunities in My Zone are reflected in Self Service in the mobile app.
Two types of time-off intervals are available based on the staffing conditions during the interval:
-
Auto-approved time-off intervals
-
Time-off intervals that need approval
To request interval-level time off:
-
Navigate to Menu
> Self Service. -
Select Time Off from the dropdown at the top.
-
Slide the interval you want to request as time off to the left. In a single request, you can select any number of intervals as long as they are of the same type and are consecutive. For example, you cannot select an auto-approved interval and an interval that requires manager approval in a single request. Similarly, you can only select the intervals that are next to each other.
-
Click Next.
-
Click Submit.
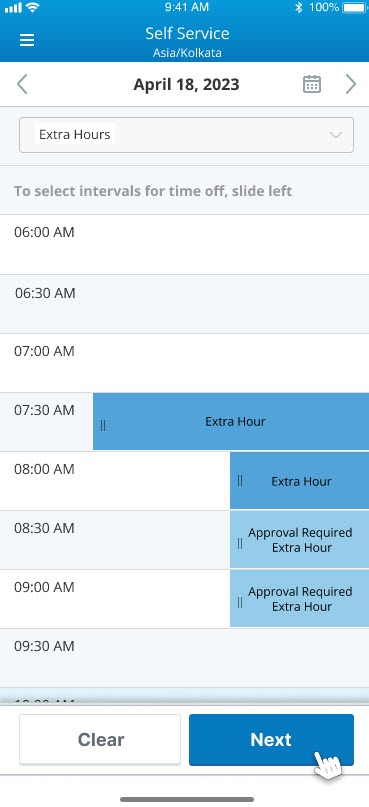
Request Interval-Level Extra Hours
This Self-Service feature allows you to see and apply for interval-level extra hours opportunities. Interval-level extra hours opportunities in My Zone are reflected in Self Service in the mobile app.
Two types of extra hours intervals are available based on the staffing conditions during the interval:
-
Auto-approved extra hours intervals
-
Extra hours intervals that need approval
To request interval-level extra hours:
-
Navigate to Menu
> Self Service. -
Select Extra Hours from the dropdown at the top.
-
Slide the interval you want to request as time off to the left. In a single request, you can select any number of intervals as long as they are of the same type and are consecutive. For example, you cannot select an auto-approved interval and an interval that requires manager approval in a single request. Similarly, you can only select the intervals that are next to each other.
-
Click Next.
-
Click Submit.
Emma has personal commitments on certain days, like a doctor's appointment or her child's school event. She uses the Interval Time Off feature to request time off only for the specific intervals when she has these commitments instead of taking the whole day off. At the same time, she uses the Interval Extra Hours feature to schedule extra hours to cover her work. By combining both functionalities, Emma can manage her personal and professional commitments.
Self-Swap Self-Service Requests
Self-swap lets you fine-tune your schedules by trading hours from the shifts. You give up some intervals from your shift and take an equal number of intervals from outside of the shifts. This way, the total work hours stay the same. Self-swap gives you more control over your schedules without affecting the overall workload. Accepted swaps automatically update the schedule.
Self-swaps are approved automatically and do not need manager interference.
Required permissions must be set to use self-swap.
To add the self-swap self-service:
-
Go to Menu
> Self Service.Self-swap is available in daily view.
-
Select Self Swap from the dropdown at the top. Your schedule displays all the available self-swap intervals. All intervals are approved automatically.
-
Find the interval you want to request, and slide it to the left. In a single request, you can select any number of intervals.
Use Clear to discard the selected intervals.
-
Click Next. You can see the available intervals that can be taken in exchange. The intervals shown are outside scheduled shifts to ensure that total working hours won't be affected.
Select the intervals you want to take in exchange.
You must add the same number of intervals that you removed. Once you do so, the Confirm Swap button is enabled.
Clicking Go Back returns you to the previous dialogue. In this case, the added intervals in exchange will be cleared, if any.
-
Click Confirm Swap. If all the selections align with the set guidelines, self-swap is auto-approved. The new intervals are added as per the selected slots on the My Schedule page.
A notification is sent whether a self-swap is approved or auto-declined. For example, net staffing has been changed, and the slot is no longer available, but the request has already been submitted.
Keep in mind that one or more agents may try to swap the same intervals while you are opting. In this case, the intervals are assigned on a first-come, first-served basis. In such cases, you might see intervals available for swapping, but the request gets auto-declined later based on validation.
Cancellation of Approved Out-of-Office Activities
You can cancel your approved time-off requests. Your manager gets only the cancellation notifications, not the requests. Your previous schedule is restored after the cancellation. You can cancel your:
-
Full day time-off requests only for future dates.
-
Partial day time-off requests for future time and dates.
-
If the last activity on the schedule is approved time off, only then an agent can cancel the request.
-
If the schedule is generated but not published. After cancellation request:
-
An agent sees a blank schedule.
-
The manager sees the last generated schedule.
-
-
If the schedule is neither generated nor published, and an agent sees a blank schedule after cancelling the request.
-
The agent cannot cancel the approved time-off request:
-
If the schedule is updated or republished after the time-off request is approved.
-
If the cancellation and the partial day requests are selected together.
-
Request Absence in Workforce Management (IEX Integrated)
You can request for absence using the mobile app without the need for involving your supervisor.
Request Absence allows you to:
-
Request partial or full day absence for a single day using the mobile app.
-
Submit an absence request for a configured number of days into the future (up to 28 days).
-
Send email notification to the agent’s supervisor.
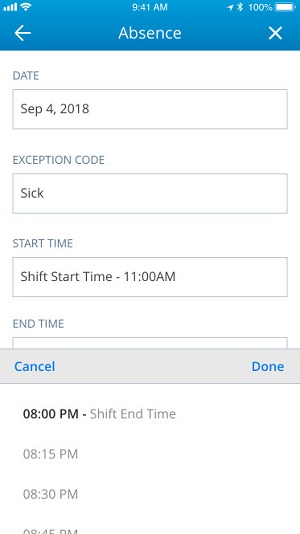
To request absence in the mobile app for Workforce Management (IEX Integrated):
-
Navigate to
> Adjust Schedule > Time Off. -
Enter the following details:
-
Date: Date of the absence.
-
Exception Code: Activity or reason for the absence.
-
Start Time: Select the start time for the time off.
-
End Time: Select the end time for the time off.
-
-
Tap Send Absence Request.