

Required permissions: Data Streams
This page leads you through the processes of setting up a Kinesis data stream. NiCE CXone provides IVR![]() Interactive Voice Response. Automated phone menu contacts use via voice or key inputs to obtain information, route an inbound voice call, or both. logs as a stream, so you must set up a method of consuming the data at a destination that you control. A full setup includes configuration steps in NiCE CXone and also setting up the service or system that will subscribe to and consume the stream.
Interactive Voice Response. Automated phone menu contacts use via voice or key inputs to obtain information, route an inbound voice call, or both. logs as a stream, so you must set up a method of consuming the data at a destination that you control. A full setup includes configuration steps in NiCE CXone and also setting up the service or system that will subscribe to and consume the stream.
You can subscribe to the data stream in any language, such as Python, .NET, Java, and so forth. When configuring the stream in NiCE CXone, you can choose to consume the data in the following schema formats:
- PROTO
- JSON
- AVRO
- JSON with Line Feed
- JSON AVRO with Line Feed
Set Up a Kinesis Data Stream
After you have a destination, you can enter the details into NiCE CXone, and the data will start flowing to the destination. After you add the Kinesis destination details into NiCE CXone, the back end takes 24 hours to update. After the update, then the data begins streaming.
Set Up a Kinesis Destination
You must create a destination in your infrastructure for the data stream and give it the permissions required to let NiCE CXone Data Streams publish data to it. This is where NiCE CXone can access and consume the data.
- Create the Kinesis stream in AWS Management console
 . You can learn more about this process in the Amazon documentation. Be sure to record your Kinesis stream ARN, which you must include in the permissions policy.
 - Create an IAM role in the AWS Management console . Make sure to configure the following:
- Permissions
"kinesis:DescribeStream"
"kinesis:DescribeStreamSummary"
"kinesis:DescribeStreamConsumer"
"kinesis:SubscribeToShard"
"kinesis:RegisterStreamConsumer"
"kinesis:PutRecords"
"kinesis:PutRecord"
"kinesis:ListShards"
Make sure to include "Resource": "<YOUR_KINESIS_STREAM_ARN>" in the permissions policy.
- Trust Relationships
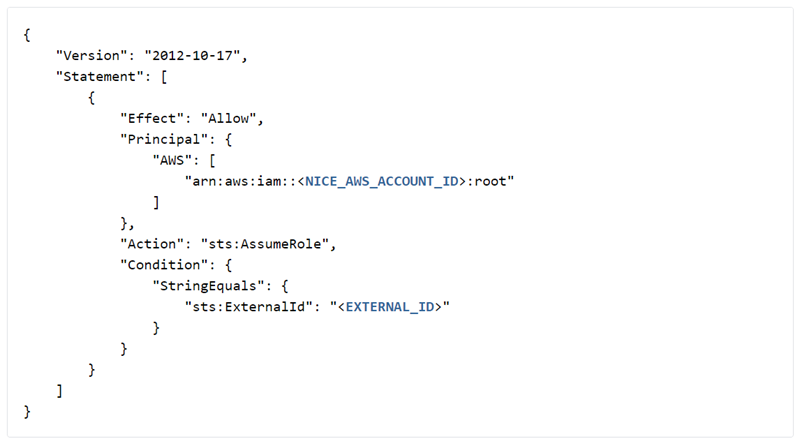
Include a trust policy in the trust relationships of the IAM role, such as the one shown in the following image. As shown in the image, you must replace NICE_AWS_ACCOUNT_ID and EXTERNAL_ID with your own valid values.
The following are valid NiCE CXone AWS account ID values:
NiCE CXone AWS ACCOUNT ID
VALUE
Production AWS Account ID
737494165703
FedRamp AWS Account ID 751344753113 FedRamp High AWS Account ID 420587085960 Australia sovereign cloud configurations 637423616941 Note: FedRAMP IDs are specifically for government organizations. Ask your account representative for more information.
- Permissions
- Create an external ID to associate with the role. It can be any random string, for example: 70ffec909539cdb4f01fb0aa3d249713cad411c2e652707a92fb51d0f5449ea.
Create a Kinesis Data Stream in NiCE CXone
Updates to Kinesis data streams can take up to 24 hours to be implemented. An updated data stream shows as pending until the changes take effect.
- Click the app selector
 and select Admin.
 - Go to Account Settings > Event Data Stream.
-
Click Create New Data Stream.
-
Enter the data stream's Name, Description, Event Type, and other details.
 Learn more about fields in this step
Field
Details
Event Type
Select the type of event, such as IVR Log.
Data Format Select the format of the data in which you want to create and use the data stream's output. For example, if you want to store serialized values in a space-efficient binary format, the AVRO schema is suitable for that. Point of Contact Select one or more points of contact The entry point that an inbound contact uses to initiate an interaction, such as a phone number or email address. to filter the data stream's input data. For example, a point of contact might be endpoints such as email or chat.Target Stream Type To receive data on a Kinesis stream, select Kinesis External. Kinesis Stream Name Applies only to Kinesis data streams.
Enter the name of the Kinesis stream you created in the previous steps.AWS Region Applies only to Kinesis External.
Enter the AWS region of the External Kinesis stream from where IVR data is to be published.Role ARN Applies only to Kinesis External.
Enter the AWS cross-account role ARN created for NiCE CXone. This was created in the previous task.
External ID Applies only to Kinesis External.
Enter the external ID associated with the AWS cross-account role ARN you specified in the Role ARN field. You created this ID in the previous task.
- Click Create.
-
If you want to update the data format, select the new data format and click Save.