This page is for administrators. It provides information about setting up NiCE CXone Autopilot (Omilia) virtual agents to work in NiCE CXone. You can learn more about Autopilot (Omilia) and its supported options. You can learn more about the general process of setting up virtual agent integrations with NiCE CXone.
Setting up an Autopilot (Omilia) virtual agent requires the following components:
- NiCE CXone: NiCE CXone must have a configured
 Various voice and digital communication mediums that facilitate customer interactions in a contact center. to use with the integration. Setting up Autopilot (Omilia) for voice channels requires assistance from NiCE. Contact your account representative to learn more.
 - Virtual Agent Hub in NiCE CXone: Virtual Agent Hub holds the configuration information for connecting to your virtual agent A software application that handles customer interactions in place of a live human agent. provider, such as service account credentials. This includes choosing the options you want to use for transcription Written form of all or part of a voice or digital interaction., if your integration requires this service.
- Studio scripts: You need at least one script that includes a virtual agent Studio action. The action must be configured with the connection information for your virtual agent. The point of contact for the channel you're using with the integration must be configured to use this script.
- Autopilot (Omilia): You must have an Autopilot (Omilia) virtual agent fully set up and configured.
Additionally, you can include the following options with your Autopilot (Omilia) virtual agent:
- Use NiCE CXone Recording Management (CXone) to record Autopilot (Omilia) voice interactions.
- Use voice biometric authentication to verify the identity of contacts before they interact with your Autopilot (Omilia) virtual agent. You can use the Omilia voice biometrics miniapp that's available on the Omiliaplatform. This option allows you to use Omilia anti-fraud features with your Autopilot (Omilia) virtual agent. These features include a block list for known fraudulent contacts and the ability to detect ANI Also known as caller ID. Listed phone number of an incoming voice call. spoofing and the use of recorded voices to try to trick the system.
- Integrate Autopilot (Omilia) with NiCE CXoneKnowledge Management (Expert) or any third-party knowledge base (KB).
Rich Media Support for Text Virtual Agents
If your channel supports it, you can include rich media![]() Elements in digital messaging such as buttons, images, menus, and option pickers. content in the messages. The type of rich media that can be sent differs from channel to channel, as shown in the following table.
Elements in digital messaging such as buttons, images, menus, and option pickers. content in the messages. The type of rich media that can be sent differs from channel to channel, as shown in the following table.
| Adaptive Cards | Images | HTML & Markdown Text | Rich Link | |
|---|---|---|---|---|
| Apple Messages for Business |
Live Agents: No API: Uses fallback text |
Live Agents: Yes API: Yes |
Live Agents: No API: No |
Live Agents: Yes API: Yes |
|
Digital Chat |
Live Agents: No API: Yes |
Live Agents: Yes API: Yes |
Live Agents: No API: Yes |
Live Agents: Yes API: Yes |
|
Live Agents: No API: Uses fallback text |
Live Agents: Yes API: Yes |
Live Agents: Yes API: Yes |
Live Agents: Uses fallback text API: Uses fallback text |
|
| Facebook Messenger |
Live Agents: No API: Uses fallback text |
Live Agents: Yes API: Yes |
Live Agents: No API: No |
Live Agents: Yes API: Yes |
|
Live Agents: No API: Uses fallback text |
Live Agents: Yes API: Yes |
Live Agents: Yes API: Yes |
Live Agents: Yes API: Yes |
|
| SMS Messaging |
Live Agents: No API: Uses fallback text |
Live Agents: Yes API: Yes |
Live Agents: No API: No |
Live Agents: Uses fallback text API: Uses fallback text |
| Mobile SDK | Live Agents: No API: No |
Live Agents: Yes API: Yes |
Live Agents: No API: No |
Live Agents: Yes API: Yes |
Live agents: supported in the agent application API: Supported for API-based use cases
| Quick Replies | List Picker | Time Picker | Form message | |
|---|---|---|---|---|
| Apple Messages for Business | Live Agents: Yes API: Yes |
Live Agents: Yes API: Yes |
Live Agents: Yes API: Yes |
Live Agents: Yes API: Yes |
|
Digital Chat |
Live Agents: Yes API: Yes |
Live Agents: Yes API: Yes |
Live Agents: Uses fallback text API: Uses fallback text |
Live Agents: Uses fallback text API: Varies * URL opens in browser where contacts can fill out the form. |
| Live Agents: Uses fallback text API: Uses fallback text |
Live Agents: Uses fallback text API: Uses fallback text |
Live Agents: Uses fallback text API: Uses fallback text |
Live Agents: Uses fallback text API: Uses fallback text |
|
| Facebook Messenger | Live Agents: Yes API: Yes |
Live Agents: Yes API: Yes |
Live Agents: Uses fallback text API: Uses fallback text |
Live Agents: Uses fallback text API: Uses fallback text |
| Live Agents: Yes API: Yes |
Live Agents: Yes API: Yes |
Live Agents: Uses fallback text API: Uses fallback text |
Live Agents: Uses fallback text API: Uses fallback text |
|
| SMS Messaging | Live Agents: Uses fallback text API: Uses fallback text |
Live Agents: Uses fallback text API: Uses fallback text |
Live Agents: Uses fallback text API: Uses fallback text |
Live Agents: Uses fallback text API: Uses fallback text |
| Mobile SDK | Live Agents: Yes API: Yes |
Live Agents: Yes API: Yes |
Live Agents: No API: No |
Live Agents: No API: No |
Live agents: supported in the agent application API: Supported for API-based use cases
Learn more about digital channel support for rich media.
When you want to include rich media content in text virtual agent responses, configure it in your virtual agent's management console. It should go in the configuration for each response that will send the rich media.
Rich media content is sent as JSON. When building your rich media JSON, follow the schema for the digital channel you're using. The schemas are different for each channel. Find the JSON for the media content you want to use, then add it to the response message configurations that you create in
Custom Scripting Guidelines
Before integrating a virtual agent![]() The meaning or purpose behind what a contact says/types; what the contact wants to communicate or accomplish., you need to know:
The meaning or purpose behind what a contact says/types; what the contact wants to communicate or accomplish., you need to know:
- Which script you want to add a virtual agent to.
-
The virtual agent Studio action you need to use.
- Where the Studio actions must be placed in your script flow.
- The configuration requirements specific to the virtual agent you're using.
- Provider-specific requirements. Autopilot (Omilia) has no provider-specific requirements.
- Use the TYPING INDICATOR Studio action in your script for text virtual agents. This action adds a visual indicator, such as bouncing dots, to the chat window when the virtual agent is responding. This can help your virtual agent appear more human during the interaction.
- How to complete the script after adding the virtual agent action. You may need to:
- Add initialization snippets as needed to the script using Snippet actions. This is required if you want to customize your virtual agent's behavior.
- Re-configure the Studio action Performs a process within a Studio script, such as collecting customer data or playing music. connectors to ensure proper contact flow and correct potential errors.
- Use the OnReturnControlToScript branch to handle hanging up or ending the interaction. If you use the Default branch to handle hanging up or ending an interaction, your script may not work as intended. StandardBot behaviors. You can learn more about handling the end of the interaction in the online help about
- Complete any additional scripting and test the script.
Ensure that all parameters in the virtual agent actions you add to your script are configured to pass the correct data. The online help pages for the actions cover how to configure each parameter.
Additionally, ensure that you completely configure your virtual agent on the provider side. Verify that it's configured with all possible default messages, including error messages or messages indicating an intent has been fulfilled.
You may be able to obtain template scripts from NiCE CXone Expert Services for use with virtual agent integrations. If you need assistance with scripting in Studio, contact your account representative, see the Technical Reference Guide section in the online help, or visit the NiCE CXone Community ![]() site.
site.
Supported Studio Actions
Use the Textbot Exchange Studio actions in your scripts with Autopilot (Omilia). If you're setting up a voice virtual agent with Autopilot (Omilia), contact your NiCE CXone account representative for assistance.
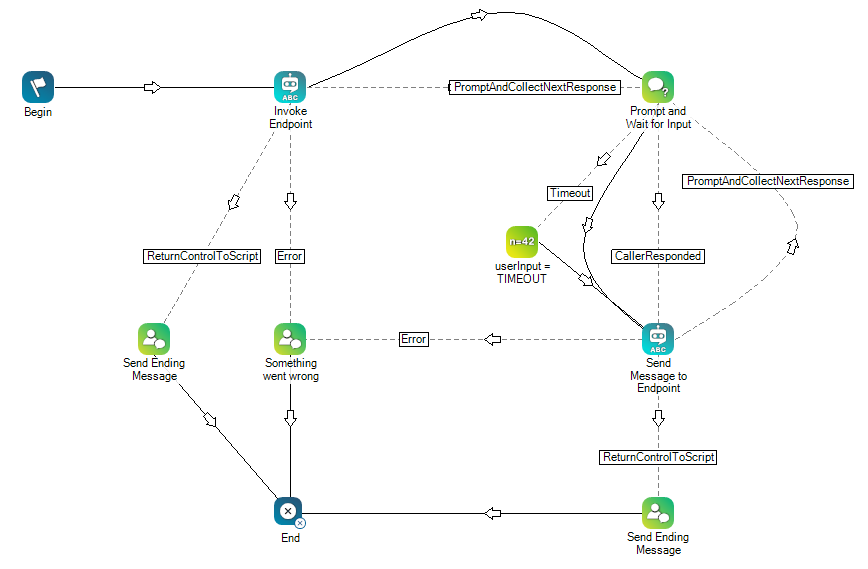
The TextBot Exchange action is for complex virtual agents or for when you need to customize the virtual agent's behavior from turn to turn. It monitors the conversation between the contact and the virtual agent![]() A software application that handles customer interactions in place of a live human agent. turn by turn. It sends each utterance
A software application that handles customer interactions in place of a live human agent. turn by turn. It sends each utterance![]() What a contact says or types. to the virtual agent. The virtual agent analyzes the utterance for intent
What a contact says or types. to the virtual agent. The virtual agent analyzes the utterance for intent![]() The meaning or purpose behind what a contact says/types; what the contact wants to communicate or accomplish. and context and determines which response to give. TextBot Exchange passes the response to the contact. When the conversation is complete, the action continues the script.
The meaning or purpose behind what a contact says/types; what the contact wants to communicate or accomplish. and context and determines which response to give. TextBot Exchange passes the response to the contact. When the conversation is complete, the action continues the script.