

This setup process may require coordination between your organization's RTIG administrator and the Studio script developer. If your organization uses Salesforce Agent, additional configuration steps are required. No additional steps are required for MAX users.
Create Studio Scripts for Real-Time Interaction Guidance
Required permissions:
You need to create or modify at least one Studio script to set up RTIG in your contact center. The scripts must include the Agent Assist Studio action. The action must have an RTIG profile assigned to it.
Download these scripts and import them into Studio.
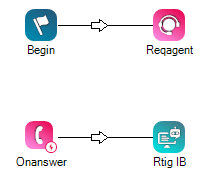
Inbound Script: In a basic inbound script for RTIG, the Begin action connects to the Reqagent action. The OnAnswer event connects to the Agent Assist action, so that when an agent answers the call, RTIG starts listening to the conversation.
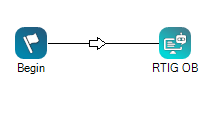
Outbound Script: In a basic outbound script, the Begin action connects to the Agent Assist action, so that when the agent places an outbound call, RTIG is triggered.
When creating scripts for Real-Time Interaction Guidance, follow these scripting guidelines:
- Which scripts you want to add the agent assist application into. You can modify existing scripts or create new ones. You may need to add the application to more than one script. For example, you need different scripts for inbound and outbound phone interactions
 The full conversation with an agent through a channel. For example, an interaction can be a voice call, email, chat, or social media conversation..
 - Where the Agent Assist Studio action Performs a process within a Studio script, such as collecting customer data or playing music. must be placed in your script flow.
- The configuration requirements specific to the application you're using. The application in Agent Assist Hub needs to be configured. The actions in your Studio scripts must also be configured. Refer to the online help for each action for more information.
- What parameters the script needs to send to the agent assist provider, if any.
-
- How to complete the script after adding the Agent Assist action. You may need to:
- Add initialization snippets to the script using Snippet actions. You can do this to customize your agent assist application.
- Reconfigure the action connectors to ensure proper contact flow and correct any potential errors.
- Complete any additional scripting and test the script.
If you need assistance with scripting in Studio, see the Technical Reference Guide section in the Studio online help, or visit the NiCE Community ![]() site for NiCE CXone. For additional assistance with your script, you may want to contact NiCE CXone Expert Services.
site for NiCE CXone. For additional assistance with your script, you may want to contact NiCE CXone Expert Services.
Add an RTIG App to Agent Assist Hub
Required permissions:
You need to add at least one Real-Time Interaction Guidance app to Agent Assist Hub as part of setting up RTIG. You can create the profile now and modify the guidance and alerts later, if necessary.
When adding an RTIG profile, you're prompted to select a language. Real-Time Interaction Guidance uses this language when providing phrase-based guidance. The Selected Language field appears on the Create New Agent Assistant page when you select the Real-Time Interaction Guidance option. It defaults to the language appropriate for your NiCE CXone region. It cannot be modified.
- Click the app selector
 and select Other > Connections Hub and then click Agent Assist Hub.
 - Click Add Agent Assist App.
-
Enter a name for this profile in the Agent Assist App Name field and click Real-Time Interaction Guidance.
-
To hide the RTIG panel from agents in Agent Workspace (Agent) applications, turn on Hide RTIG Panel for Agents in the bottom-right corner.
- Click Next.
-
Configure guidance and alerts for this profile.
- Phrase-based guidance.
- Behavior and sentiment guidance. This option requires a separate license.
- Click Create.
- Create additional Real-Time Interaction Guidance profiles if needed.
- Click Close.
Assign a Profile to a Studio Script
Required permissions:
You must have a separate script for each Real-Time Interaction Guidance profile. A Studio script can only support one Real-Time Interaction Guidance profile.
- In Studio, open the script you want to modify.
- Add an Agent Assist action to the script, if you haven't already done so.
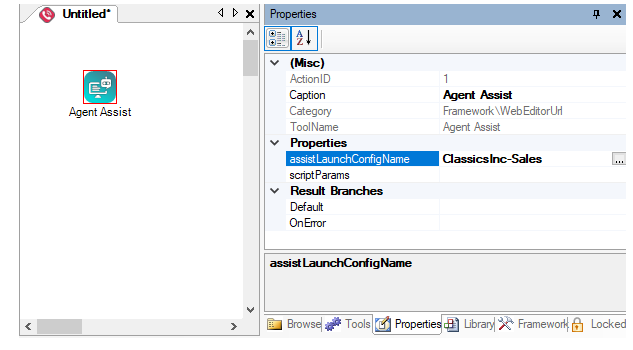
- Double-click on the Agent Assist action to open Agent Assist Hub.
- Click the selection icon
 next to the RTIG profile you want to assign to this script.
 - Click Close to exit Agent Assist Hub.
- In the Studio script, right-click on the Agent Assist action.
-
On the
- Save the script.
Set Up RTIG for Salesforce Agent Users
If you want to use Real-Time Interaction Guidance with Salesforce Agent, there are some additional steps that you must complete to set up Real-Time Interaction Guidance. Real-Time Interaction Guidance only works with the Lightning agent.
Install Real-Time Interaction Guidance in Salesforce
You need to install a package from the Salesforce AppExchange site.
- Log in to the Salesforce org where you want to install RTIG.
- In the AppExchange, search for NiCE CXone.
- Under Components, hover over NiCE CXone Real-Time Guidance for Salesforce and click More.
- Click Get it Now.
- Click Install in production. If prompted, log in first by clicking Log in to the AppExchange.
- Agree to the terms and conditions, then click Confirm and Install.
- If prompted, select a user name and log in.
- Choose whether to install for Admins Only, All Users, or Specific Profiles, and then click Install. If you are installing only for specific profiles, choose which prompts have access to this package. You can set a global policy by using the Set access level for all profiles to setting, and then modify profiles from there.
- Grant access to api.incontact.com and click Continue.
- Select the checkbox to acknowledge that you're installing a non-Salesforce application.
- Click Install. The Real-Time Interaction Guidance package is installed into Salesforce for the users or profiles you selected previously. On the Apps > Packaging > Installed Packages page in Salesforce, the package is called CXone Components for Salesforce Lightning.
Add the RTIG Window to Salesforce Agent
RTIG is a separate window that appears in Salesforce Agent. You need to add the window to all Salesforce objects where you want agents to receive RTIG guidance.
- In Salesforce, go to the App Manager and edit the SFAgentConsole.
- On the Utility Items page, add the Agent Assist option and save.
- On the User Profiles page, add the profiles that need to use Real-Time Interaction Guidance and save.
- Add the Agent Assist item to any Salesforce Agent object where you want agents to have RTIG guidance. The Agent Assist item is located under Custom Managed in the list of available components when editing an object's page.