

You can enable bi-directional presence sync for ![]() The availability status of an agent. changes in one of these apps, it changes in the other.
The availability status of an agent. changes in one of these apps, it changes in the other.
Complete each of these tasks in the order given.
Prerequisites
-
Your account representative must enable Salesforce for your tenant
 High-level organizational grouping used to manage technical support, billing, and global settings for your NiCE CXone system. under Applications & Features > Adapters.
 -
Your account representative must enable Salesforce Presence Sync for your tenant
High-level organizational grouping used to manage technical support, billing, and global settings for your NiCE CXone system. under Applications & Features > Adapters. -
You must be using Salesforce Agent Lightning.
-
Users must have the
 > Setup > Permission Sets.
 -
Users must be assigned to the
> Setup > Installed Packages.
Create Presence Statuses in Salesforce
If you haven't already, create presence statuses in Salesforce. These are the statuses that appear in
-
Log in to Salesforce Lightning as an administrator.
-
Click Setup
in the top right corner of the page and select Setup from the drop-down. -
Use the Quick Find box to search for Presence, then click Presence Statuses.
-
Click New.
-
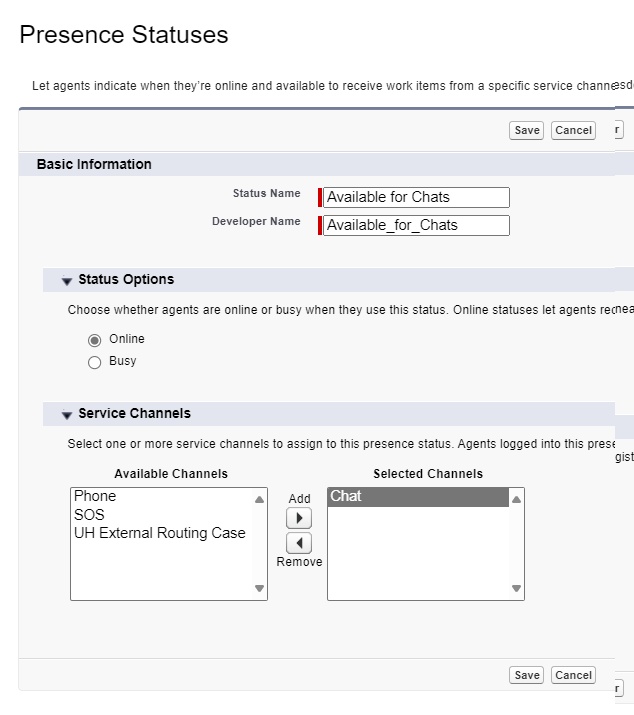
Enter a Status Name. For example, Available for Chats. The Developer Name is generated automatically; it's the Status Name without spaces. For example, Available_for_Chats.
-
Under Status Options, select one of these options:
-
Online: Make this an available status.
-
Busy: Make this an unavailable status.
-
-
If you selected Online in the previous step, add channels to the status. Under Service Channels, select a channel in the list on the left, then click Add
 . Repeat for each channel you want to add.
 -
Click Save. Repeat these steps for each presence status you want to create.
Add Presence Statuses to User Profiles
After you've created presence statuses, give Salesforce user profiles access to the statuses.
-
In Salesforce, use the Quick Find box to search for Profiles, then click Profiles.
-
Select the user profile you want to add presence statuses to.
-
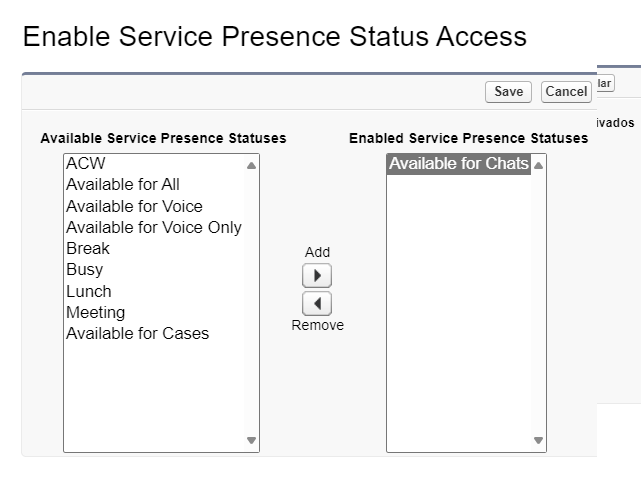
Scroll down to the Enabled Service Presence Status Access section. Click Edit.
-
Select a status in the list on the left, then click Add
. Repeat for each status you want to add. -
Click Save. Repeat these steps for each user profile you want to add presence statuses to.
Create a Connected App
Create a connected app in Salesforce to connect Salesforce to NiCE CXone.
In Spring 2026, Salesforce will no longer allow you to create connected apps. You will be able to continue using existing connected apps, but you will need to contact Salesforce Support to create new ones. See the Salesforce announcement ![]() for more information.
for more information.
-
In Salesforce, use the Quick Find box to search for App Manager, then click App Manager.
-
Click New Connected App in the top right of the Lightning Experience App Manager.
-
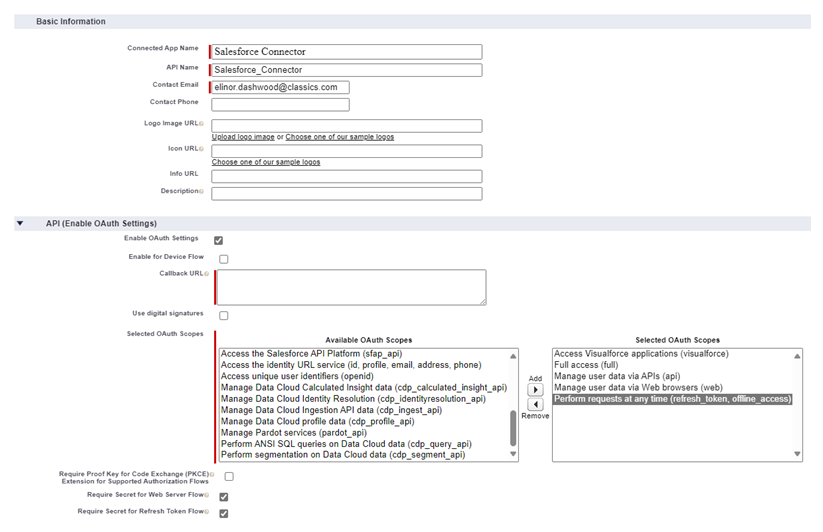
Enter a Connected App Name. For example, Salesforce Connector. The API Name is generated automatically; it's the Connected App Name without spaces. For example, Salesforce_Connector.
-
In Contact Email, enter a valid email address.
-
Under API (Enable OAuth Settings), select Enable OAuth Settings and configure the fields that appear.
-
In Callback URL, enter the URL where you want the authorization code to be sent once the authentication is successful.
-
In Selected OAuth Scopes, select the following scopes and click Add
:-
Access Visualforce applications (visualforce)
-
Full access (full)
-
Manage user data via APIs (api)
-
Manage user data via Web browsers (web)
-
Perform requests at any time (refresh_token, offline_access)
-
-
-
Make sure Require Secret for Web Server Flow and Require Secret for Refresh Token Flow are selected.
-
Click Save.
Get Consumer Key and Consumer Secret
After you've created a connected app in Salesforce, find and save its Consumer Key and Consumer Secret.
-
In Salesforce, use the Quick Find box to search for App Manager, then click App Manager.
-
In the Lightning Experience App Manager, find the connected app you created. Click Actions
 > View in the row for that connected app.
 -
Under API (Enable OAuth Settings), click Manage Consumer Details.
-
If prompted, authenticate by entering the code sent to your email.
-
Click Copy next to Consumer Key and Consumer Secret and store them in a secure location.
Configure Account Mapping
Before you create the account mapping, complete the following steps to avoid mapping errors within Salesforce.
- In Salesforce, use the Quick Find box to search for OAuth, then click OAuth and OpenID Connect Settings.
- On the OAuth and OpenID Connect Settings page, enable Allow OAuth Username-Password Flows.
From here, there are two options you can choose between to complete the configuration: adding an IP range or resetting the security token.
Only perform one of these options to prevent errors.
Option 1: Add IP Ranges to Agent Profiles
-
In Salesforce, use the Quick Find box to search for Profiles, then click Profiles.
-
Select the agent's profile, then click Login IP Ranges at the top of the page.
-
In the Login IP Ranges section, click New.
-
Enter the Start IP Address as 0.0.0.0 and the End IP Address as 255.255.255.255.
-
Click Save.
Option 2: Reset Security Token
-
In Salesforce, click your Admin profile > Settings > Reset Security Token to generate an security token. This will be sent to the email associated with this profile. Copy the token from the email.
- In NiCE CXone, click the app selector
 and select Adapters.
 -
Click Account Mapping in the left menu, then click the Salesforce tab.
-
Scroll down to Salesforce Account Details.
-
Go to the password field and append the security token onto the password associated with this profile. For example, if the password is xyz, and the security token is 123, you'll type xyz123 as the new password.
-
Click Save.
Create an Account Mapping in NiCE CXone
Required permissions: Account Mapping Create
After you've created a connected app in Salesforce, create an account mapping in NiCE CXone to connect NiCE CXone to Salesforce.
-
In NiCE CXone, click the app selector
and select Adapters. -
Click Account Mapping in the left menu, then click the Salesforce tab.
-
Click Map Accounts.
-
In User for Access Key, select the user you want to generate an access key for. Click Next.
-
In Salesforce Platform Version, choose whether your Salesforce environment is a Salesforce Sandbox or Salesforce Production environment.
-
Create a Salesforce environment. Fill out the fields in the Salesforce section.
Learn more about fields in this step
Field Details Salesforce Environment Give your Salesforce environment a name. Organisation ID
Enter your Salesforce.com organization ID. This is found in Salesforce under Setup
> Setup > Company Information > Salesforce.com Organization ID. It's 15 characters long and typically begins with 00D.Username The username of your Salesforce administrator account. Password The password of your Salesforce administrator account. Client ID The Consumer Key of the connected app you created in Salesforce in the previous section. Client Secret The Consumer Secret of the connected app you created in Salesforce in the previous section. Email Address The email addresses associated with your Salesforce administrator account. -
Click Map & Register.
-
In the Salesforce Environment drop-down, select the same Salesforce environment you entered in step 6.
-
Click Save at the top.
Create a Presence Rule
Required permissions: Rules Create
After you've created an account mapping in Adapters, create a presence rule. This maps Salesforce statuses to NiCE CXone agent states, and NiCE CXone agent states to Salesforce statuses.
-
In NiCE CXone, click the app selector
and select Adapters. -
Click Presence Sync in the left menu, then click Get NiCE CXone Users. This refreshes the list of users.
-
Click Create Rule.
-
Give your presence rule a Name.
-
To ignore the team validation, enable Skip validation of Unavailable Codes for Rule Assignment. This lets you assign the presence rule to any team, even if it doesn't have the NiCE CXone unavailable state assigned to it. When enabled and an agent selects a state that is not in their Presence Sync rule, their state in NiCE CXone changes to the system-default Unavailable state.
-
In the Publisher States section, use the ACD State and Salesforce State drop-downs to map agent states. This tells Salesforce what status to display for a NiCE CXone agent state. Click Add Row to add more mappings.
Elinor selects Open in ACD State and Available for Chats in Salesforce State.
-
In the Subscriber States section, use the Salesforce State and ACD State drop-downs to map agent states. This tells NiCE CXone what agent state to display for a Salesforce status. Click Add Row to add more mappings.
Elinor selects Available for Chats in Salesforce State and Open in ACD State. Agent Workspace (Embedded) (Agent Embedded) displays Open whenever
If you select Previous State in ACD State, the agent's NiCE CXone state returns to the previous state it was in. This may be useful to automatically return an agent's state back to what it was before handling an interaction.
-
Click Create.
-
To apply the presence rule to teams of users, click the Teams tab, then click Add Teams. Select the teams you want to add, then click Confirm.
-
To apply the presence rule to individual users, click the Users tab, then click Add Users. Select the users you want to add, then click Confirm.
-
Click Save.