

This is the final step of setting up Agent Workspace (Embedded) (Agent Embedded) in Salesforce. You can complete this task using the ENHANCED WORKFLOW EXECUTE Studio action instead. You can also optionally enable agents to manually create records.
You can configure Search, Custom Create, Standard Create, and Update workflows for Salesforce and NiCE CXone Agent Workspace (Embedded) (Agent Embedded). These workflows search, create, or update Salesforce records, also called objects. This is the back end configuration of dynamic data mapping.
|
Workflow Type |
Description |
Workflows |
|---|---|---|
| Search | Search workflows scan Salesforce for records that are applicable to the interaction |
Search for ANI |
| Custom Search | ||
| Custom Create | Custom Create workflows create any record type with both standard and custom fields. | Create Custom Record |
| Standard Create |
Standard Create workflows create standard Salesforce records with their standard data fields. The SNIPPET payload of these workflows must include the standard fields and only those fields. |
Create Account |
| Create Case | ||
| Create Contact | ||
| Create Lead | ||
| Create Opportunity | ||
| Create Work Order | ||
| Update | Update workflows update the field values of a record. They can be used to update a record retrieved by a Search workflow or a record created by a Custom Create or Standard Create workflow. | Update Record |
The Created By and Modified By Salesforce fields use the system user's name. This is the Salesforce user account you created specifically for NiCE CXone configuration. The Assigned To field shows the name of the agent handling the interaction.
Before you begin, review the CRM integration diagram, the CRM workflow diagram, and the CRM integration terminology list.
Also, download this folder of template scripts. It contains voice and digital scripts for NiCE CXone Studio and Desktop Studio.
Configure Search Workflows
There are two Search workflows: Search for ANI and Custom Search.
The Search workflow may return only one record. This is called a single match.
If you want the search workflow to return work order records, you must use a generic search, not a default search. A default search is based on either an email address or phone number. A generic search is based on any field in the record.
When you use dynamic data mappings in a Search workflow, the Related Interactions section in the customer card  first shows records that:
-
Match the search criteria, and
-
Have data in every mapped field.
Agents can click Refresh in the customer card to view all records that match the search criteria.
Configure the Search for ANI Workflow
The Search for ANI workflow uses the ANI![]() Also known as caller ID. Listed phone number of an incoming voice call. from the ACD to search all standard phone fields for matching records.
Also known as caller ID. Listed phone number of an incoming voice call. from the ACD to search all standard phone fields for matching records.
Do not include the timeoutMilliSec property in your workflow code. It may cause multiple of the same interaction to be delivered to your agents.
-
In Studio, open the script where you want to configure the Search for ANI workflow.
-
If you haven't already, add a SNIPPET action after BEGIN and before the Workflow Execute action.
-
Double-click the SNIPPET action on the script canvas.
-
Copy each of the following lines of code and paste them into the Text View tab of the Editor window.
DYNAMIC searchInput searchInput.workflowInput.phoneNumber = "{ANI}" ASSIGN searchJson = "{searchInput.asjson()}" -
Save your script.
- You can test your script by simulating an interaction in Studio.
Configure the Custom Search workflow
The Custom Search workflow allows you to search Salesforce for records that match flexible filter criteria. You can use Custom Search to:
- Search a single Salesforce record type, such as Account.
- Search multiple Salesforce record types in the same CRM instance in a single payload. For example, you can search both Case and Contact at the same time.
- Use multiple fields and variables in the search filter.
- Connect search conditions with Salesforce operators, such as AND, OR, =, !=, <, and >.
You can search any combination of up to 5 Salesforce records in a single payload. There is no enforced limit on the number of fields in a Custom Search. However, searching many fields in a single payload can slow the search. Start with a small set of fields and expand as needed.
Do not include the timeoutMilliSec property in your workflow code. It may cause multiple of the same interaction to be delivered to your agents.
-
In Studio, open the script where you want to configure the Custom Search workflow.
-
If you have not already, add a SNIPPET action after BEGIN and before the WORKFLOW EXECUTE action.
-
Double-click the SNIPPET action on the script canvas.
-
Copy one of the sample code blocks below and paste it into the Text View tab of the Editor window. Then update the values as needed.
-
 Option 1: Configure a single-entity Custom Search
Use this option when you want to search only one Salesforce record type, such as Account or Contact.
DYNAMIC searchInput
DYNAMIC payload

payload.entity = "account"
payload.filter = "phone='{ANI}'"

searchInput.workflowInput.search = payload

ASSIGN searchJson = "{searchInput.asjson()}"
In this example, the workflow searches the account record type for accounts where the phone field matches the ANI
Also known as caller ID. Listed phone number of an incoming voice call. from the interaction.-
Change the value of the payload.entity attribute to the API name for the record you want to search. For example, payload.entity = "contact". These API names are case-sensitive. The following table displays standard entity API names. Custom entities are also supported.
Record
API
Account Case Contact Lead Opportunity Task Work Order -
Change the value of the payload.filter attribute to the filter expression for the search. For example:, payload.filter = "phone='{ANI}'". A full list of Salesforce operators, such as =, !=, <, and >, can be found in the Salesforce documentation
 . Those operators are case-sensitive.
To add more than one condition to the filter, connect them with one of these Salesforce operators: AND, OR, =, or !=. For example, to search for accounts with both a matching phone number and an active status:
payload.filter = "phone='{ANI}' AND status='active'"
-
-
Option 2: Configure a multi-entity Custom Search
Use this option when you want to search more than one Salesforce record type in the same CRM instance in a single payload. Each entity in the search has its own entity and filter values.
When you use multiple entities, workflowInput.search is an array of search objects, instead of a single object.
DYNAMIC searchInput
DYNAMIC searchArray

DYNAMIC item1
item1.entity = "case"
item1.filter = "phone='{ANI}'"

DYNAMIC item2
item2.entity = "contact"
item2.filter = "phone='{ANI}'"

searchArray[1] = item1
searchArray[2] = item2

searchInput.workflowInput.search = searchArray

ASSIGN searchJson = "{searchInput.asjson()}"
In this example, the workflow searches both:
-
case records where the phone field matches the ANI.
-
contact records where the phone field matches the ANI.
You can also use different fields and variables for each entity. For example, to search Cases by case number and Contacts by phone number in one payload:
DYNAMIC searchInput
DYNAMIC searchArray

DYNAMIC item1
item1.entity = "case"
item1.filter = "CaseNumber='{caseNumber}'"

DYNAMIC item2
item2.entity = "contact"
item2.filter = "phone='{ANI}'"

searchArray[1] = item1
searchArray[2] = item2

searchInput.workflowInput.search = searchArray

ASSIGN searchJson = "{searchInput.asjson()}"
To add more entities to the same search:
-
Create another dynamic data object with a new name, such as item3.
-
Set item3.entity and item3.filter for that record type.
-
Add it to the array with the next index, such as searchArray[3] = item3.
You can include up to 5 entities.
-
Change the values of the item.entity attributes to the API names for the records you want to search. For example, item1.entity = "contact". These API names are case-sensitive. The following table displays standard entity API names. Custom entities are also supported.
Record
API
Account Case Contact Lead Opportunity Task Work Order -
Change the values of the item.filter attributes to the filter expressions for the search. For example, item1.filter = "phone='{ANI}'". A full list of Salesforce operators, such as =, !=, <, and >, can be found in the Salesforce documentation
. Those operators are case-sensitive.To add more than one condition to the filter, connect them with one of these Salesforce operators: AND, OR, =, or !=. For example, to search for accounts with both a matching phone number and an active status:
item1.filter = "phone='{ANI}' AND status='active'"
-
-
Save your script.
- You can test your script by simulating an interaction in Studio.
Option 2: Configure a multi-entity Custom Search
Configure Custom Create Workflows
Custom Create workflows allow you to configure a SNIPPET payload to create any type of Salesforce record, standard or custom. They also allow you to populate any field type, standard or custom. For example, you could create an Account record with some of the standard fields from that record type, as well as your own custom fields.
This is the recommended method to create Salesforce records.
Configure the Create Custom Record Workflow (Previously Create Entity)
The Create Custom Record workflow creates any type of Salesforce record, standard or custom. This record can display standard and custom data fields. The fields must contain text, numbers, or variables. Binded fields are most often populated by search results or lists of options, but you can configure this workflow to add hard-coded data to a binded field.
If you use the older version of this workflow, called the Create Entity workflow, you need to configure your Studio script with two additional actions: a SNIPPET called Snippet for Send Workflow Response, and a CUSTOMEVENT called Send Workflow Response. Use this template script for Desktop Studio or this template script for Studio.
-
In Studio, open the script where you want to configure the Create Custom Record workflow.
-
If you haven't already, add a SNIPPET action after BEGIN and before the Workflow Execute action.
-
Double-click the SNIPPET action on the script canvas.
-
Copy each of the following lines of code and paste them into the Text View tab of the Editor window.
DYNAMIC createPayload
DYNAMIC createDataArray

DYNAMIC item1
item1.key = "[API name]"
item1.value = "[variable]"
DYNAMIC item2
item2.key = "[API name]"
item2.value = "[variable]"
DYNAMIC item3
item3.key = "[API name]"
item3.value = "[variable]"

createPayload.entity = "[record type]"
createDataArray[1] = item1
createDataArray[2] = item2
createDataArray[3] = item3

createPayload.data = createDataArray

createPayload.pinnedRecord = "[true or false]"
createPayload.screenPop = "[true or false]"
createPayload.relatesTo = "[true or false]"

DYNAMIC create[RecordName]Payload
create[RecordName]Payload.workflowInput = createPayload

ASSIGN createJson = "{create[RecordName]Payload.asjson()}"
You must include each of those lines.
-
Change the values of the attributes listed below. Any of these can be hard-coded, a variable, or a combination of these. Use a variable if you want the value to update for each interaction.
-
Change the value of item1.key to the first field you want to display. Change item1.value to the value of that field. For example:
item1.key = "Status" item1.value = "New" -
Change the value of item2.key to the second field you want to display. Change item2.value to the value of that field. For example:
item2.key = "Origin" item2.value = "Phone" -
Change the value of item3.key to the third field you want to display. Change item3.value to the value of that field. For example:
item3.key = "CXone_Contact_ID_c"
item3.value = "{ContactID}"
-
-
To add additional fields:
-
Create additional item dynamic data objects after item3.value. Follow this format:
DYNAMIC item#
item#.key = "[Field #]"
item#.value = "[Field # Value]"
The number (#) needs to increment by one with each additional dynamic data object you add. For example, item4, item5, and so on.
-
Create additional data arrays after createDataArray[3]. Follow this format:
ASSIGN createDataArray[#] = item#The number (#) needs to increment by one with each additional item you add to the array. For example, createDataArray[4], createDataArray[5], and so on.
-
-
Change the value of the createPayload.entity attribute to the API name for the record you want to use. For example, createPayload.entity = "account". This is case-sensitive.
To find the API name for the record, open Salesforce and navigate to Setup
 > Object Manager. Click the record's name. In the Details page that opens, find the API Name.
 - Change the value of the createPayload.pinnedRecord attribute to either true or false. When set to true, the created record displays to agents in the Current Interactions section of the customer card. When set to false, it displays in the Recent Interactions section of the customer card. If you do not include this attribute in the payload, it will be assumed as false.
- Change the value of the createPayload.screenPop attribute to either true or false. When set to true, the created record automatically appears to the agent as a screen pop in Salesforce. When set to false, it does not. If you do not include this attribute in the payload, it will be assumed as false.
- Change the value of the createPayload.relatesTo attribute to either true or false. When set to true, agents can manually relate records inside Agent Workspace (Embedded) (Agent Embedded). When set to false, they cannot; relating records happens automatically through data memorialization. If you do not include this attribute in the payload, it will be assumed as false.
-
Change all the instances of [RecordName] in the last three lines of the code to the name of the record you created. Capitalize the name to match the camel case of the attribute. For example, if the name of the record you created is workorder, your code would be:
DYNAMIC createWorkOrderPayload createWorkOrderPayload.workflowInput = createPayload ASSIGN createJson = "{createWorkOrderPayload.asjson()}" -
Save your script.
- You can test your script by simulating an interaction in Studio.
Configure Standard Create Workflows
Standard Create workflows create standard Salesforce records with the fields specified in the workflow's payload.
You cannot add or delete fields in the SNIPPET payload of Standard Create workflows. If you add or delete fields, the workflow will fail and the record won't be created. To create a standard or custom record with the fields you want, use the Create Custom Record workflow.
Configure the Create Account Workflow
-
In Studio, open the script where you want to configure the Create Account workflow.
-
If you haven't already, add a SNIPPET action after BEGIN and before the Workflow Execute action.
-
Double-click the SNIPPET action on the script canvas.
-
Copy each of the following lines of code and paste them into the Text View tab of the Editor window.
DYNAMIC createAccount
createAccount.accountName = "[account name]"
createAccount.accountType = "[account type]"
createAccount.accountPhone = "{ANI}"

createAccount.pinnedRecord = "[true or false]"
createAccount.screenPop = "[true or false]"
createAccount.relatesTo = "[true or false]"

DYNAMIC createAccountPayload
createAccountPayload.workflowInput = createAccount

ASSIGN createAccountJson = "{createAccountPayload.asjson()}"
You must include each of those lines. If you want a field to stay blank, you can use a null value (""). For example, createAccount.accountType = "". However, you cannot assign a null value to createAccount.accountName.
-
Change the value of the createAccount.accountName attribute to the name of the account. For example, createAccount.accountName = "Elinor from Classics, Inc.". This value can be hard-coded, a variable, or a combination of these. Use a variable if you want this value to update for each interaction.
-
Change the value of the createAccount.accountType attribute to the type of account. For example, createAccount.accountType = "Book Orders - Chat". This value can be hard-coded, a variable, or a combination of these. Use a variable if you want this value to update for each interaction.
- Change the value of the createAccount.pinnedRecord attribute to either true or false. When set to true, the created record displays to agents in the Current Interactions section of the customer card. When set to false, it displays in the Recent Interactions section of the customer card. If you do not include this attribute in the payload, it will be assumed as false.
- Change the value of the createAccount.screenPop attribute to either true or false. When set to true, the created record automatically appears to the agent as a screen pop in Salesforce. When set to false, it does not. If you do not include this attribute in the payload, it will be assumed as false.
- Change the value of the createAccount.relatesTo attribute to either true or false. When set to true, agents can manually relate records inside Agent Workspace (Embedded) (Agent Embedded). When set to false, they cannot; relating records happens automatically through data memorialization. If you do not include this attribute in the payload, it will be assumed as false.
-
Click the Workflow Execute action that comes after this workflow's SNIPPET. Change that action's workflowPayload property to {createAccountJson}. Be sure to include the curly braces.
-
Save your script.
- You can test your script by simulating an interaction in Studio.
Configure the Create Case Workflow
-
In Studio, open the script where you want to configure the Create Case workflow.
-
If you haven't already, add a SNIPPET action after BEGIN and before the Workflow Execute action.
-
Double-click the SNIPPET action on the script canvas.
-
Copy each of the following lines of code and paste them into the Text View tab of the Editor window.
DYNAMIC createCase
createCase.entityType = "[Contact or Account]"
createCase.name = "[case name]"
createCase.phone = "{ANI}"
createCase.email = "[case email]"
createCase.company = "[case company]"
createCase.status = "[case status]"
createCase.caseReason = "[reason for case]"
createCase.caseOrigin = "{SKILL}"
createCase.priority = "[low, medium, high, or critical]"
createCase.description = "New Record - {CONTACTID}"
createCase.internalComments = "[internal comments]"

createCase.pinnedRecord = "[true or false]"
createCase.screenPop = "[true or false]"
createCase.relatesTo = "[true or false]"

DYNAMIC createCasePayload
createCasePayload.workflowInput = createCase

ASSIGN createCaseJson = "{createCasePayload.asjson()}"
You must include each of those lines. If you want a field to stay blank, you can use a null value (""). For example, createCase.name = "". However, you cannot assign a null value to createCase.entityType or createCase.status.
-
Change the values of the attributes. Any of these can be hard-coded, a variable, or a combination of these. Use a variable if you want the value to update for each interaction.
-
Change the value of the createCase.entityType attribute to Contact or Account. For example, createCase.entityType = "Contact".
-
Change the value of the createCase.name attribute to the case's name. For example, createCase.name = "Elinor Dashwood's Case".
-
Change the value of the createCase.email attribute to the email address for the case. For example, createCase.email = "elinor.dashwood@classics.com".
-
Change the value of the createCase.company attribute to the organization for the case. For example, createCase.company = "Classics, Inc.".
-
Change the value of the createCase.status attribute to the case's status. For example, createCase.status = "New".
-
Change the value of the createCase.caseReason attribute to the reason for the case. For example, createCase.caseReason = "Shipping problems".
-
Change the value of the createCase.priority attribute to low, medium, high, or critical. For example, createCase.priority = "low".
-
Change the value of the createCase.internalComments attribute to a description of the case for internal use. For example, createCase.internalComments = "Elinor's book order is missing. It might have a wrong shipping address.".
-
- Change the value of the createCase.pinnedRecord attribute to either true or false. When set to true, the created record displays to agents in the Current Interactions section of the customer card. When set to false, it displays in the Recent Interactions section of the customer card. If you do not include this attribute in the payload, it will be assumed as false.
- Change the value of the createCase.screenPop attribute to either true or false. When set to true, the created record automatically appears to the agent as a screen pop in Salesforce. When set to false, it does not. If you do not include this attribute in the payload, it will be assumed as false.
- Change the value of the createCase.relatesTo attribute to either true or false. When set to true, agents can manually relate records inside Agent Workspace (Embedded) (Agent Embedded). When set to false, they cannot; relating records happens automatically through data memorialization. If you do not include this attribute in the payload, it will be assumed as false.
-
Click the Workflow Execute action that comes after this workflow's SNIPPET. Change that action's workflowPayload property to {createCaseJson}. Be sure to include the curly braces.
-
Save your script.
- You can test your script by simulating an interaction in Studio.
Configure the Create Contact Workflow
-
In Studio, open the script where you want to configure the Create Contact workflow.
-
If you haven't already, add a SNIPPET action after BEGIN and before the Workflow Execute action.
-
Double-click the SNIPPET action on the script canvas.
-
Copy each of the following lines of code and paste them into the Text View tab of the Editor window.
DYNAMIC createContact
createContact.firstName = "[first name]"
createContact.lastName = "[last name]"
createContact.homePhone = "{ANI}"
createContact.mobilePhone = "[mobile phone number]"
createContact.businessPhone = "{ANI}"
createContact.email = "[email address]"
createContact.contactDescription = "[description of contact]"

createContact.pinnedRecord = "[true or false]"
createContact.screenPop = "[true or false]"
createContact.relatesTo = "[true or false]"

DYNAMIC createContactPayload
createContactPayload.workflowInput = createContact

ASSIGN createContactJson = "{createContactPayload.asjson()}"
You must include each of those lines. If you want a field to stay blank, you can use a null value (""). For example, createContact.firstName = "". However, you cannot assign a null value to createContact.lastName.
-
Change the values of the attributes. Any of these can be hard-coded, a variable, or a combination of these. Use a variable if you want the value to update for each interaction.
-
Change the value of the createContact.firstName attribute to the contact's first name. For example, createContact.firstName = "Elinor".
-
Change the value of the createContact.lastName attribute to the contact's last name. For example, createContact.lastName = "Dashwood".
-
Change the value of thecreateContact.mobilePhone attribute to the contact's mobile phone number. For example, createContact.mobilePhone = "1234567890".
-
Change the value of the createContact.email attribute to the contact's email address. For example, createContact.email = "elinor.dashwood@classics.com".
-
Change the value of the createContact.contactDescription attribute to a description of the contact. For example, createContact.contactDescription = "Elinor needs help with her book order".
-
- Change the value of the createContact.pinnedRecord attribute to either true or false. When set to true, the created record displays to agents in the Current Interactions section of the customer card. When set to false, it displays in the Recent Interactions section of the customer card. If you do not include this attribute in the payload, it will be assumed as false.
- Change the value of the createContact.screenPop attribute to either true or false. When set to true, the created record automatically appears to the agent as a screen pop in Salesforce. When set to false, it does not. If you do not include this attribute in the payload, it will be assumed as false.
- Change the value of the createContact.relatesTo attribute to either true or false. When set to true, agents can manually relate records inside Agent Workspace (Embedded) (Agent Embedded). When set to false, they cannot; relating records happens automatically through data memorialization. If you do not include this attribute in the payload, it will be assumed as false.
-
Click the Workflow Execute action that comes after this workflow's SNIPPET. Change that action's workflowPayload property to {createContactJson}. Be sure to include the curly braces.
-
Save your script.
- You can test your script by simulating an interaction in Studio.
Configure the Create Lead Workflow
-
In Studio, open the script where you want to configure the Create Lead workflow.
-
If you haven't already, add a SNIPPET action after BEGIN and before the Workflow Execute action.
-
Double-click the SNIPPET action on the script canvas.
-
Copy each of the following lines of code and paste them into the Text View tab of the Editor window.
DYNAMIC createLead
createLead.firstName = "[first name]"
createLead.lastName = "[last name]"
createLead.company = "[company]"
createLead.phone = "{ANI}"
createLead.email = "[email address]"
createLead.website = "[website URL]"
createLead.description = "New Record - {CONTACTID}"
createLead.status = "[status of lead]"

createLead.pinnedRecord = "[true or false]"
createLead.screenPop = "[true or false]"
createLead.relatesTo = "[true or false]"

DYNAMIC createLeadPayload
createLeadPayload.workflowInput = createLead

ASSIGN createLeadJson = "{createLeadPayload.asjson()}"
You must include each of those lines. If you want a field to stay blank, you can use a null value (""). For example, createLead.firstName = "". However, you cannot assign a null value to createLead.lastName, createLead.company, or createLead.status.
-
Change the values of the attributes. Any of these can be hard-coded, a variable, or a combination of these. Use a variable if you want the value to update for each interaction.
-
Change the value of the createLead.firstName attribute to the lead's first name. For example, createLead.firstName = "Elinor".
-
Change the value of the createLead.lastName attribute to the lead's last name. For example, createLead.lastName = "Dashwood".
-
Change the value of the createLead.company attribute to the lead's organization. For example, createLead.company = "Classics, Inc.".
-
Change the value of the createLead.email attribute to the lead's email address. For example, createLead.email = "elinor.dashwood@classics.com".
-
Change the value of the createLead.website attribute to the lead's website. For example, createLead.website = "classics.com".
-
Change the value of the createLead.status attribute to the lead's status. For example, createLead.status = "New".
-
- Change the value of the createLead.pinnedRecord attribute to either true or false. When set to true, the created record displays to agents in the Current Interactions section of the customer card. When set to false, it displays in the Recent Interactions section of the customer card. If you do not include this attribute in the payload, it will be assumed as false.
- Change the value of the createLead.screenPop attribute to either true or false. When set to true, the created record automatically appears to the agent as a screen pop in Salesforce. When set to false, it does not. If you do not include this attribute in the payload, it will be assumed as false.
- Change the value of the createLead.relatesTo attribute to either true or false. When set to true, agents can manually relate records inside Agent Workspace (Embedded) (Agent Embedded). When set to false, they cannot; relating records happens automatically through data memorialization. If you do not include this attribute in the payload, it will be assumed as false.
-
Click the Workflow Execute action that comes after this workflow's SNIPPET. Change that action's workflowPayload property to {createLeadJson}. Be sure to include the curly braces.
-
Save your script.
- You can test your script by simulating an interaction in Studio.
Configure the Create Opportunity Workflow
-
In Studio, open the script where you want to configure the Create Opportunity workflow.
-
If you haven't already, add a SNIPPET action after BEGIN and before the Workflow Execute action.
-
Double-click the SNIPPET action on the script canvas.
-
Copy each of the following lines of code and paste them into the Text View tab of the Editor window.
DYNAMIC createOpportunity
createOpportunity.name = "[opportunity name]"
createOpportunity.description = "New Record - {CONTACTID}"
createOpportunity.stageName = "[stage of opportunity]"
createOpportunity.closeDate = "[YYYY-MM-DD]"

createOpportunity.pinnedRecord = "[true or false]"
createOpportunity.screenPop = "[true or false]"
createOpportunity.relatesTo = "[true or false]"

DYNAMIC createOpportunityPayload
createOpportunityPayload.workflowInput = createOpportunity

ASSIGN createOpportunityJson = "{createOpportunityPayload.asjson()}"
You must include each of those lines. If you want a field to stay blank, you can use a null value (""). For example, createOpportunity.description = "". However, you cannot assign a null value to createOpportunity.name, createOpportunity.stageName, or createOpportunity.closeDate.
-
Change the values of the attributes. Any of these can be hard-coded, a variable, or a combination of these. Use a variable if you want the value to update for each interaction.
-
Change the value of the createOpportunity.name attribute to the name of the opportunity. For example, createOpportunity.name = "Classics, Inc. Elinor".
-
Change the value of the createOpportunity.stageName attribute to the stage of the opportunity. For example, createOpportunity.stageName = "New".
-
Change the value of the createOpportunity.closeDate attribute to the date the opportunity closed. For example, createOpportunity.closeDate = "2024-01-31".
-
- Change the value of the createOpportunity.pinnedRecord attribute to either true or false. When set to true, the created record displays to agents in the Current Interactions section of the customer card. When set to false, it displays in the Recent Interactions section of the customer card. If you do not include this attribute in the payload, it will be assumed as false.
- Change the value of the createOpportunity.screenPop attribute to either true or false. When set to true, the created record automatically appears to the agent as a screen pop in Salesforce. When set to false, it does not. If you do not include this attribute in the payload, it will be assumed as false.
- Change the value of the createOpportunity.relatesTo attribute to either true or false. When set to true, agents can manually relate records inside Agent Workspace (Embedded) (Agent Embedded). When set to false, they cannot; relating records happens automatically through data memorialization. If you do not include this attribute in the payload, it will be assumed as false.
-
Click the Workflow Execute action that comes after this workflow's SNIPPET. Change that action's workflowPayload property to {createOpportunityJson}. Be sure to include the curly braces.
-
Save your script.
- You can test your script by simulating an interaction in Studio.
Configure the Create Work Order Workflow
-
In Studio, open the script where you want to configure the Create Work Order workflow.
-
If you haven't already, add a SNIPPET action after BEGIN and before the Workflow Execute action.
-
Double-click the SNIPPET action on the script canvas.
-
Copy each of the following lines of code and paste them into the Text View tab of the Editor window.
DYNAMIC createWorkOrder
createWorkOrder.description = "New Record - {CONTACTID}"
createWorkOrder.startDate = "[YYYY-MM-DD]"
createWorkOrder.endDate = "[YYYY-MM-DD]"
createWorkOrder.subject = "New Record"
createWorkOrder.status = "[status]"
createWorkOrder.priority = "[low, medium, high, or critical]"
createWorkOrder.duration = "[number of minutes or hours]"

createWorkOrder.pinnedRecord = "[true or false]"
createWorkOrder.screenPop = "[true or false]"
createWorkOrder.relatesTo = "[true or false]"

DYNAMIC createWorkOrderPayload
createWorkOrderPayload.workflowInput = createWorkOrder

ASSIGN createWorkOrderJson = "{createWorkOrderPayload.asjson()}"
You must include each of those lines. If you want a field to stay blank, you can use a null value (""). For example, createWorkOrder.description = "".
-
Change the values of the attributes. Any of these can be hard-coded, a variable, or a combination of these. Use a variable if you want the value to update for each interaction.
-
Change the value of the createWorkOrder.startDate attribute to the date the work order began. For example, createWorkOrder.startDate = "2024-01-30".
-
Change the value of the createWorkOrder.endDate attribute to the date the work order ended. For example, createWorkOrder.endDate = "2024-01-31".
-
Change the value of the createWorkOrder.status attribute to the status of the work order. For example, createWorkOrder.status = "New".
-
Change the value of the createWorkOrder.priority attribute to low, medium, high, or critical. For example, createWorkOrder.priority = "low".
-
Change the value of the createWorkOrder.duration attribute to the number of minutes or hours it took to complete the work order. For example, createWorkOrder.duration = "02".
-
- Change the value of the createWorkOrder.pinnedRecord attribute to either true or false. When set to true, the created record displays to agents in the Current Interactions section of the customer card. When set to false, it displays in the Recent Interactions section of the customer card. If you do not include this attribute in the payload, it will be assumed as false.
- Change the value of the createWorkOrder.screenPop attribute to either true or false. When set to true, the created record automatically appears to the agent as a screen pop in Salesforce. When set to false, it does not. If you do not include this attribute in the payload, it will be assumed as false.
- Change the value of the createWorkOrder.relatesTo attribute to either true or false. When set to true, agents can manually relate records inside Agent Workspace (Embedded) (Agent Embedded). When set to false, they cannot; relating records happens automatically through data memorialization. If you do not include this attribute in the payload, it will be assumed as false.
-
Click the Workflow Execute action that comes after this workflow's SNIPPET. Change that action's workflowPayload property to {createWorkOrderJson}. Be sure to include the curly braces.
-
Save your script.
- You can test your script by simulating an interaction in Studio.
Update Workflows
Update workflows allow you to configure a SNIPPET payload to update any type of Salesforce record, standard or custom. Update workflows can update records retrieved by Search workflows. They can also update records created by Custom Create and Standard Create workflows.
Elinor Dashwood sets up Custom Create workflows to create records before interactions are assigned to agents. This way, records are ready to appear without delay. However, they don't contain the answering agent's information. She configures an Update workflow to add that information after agent assignment.
Configure the Update Record Workflow
The Update Record workflow updates the fields in a record. You can use it to:
-
Update the fields of a record retrieved by a Search workflow. Update Record is designed for single match. If more than one record is returned in the search, only the first retrieved record is updated.
-
Update the fields of a record created by a Custom Create or Standard Create workflow.
-
Update both standard and custom fields.
Each Update Record workflow can only update one record. To update more than one record, configure more than one Update Record workflow.
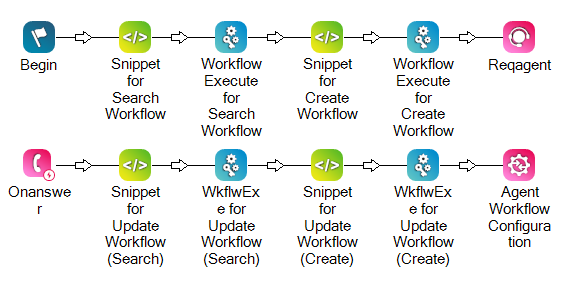
In this example, SNIPPET and WORKFLOW EXECUTE actions before REQAGENT define a Search workflow.
Then, SNIPPET and WORKFLOW EXECUTE actions after ONANSWER define an Update workflow.

In this example, SNIPPET and WORKFLOW EXECUTE actions before REQAGENT define a Search workflow. Another pair of SNIPPET and WORKFLOW EXECUTE actions before REQAGENT define a Create workflow.
Then, two pairs of SNIPPET and WORKFLOW EXECUTE actions after ONANSWER define two Update workflows: one for a Search workflow, one for a Create workflow.
-
In Studio, open the script where you want to configure the Update Record workflow.
-
Add a SNIPPET action after ONANSWER or ONASSIGNMENT.
-
Double-click the SNIPPET action on the script canvas.
-
Copy each of the following lines of code and paste them into the Text View tab of the Editor window.
ASSIGN recordId = workflowResultSet.result[1].records[1].id DYNAMIC updatePayload updatePayload.entityId = [recordId] updatePayload.entity = "[entity API]" DYNAMIC fields fields[1].key = "[FieldName]" fields[1].value = "[Field value]" fields[2].key = "[FieldName]" fields[2].value = "[Field value]" fields[3].key = "[FieldName]" fields[3].value = "[Field value]" updatePayload.fields = fields DYNAMIC updateInput updateInput.workflowInput = updatePayload ASSIGN updateInputJson = "{updateInput.asjson()}" -
Change the value of the updatePayload.entityId attribute to the record ID of the record you want to update. For example, updatePayload.entityId = "123456-7891011-12131415".
You can retrieve this record ID from the Search workflow results that appear in the customer card in Agent Workspace (Embedded) (Agent Embedded).
-
Change the value of the updatePayload.entity attribute to the API name for the record you want to update. For example, updatePayload.entity = "account". This is case-sensitive. You can use the API name of a standard or custom record.
To find the API name for the record, open Salesforce and navigate to Setup
> Object Manager. Click the record's name. In the Details page that opens, find the API Name.View the API names for each standard record type
Record
API
Account Case Contact Lead Opportunity Work Order - Change the value of the fields.key attributes to the fields you want to update. For example, fields[1].key = "SuppliedPhone".
- Change the value of the fields.value attributes to the new values for the fields. These can be hard-coded, variables, or a combination of these. For example, fields[1].value = "{ANI}".
-
Save your script.
- You can test your script by simulating an interaction in Studio.
Pin Records
You can pin a record to the Current Interaction section of the customer card. When a record is pinned, it is linked ![]() for data memorialization and timeline information by default. This means that data memorialization and timeline information will be added to the Salesforce record when the interaction is completed. If the agent does not want the information to be mapped, they can unlink the record.
for data memorialization and timeline information by default. This means that data memorialization and timeline information will be added to the Salesforce record when the interaction is completed. If the agent does not want the information to be mapped, they can unlink the record.
-
Open the Snippet for Create Workflow SNIPPET action in your script.
-
In the workflow payload, copy this line of code and paste it before DYNAMIC create[RecordType]Payload:
createPayload.pinnedRecord = "true" -
Make sure that createPayload matches the earlier lines in your workflow.
-
Save your script.
Configure Records for Screen Pop
You can configure records to automatically appear as screen pops in Salesforce. This is done by editing the workflow payload.
In Search Workflows
By default, single match records![]() Occurs when a Search workflow returns only one record. appear as screen pops. You can change this by setting the screenPop attribute to false.
Occurs when a Search workflow returns only one record. appear as screen pops. You can change this by setting the screenPop attribute to false.
Multiple match records do not appear as screen pops, even if you set the screenPop attribute to true.
-
Open the workflow's SNIPPET action in your Studio script.
-
In the workflow payload, copy this line of code and paste it before ASSIGN searchJson = "{searchInput.asjson()}":
searchPayload.screenPop = "[true or false]" -
Configure the pasted code.
-
Make sure searchPayload matches the earlier lines in your workflow.
-
Change the value of the screenPop attribute:
-
Set it to true to show the record as a screen pop.
-
Set it to false to not show it.
-
-
-
Save your script.
In Create Workflows
By default, created records do not appear as screen pops. You can change this by setting the screenPop attribute to true.
-
Open the workflow's SNIPPET action in your Studio script.
-
In the workflow payload, copy this line of code and paste it before DYNAMIC create[RecordName]Payload:
createPayload.screenPop = "[true or false]" -
Configure the pasted code.
-
Make sure createPayload matches the earlier lines in your workflow.
-
Change the value of the screenPop attribute:
-
Set it to true to show the record as a screen pop.
-
Set it to false to not show it.
-
-
-
Save your script.
Configure Workflow Caching
You can control whether Search
In Search Workflows
By default, Search workflow results are cached. You can change this by setting the cacheResponse attribute to false. The returned records won't appear in the agent application.
-
Open the workflow's SNIPPET action in your Studio script.
-
In the workflow payload, copy this line of code and paste it before ASSIGN searchJson = "{searchInput.asjson()}":
searchPayload.cacheResponse = "[true or false]" -
Configure the pasted code.
-
Make sure searchPayload matches the earlier lines in your workflow.
-
Change the value of the cacheResponse attribute:
-
Set it to true to cache the workflow results.
-
Set it to false to not cache them.
-
-
-
Save your script.
In Create Workflows
By default, Create workflow results are cached. You can change this by setting the cacheResponse attribute to false. The created records won't appear in the agent application.
-
Open the workflow's SNIPPET action in your script.
-
In the workflow payload, copy this line of code and paste it before DYNAMIC create[RecordName]Payload:
createPayload.cacheResponse = "[true or false]" -
Configure the pasted code.
-
Make sure createPayload matches the earlier lines in your workflow.
-
Change the value of the cacheResponse attribute:
-
Set it to true to cache the workflow results.
-
Set it to false to not cache them.
-
-
-
Save your script.
Enable Relate Records
You can enable agents to relate Salesforce records inside Agent Workspace (Embedded) (Agent Embedded). This adds the Relates To icon ![]() to the Current Interaction section of the customer card. When agents click Relates To
to the Current Interaction section of the customer card. When agents click Relates To ![]() , the Name and Relates To fields appear. They can use these fields to select a record to relate to the current interaction record. Records that have been active during the interaction appear in either the Name and Relates To field, depending on the type of record:
, the Name and Relates To fields appear. They can use these fields to select a record to relate to the current interaction record. Records that have been active during the interaction appear in either the Name and Relates To field, depending on the type of record:
-
Contacts, leads, and person accounts appear in the Name field.
-
Accounts, campaigns, cases, opportunities, and custom records appear in the Relates To field. You must configure custom records
 to appear in Relates To.
This is only available for Agent Workspace (Embedded) (Agent Embedded). It is not available for Agent Workspace (Agent), Agent Workspace for Microsoft Teams (Agent for Microsoft Teams), or Agent Workspace (Browser Extension) (Agent Integrated).
Salesforce allows for records to be related automatically without any additional configuration. Through context switching, the last active record is agents select is related to the current interaction record. The steps below add the Relates To icon ![]() and the Name and Relates To fields to the customer card in Agent Workspace (Embedded) (Agent Embedded) so that agents can relate records manually.
and the Name and Relates To fields to the customer card in Agent Workspace (Embedded) (Agent Embedded) so that agents can relate records manually.
To enable agents to manually relate records:
-
In Agent Integrations
 , add data memorialization mappings for the whoid and whatid NiCE CXone data fields.
 The whoid NiCE CXone data field corresponds with the Name field that agents use. The whatid data field corresponds with the Relates To field.
-
Follow these steps to open a CRM integration, navigate to the Data Memorialization tab, and add an entity.
-
In the External CRM Field drop-down, select a Salesforce field that can be mapped to the whoid or whatid NiCE CXone data field. Then select Script Variable in the Select Channel drop-down and enter whoid or whatid in CXone Data.
Learn more about this step
Only certain standard Salesforce fields can be mapped to whoid or whatid. However, you can create a custom field that can be mapped to whoid or whatid.
The Salesforce field you select in the External CRM Field drop-down will be populated with the related record.
Elinor Dashwood, an administrator, selects Name ID in the External CRM Field drop-down and Script Variable in the Select Channel drop-down. She then enters whoid in the CXone Data field. This maps the Name ID Salesforce field to the whoid NiCE CXone data field.
Marianne Dashwood, an agent, is chatting with a contact
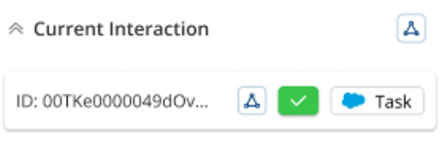
The person interacting with an agent, IVR, or bot in your contact center., Christopher Brandon. She finds a lead she wants to relate to Brandon's current interaction record. She selects Relates To  in the customer card in Agent Workspace (Embedded) (Agent Embedded). The Name field appears. She selects the lead in that field. That lead appears in the Name ID field in Brandon's current interaction record in Salesforce.View image
In this example, the Name ID Salesforce field is mapped to whoid. The Related To ID field is mapped to whatid.
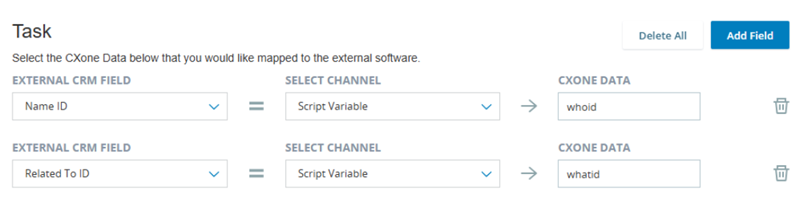
If agents will select leads for whoid, do not map to whatid. If agents select a lead in the Name field, they cannot select a record in Relates To. This prevents a data memorialization error.
-
Click Save at the top of the page.
-
-
In Studio, open the Snippet for Create Workflow SNIPPET action in your script.
-
Make sure the record is pinned to the Current Interaction section of the customer card.
-
Make sure the AGENT WORKFLOW CONFIGURATION action in your script is configured for data memorialization. This involves selecting a data memorialization workflow mapping in the wizard.
-
Save your script.