

You can enable agents to manually create new Salesforce records from inside NiCE CXone Agent Workspace (Agent) while they're handling interactions. Agents can click Create New  in the Related Interactions section of the customer card and select the type of record they want to create.
To enable this, you need to modify your Studio script. Your organization's NiCE CXone administrator, agent application administrator, and Studio scripter may need to coordinate to complete this task.
Complete each of these tasks in the order given.
Before You Begin
-
Complete these prerequisites.
-
Set up a CRM configuration for Salesforce in Agent Integrations
 > Configurations in NiCE CXone.
Download Template Script
Download this folder of template scripts. It contains voice and digital![]() Any channel, contact, or skill associated with Digital Experience (DX). scripts for NiCE CXone Studio and Desktop Studio.
Any channel, contact, or skill associated with Digital Experience (DX). scripts for NiCE CXone Studio and Desktop Studio.
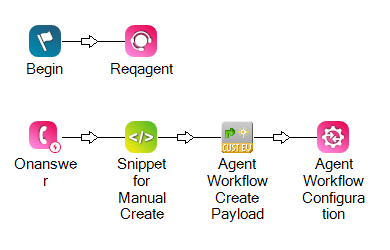
Add Actions to Your Script
Modify your existing script for the channel![]() Various voice and digital communication mediums that facilitate customer interactions in a contact center. you're working with.
Various voice and digital communication mediums that facilitate customer interactions in a contact center. you're working with.
In Desktop Studio
-
Click File > Import from File. Select the voice or digital template script for Desktop Studio.
-
Open the script you want to modify.
-
Copy these actions from the template script and paste them where they belong in your existing script:
Action Caption SNIPPET Snippet for Manual Create CUSTOMEVENT Agent Workflow Create Payload -
Save your script.
In NiCE CXone Studio
- In NiCE CXone, click the app selector
 and select Omnichannel Routing > Studio
  .
. -
Click Load Script. Select the voice or digital template script for NiCE CXone Studio.
-
Open the script you want to modify.
-
Add these actions to your script:
Action Caption SNIPPET Snippet for Manual Create CUSTOMEVENT Agent Workflow Create Payload Copying actions between scripts isn't yet supported in NiCE CXone Studio.
-
Copy the code from the SNIPPET action in the template script and paste it into the corresponding SNIPPET action you added to your script.
-
Save your script.
Customize Studio Actions
Snippet for Create During Interaction
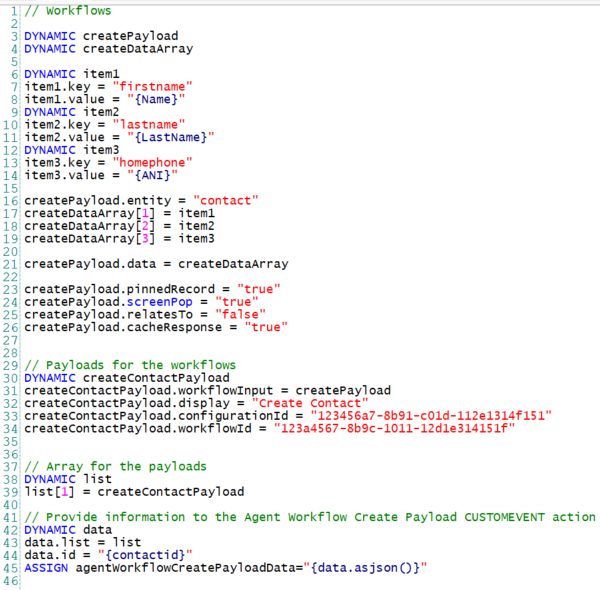
This step involves configuring JSON in the SNIPPET action. Use the template provided in the SNIPPET action in the template script. Once completed, the JSON should look similar to this:
-
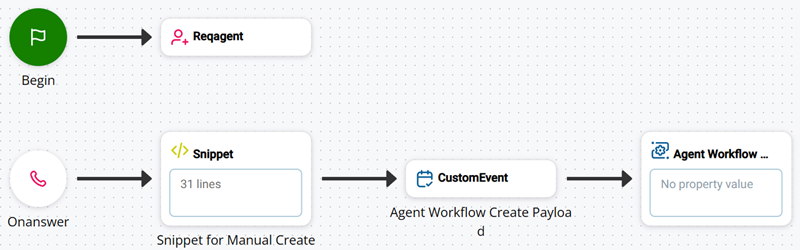
If you're using Desktop Studio, double-click the SNIPPET action in your script named Snippet for Manual Create.
-
If you're using NiCE CXone Studio, select the SNIPPET action in your script named Snippet for Manual Create and click Open Editor in the action's properties.
-
Add the Salesforce Create workflow for the record type you want agents to be able to manually create. It is highly recommended you use the Create Custom Record workflow. To enable agents to manually create more than one type of record, include more than one workflow.
Do not include the last three lines of the workflow, beginning with DYNAMIC create[RecordName]Payload. You will create a payload for the workflow in the next step.
-
Configure each workflow according to the steps for that workflow.
-
To cache the created record so that it appears in the customer card while the interaction
 The full conversation with an agent through a channel. For example, an interaction can be a voice call, email, chat, or social media conversation. is active, set cacheResponse to true, as shown below.
createPayload.cacheResponse = "true"To prevent the created record from appearing in the customer card, set cacheResponse to false.
If you include cacheResponse = "false", the record will not be pinned or displayed as a screen pop, even if pinnedRecord and screenPop are set to true.
-
-
Create a payload for each workflow you included. Copy and paste the code below, then configure it.
DYNAMIC create[RecordType]Payload create[RecordType]Payload.workflowInput = createPayload create[RecordType]Payload.display = "[Display name]" create[RecordType]Payload.configurationId = "[CRM Configuration ID from NiCE CXone]" create[RecordType]Payload.workflowId = "[Workflow ID from NiCE CXone]"-
On each line, change the [RecordType] placeholder to the record type for the workflow. For example, if this is the payload for the Create Contact workflow, your first line would be DYNAMIC createContactPayload.
-
Change the value of the create[RecordType]Payload.workflowInput attribute to match the dynamic data object for the workflow. If you used createPayload, you do not need to change this value.
-
Change the value of the create[RecordType]Payload.display attribute to the name you want to appear to agents. For example, if you enter createContactPayload.display = "Contact", the agent will see an option for Contact when they click Create New
in the customer card. This value must be 15 characters or less. -
Change the value of the create[RecordType]Payload.configurationId attribute to the CRM configuration ID for your Salesforce configuration.
Learn how to find the configuration ID
-
Navigate to Agent Integrations
> Configurations in NiCE CXone. -
Select an Salesforce integration.
-
Click the Connector Mappings tab.
-
Click Copy under Configuration ID.
-
-
Change the value of the create[RecordType]Payload.workflowId attribute to the workflow ID of the Create Custom Record workflow.
Learn how to find the workflow ID
-
Navigate to Agent Integrations
> Configurations in NiCE CXone. -
Select an Salesforce integration.
-
Click the Connector Mappings tab.
-
Click Copy next to the workflow ID for the Create Custom Record workflow.
-
-
-
Create an array for the payloads. Copy and paste the code below, then configure it.
DYNAMIC list list[1] = create[RecordType]Payload list[2] = create[RecordType]Payload-
On each line, change the [RecordType] placeholder to match the workflows you configured in step 4. For example, if you included the Create Case workflow and the Create Contact workflow, your code would be:
DYNAMIC list list[1] = createCasePayload list[2] = createContactPayload -
If you included only one workflow, delete the third line in the code.
-
If you included more than two workflows, add additional lines following the pattern: list[3] = create[RecordType]Payload, list[4] = create[RecordType]Payload, and so on.
-
-
Provide the necessary information for the Agent Workflow Create Payload CUSTOMEVENT action. Copy and paste the code below.
DYNAMIC data data.list = list data.id = "{contactId}" ASSIGN agentWorkflowCreatePayloadData = "{data.asjson()}" -
Save your script.
Agent Workflow Create Payload
-
Select the CUSTOMEVENT action in your script named Agent Workflow Create Payload.
-
In the properties pane, configure the CUSTOMEVENT action's properties to match these values:
-
The TargetAgent property should be set to:
-
{__agentId} for voice.
-
{agentid} for digital.
-
-
The EventName property should be set to AgentWorkflowCreatePayload.
-
The PersistInMemory property should be set to True if you're using Desktop Studio and On if you're using NiCE CXone Studio.
-
The Data property should be set to {agentWorkflowCreatePayloadData}.
-
-
Save your script.