

Stripe Payments
You can create an account with Stripe ![]() , an online payment processor. Then you can set up a channel to connect this account with Digital Experience. This allows your agents to use quick responses in Digital Channels to send customers a secure link to the Stripe payment interface to make a payment. Payments are received in real-time, and the agent receives a notification as soon as the payment has been made.
, an online payment processor. Then you can set up a channel to connect this account with Digital Experience. This allows your agents to use quick responses in Digital Channels to send customers a secure link to the Stripe payment interface to make a payment. Payments are received in real-time, and the agent receives a notification as soon as the payment has been made.
Classics Inc., provides customers with benefits when they sign up for and use a Classics Rewards credit card. The administrator for Classics, Mowgli Kipling, needs to set up a payment service, so customers can pay their monthly credit card bill online. He already set up an account with Stripe online payment processing, and needs to connect it to a messaging channel. Mowgli creates a Stripe token and selects the agent in charge of that channel to be notified when customers complete payments. He then creates a quick response called Classics Rewards that his agents can send to customers to direct them to the payment portal.
Connect Channels with Stripe
You need to create a Stripe token to connect your Stripe account with Digital Experience. Then you can use messaging channels, SMS, chat, or email to manage payments.
- Click the app selector
 and select ACD.
 - Go to Digital > Points of Contact Digital.
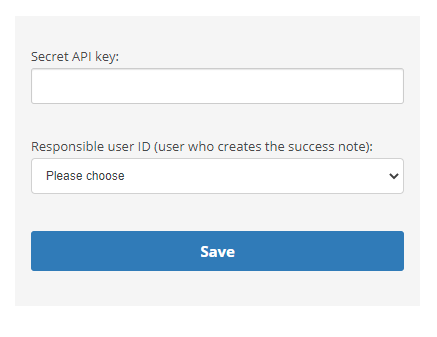
- Under General channel features, click Stripe Payments.
- Enter the Secret API key. Select a user from the Responsible user ID drop-down.
- Click Save.
Create a Quick Response
Agents send payment requests to customers from quick responses. If you don't complete this section, agents won't be able to use this feature with your customers.
- Click the app selector and select ACD.
-
Go to Digital > Quick Responses.
- Click Add in the top right corner.
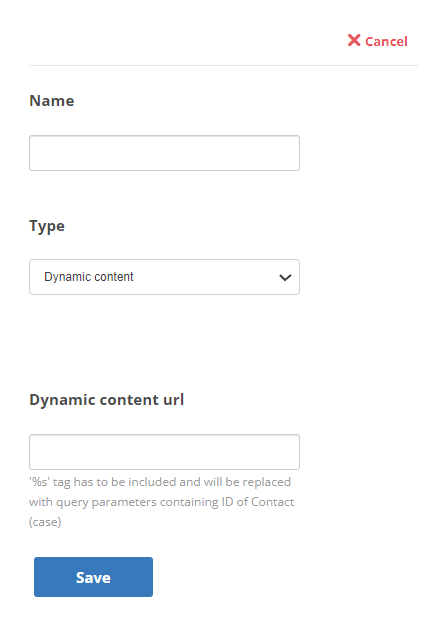
- Enter a Name for the quick response.
- Click the quick response Type drop-down and select Dynamic content.
- Enter https://channels-de-<REGION>.niceincontact.com/stripe-payments/custom-components/payment-request%s in the Dynamic content url field. Replace <REGION> with your region code, such as na1 for North America.
- Click Save. You will be directed back to the Quick Responses page.
-
Click Channels to select the channels you want the quick response to be available for.
-
On the next page, click Add next to the desired channels.
-
Click Back at the top when you are finished. Changes are automatically saved.
-
Click Tags to select the tags you want the quick response to be available for.
-
On the next page, click Add next to the desired tags.
-
Click Back at the top when you are finished. Changes are automatically saved.
On the Quick Responses page, in the Limitations column, a number in parentheses indicates how many channels and tags you selected.